Recurring A/P Bills are ones that are entered repetitively. Payment for rented storage facilities or equipment lease payments might be examples of recurring A/P Bills. Add Recurring Bills at Setup / A/P / Recurring A/P Bills.
This function allows any recurring vendor commitments to be set up that are expensed in the same manner each period. Recurring entries have a frequency, a date to start posting, and a number of times to post, which determines when they display to be posted at the Post Recurring Bills screen. A Due Date is established as they are posted. These bills are then managed along with the rest of the A/P Bills.
Recurring A/P Bills work well for commitments such as rent or warehousing payments since these types of bills would usually be expensed at the same dollar figure each period. Some recurring A/P Bills have dollar amounts that vary from month to month (like the interest/principal for bank note payments). Dollar amounts may be altered as the recurring bills are processed if the Preview Entries option is used when posting. Therefore, these variable recurring bills may also be processed using this function.
Setup

There is no posting done by creating these recurring bills other than adding to the Recurring Bill table.
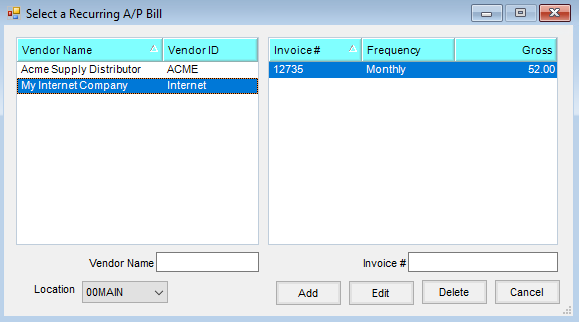
- Vendor – Select the vendor for the Recurring A/P Bill. Check the Favorite Vendors option to only display Vendors set up at Hub / Setup / Favorite Vendors.
- Invoice# – Enter the Invoice number for the bill. Since Invoice numbers cannot be duplicated for the vendor, posting the recurring bill uses the Invoice number entered here and appends the date to make it unique.
- Day of month due – Select the day of the month that this bill is due from the drop-down.
- Description – Entering a description for this bill is optional. If a description is entered, it is referenced by some of the A/P reports.
- PO # – An optional area to enter a Purchase Order number. This Purchase Order number is not verified with the Purchase Order area of the program.
- On Hold – Bills that are marked On Hold are not shown at the Pay Bills screen.
- 1099 Pay – If this Vendor is set to receive a 1099 on the Vendor file, this option may be selected or deselected depending on whether this bill should be part of the 1099 amount.
- 1099 Amount – If this bill should affect the Vendor’s 1099 amount, enter the 1099 Amount in this area.
- Discount G/L – If a discount is taken when this bill is paid, enter the G/L account where the discount should post.
- Date to Start Posting – Enter the date when this bill should start appearing in the Recurring Bill List for posting.
- Frequency – Select the frequency for this bill from the drop-down menu.
- Number of Times to Post – Enter the number of times this bill should be posted. If this bill is to be available for posting indefinitely, enter a zero in this area.
- Number of Times Posted – For informational purposes, the number of times this bill has been posted displays in this area.
- Date Last Posted – Informational only, this displays the date of when this bill was last posted.
- G/L Account – Double-click to select the general ledger account for this bill. Multiple G/L accounts may be selected if necessary.
- Description – Once the G/L account is selected, the description automatically fills in. This description cannot be edited.
- $ Amount – Enter the appropriate dollar amount for each of the selected general ledger accounts in the expense grid.
- Vehicle ID – If the expense is related to a specific vehicle, double-click to select the vehicle from the list. Once recurring A/P bills are posted, any lines related to vehicles display on the Vehicle Expense report.
- Predefined Split – To use this option, splits must be defined at Setup / G/L / G/L Splits.
- Split ID – Choose from the list of predefined splits.
- Amount – Enter the total amount to be divided between the accounts named in the split.
- Acct ID – This is used only if using the Wild Card option of the Split Out feature. Enter a complete valid account and the corresponding group of related accounts will be split according to the predefined split. For example, enter 61* in the Acct ID and all the 6100 accounts will be split out according to the selected Split ID arrangement.
Use a Recurring A/P Bill
- Add the vendor bill at Setup / A/P / Recurring A/P Bills. Assign the bill a date to start posting, the posting frequency, and a number of times to post for this bill. An Invoice number for this bill must also be assigned. When this bill is posted, the Invoice number entered is used as entered but will automatically have the posting date appended to make it unique. Setting up a Recurring A/P Bill does no posting to the general ledger or vendor balance.
 Note: Recurring A/P Bills can be edited at Setup / A/P / Recurring A/P Bills if anything about the vendor commitment changes.
 - When appropriate, post the recurring A/P Bills by going to A/P / Post Recurring Bills and selecting the Posting Date. Select the appropriate Display By option – Posting Date, All, or the frequency entered when the recurring bill was set up, and choose Apply.
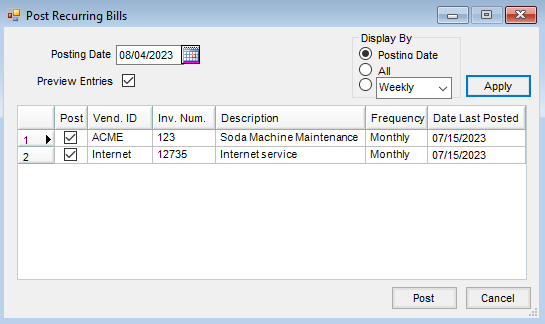
- The entries may optionally be previewed by marking the Preview Entries checkbox. Previewing the entries is necessary when the amounts or posting accounts vary from the recurring bill entry. The Recurring Bills available to post within the selected posting date display in the grid. If any bills listed in the grid should not be posted, uncheck the Post column for those bills.
- After selecting Post, the first bill in the group displays. The Bill Date and Due Date display according to the specifications entered when the recurring bill was defined (but may be edited if necessary). The general ledger account and the dollar amount to be posted also display and may be edited if necessary.
- Save posts the A/P Bill and moves to the next recurring bill. Skip does no posting and moves to the next recurring bill in the selected group. The posting that occurs for this step is identical to the posting when adding a bill at A/P / Add/Edit Bills.
 Note: Recurring A/P Bills can be edited at Setup / A/P / Recurring A/P Bills if anything about the vendor commitment changes.
Twice a Month Frequency
Enter two recurring bills for the same vendor using a Frequency of Monthly. The first bill will have a beginning posting date of the first due date. The second bill will have the later beginning posting date.
Post Recurring Bills
This function allows recurring A/P bills defined at Setup / A/P / Recurring A/P Bills to be posted into the A/P Bill file without manually entering them each time. Posting is identical to the posting that occurs when an A/P Bill is manually added.

- Posting Date – Enter the date to be used as the Invoice Date on the A/P Bills being created.
- Preview Entries – With this option selected, Post causes each selected Recurring Bill to be previewed. During the preview, there are options to Save or to Skip. If this option is not selected, the Recurring A/P Bills automatically post.
- Display By – Filter the Recurring Bills to display. Recurring Bills may be displayed by Posting Date, All recurring bills, or by the Frequency entered on the recurring bill.
