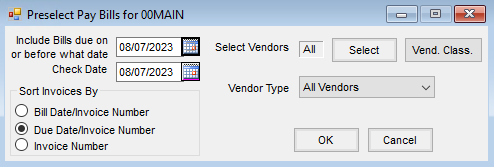
To pay Bills that originated from a Purchase Invoice, an A/P Bill, or a prepaid Purchase Order, go to A/P / Pay Bills. The first screen allows filtering of the bills to be paid by due date, by ACH, Non-ACH, or EFT Vendors, or by selecting Vendors.
More information on AP Payments in Agvance SKY can be found here.
Vendor Bills entered either through Inventory / Purchase Invoicing, the A/P / Add/Edit Bills screen, or the A/P / Post Recurring Bills screen can be summarized, selected, and paid with due dates and discounts taken into account.
There are many A/P reports available to review the Bills in a variety of ways (by Vendor, due date, aging report, and pre-check run). As with all Accounting reports, the A/P reports do no posting and are therefore safe to run at any time.
The A/P Check Stub Style can be determined at Accounting / Setup / Preferences on the A/P tab. More information on this setting and examples of each style (Summarized, Inv Description, G/L Detail) can be found here.
If Bills for a certain Vendor appear on the AP Bill List and at A/P / Add/Edit Bills but not at A/P Pay Bills:
If the company has multiple Locations, check the default Location at Accounting / Setup / Set Default Location and be sure it is set to the same Location as the Vendor. The Pay Bills screen checks the default Location before displaying Bills and does not display Bills for a Vendor belonging to a Location not currently set as the default.
- Include Bills due on or before what date – Any Bill with a due date or discount date on or before the date entered is displayed in the grid.
- Check Date – The date of the check determines the discounts that display. This is the date used in the posting of the transaction.
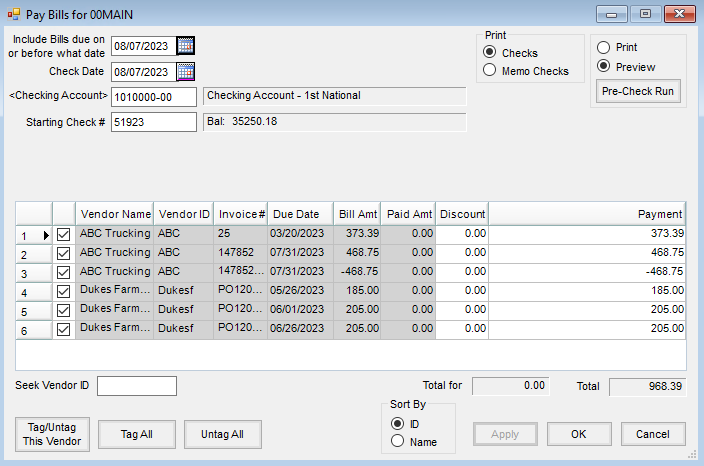
- Checking Account – This defaults to the account named at Setup / Locations on the G/L Posting tab as the Default Checking Account. The account and its current balance is displayed. To choose a different account, double-click in the field.
- Starting Check # – This number defaults to the next consecutive number as the last computer generated check for that account (stored at Setup / Preferences on the G/L tab).
- Pre-Check Run – The Pre-Check Run is a report that allows a preview of the check run that would be made based on the selected criteria. The detail is grouped by Vendor. This report may be previewed or printed by selecting Pre-Check Run. No posting occurs.
- Checks – This prints checks based on the selected criteria. After the checks are printed, a posting decision must be made before any Vendor or G/L Accounts are affected.
- Memo Checks – This may be used for writing off Bills that had credits applied to them or for settlement of Inter-Company Bills. A different General Ledger Account may be selected. The check number defaults to the Memo Check number sequence, therefore the regular check number sequence is unaffected. If this is a direct draft from the checking account, the payment could post to the disbursement checking account.
- ACH Filename – This is available when ACH Vendors was selected as the Vendor Type on the Preselect Pay Bills screen. The path defaults from the A/P preferences along with the file name. This information may be changed as needed.
- Email ACH Payment Advice to Vendor – This is available when ACH Vendors was selected as the Vendor Type on the Preselect Pay Bills screen. When emailing the ACH Payment Advice directly to the Vendor, select this option.
- A/P Bills Grid – All the bills that are due based on the selection criteria entered display. The checkmarks indicate that they will be paid. Use Tag/Untag This Vendor, Tag All, or Untag All on the bottom to help untag or tag selected groups of bills.
- Discount – This displays automatically if the date for the offered discount falls on or before the Check Date. This amount may also be overridden by typing an amount in this field.
- Payment – This indicates the amount of each bill left to be paid. Make a partial payment by selecting in this column and overriding with the amount to be paid.
- Seek Vendor ID – Start typing the Vendor ID and the grid shifts to display the bills for Vendor IDs that begin with those characters.
- Total for Vendor Amount – This displays the total of the unpaid bills on the screen for the currently selected vendor.
- Total – The total payment amount for the selected bills is displayed.
- CIBC Currency – Using the ACH File Type of CIBC and paying ACH Vendors enables this option to choose between paying in U.S. dollars (USD) or Canadian dollars (CAD). The last used selection is remembered by user for future use.
- Sort By – Select to sort the bills in the grid by Vendor ID or Vendor Name.
Vendor checks may be printed on the wrong check number when the Pay Bills window is sorted by Name and there are Vendors with similar names, but the letter case does not match.
For example, if there is a Vendor named Acme and one named ACME Grain Haulers, the check for ACME Grain Haulers will print first, even though Acme is listed first on the Pay Bills window. The Journal Entry is created for the correct dollar amount for the correct Vendor; however, the check is printed out of order.
Before paying the Bills, edit the Vendors at Accounting / File / Open / Vendor and change the letter case to match.
Pay Bills Process
The Pay Bills utility marks A/P bills paid, prints a check, updates Vendor balances, and posts to the General Ledger.
- Navigate to Accounting / A/P / Pay Bills.
- At the Preselect Pay Bills window, filter the bills to be paid by selecting an Include Bills due on or before what date. The Vendor and/or Vendor Type may be selected to further filter the bills that display. Choose OK to continue to the Pay Bills window.

- Choose the bills of a single Vendor, multiple Vendors, or all Vendors. The Sort Invoices By option provides a method to further sort a Vendor’s outstanding bills.
- Select a Check Date. Discounts display based on this date.
- Choose OK.
- On the Pay Bills window, verify the Checking Account G/L Account number is correct. Select a different G/L Account if necessary.
- Verify the Starting Check # and select the bills in the grid to be paid.

- For non-ACH vendors, the Print option defaults to Checks in the upper right portion of the window.
- When the Pay Bills screen loads, all A/P Bills are selected for payment, indicated by a checkmark in the first column of the grid. The displayed bills may be manually selected or deselected as needed. The bills noted with checkmarks will be included in the check run.
- To indicate a partial payment of a bill, enter the amount of the payment in the Payment column of the row corresponding to the bill (overriding the unpaid amount).
- An optional Pre-Check Run report may be reviewed by setting the Print or Preview option as desired and selecting Pre-Check Run. After reviewing this report, proceed to the next step to print the checks.
- Make sure the checks are loaded into the correct printer tray and choose OK to print the checks.
- After the checks are sent to the printer, the Posting Options window displays. It is strongly recommended to wait until the checks have finished printing before selecting the posting option.
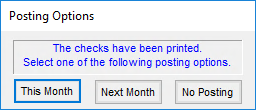
- This Month – The most common posting option is This Month which affects the G/L and Vendor accounts immediately in the current fiscal month. The bills are also updated to a Paid status.
- Next Month – Occasionally, at the beginning of the month, the fiscal month may not yet be closed but checks still need to go out. In this case, the Next Month option could be used. The bills would be marked Paid, but the posting to the G/L and Vendor accounts would not occur until next fiscal month after the current month is closed.
- No Posting – The last option, No Posting, is used in instances such as if the wrong criteria was entered, the checks jammed in the printer, or they were sent to the wrong printer. This option does no posting to the Vendor accounts or the General Ledger and does not mark the bills as paid.

Posting Notes
For Checks or Memo Checks, if the Next Month option is selected, the A/P Bill file is updated but no G/L or Vendor posting occurs. If Post this Month is chosen, the following occurs:
- Accounts Payable Bill File – The bills are marked as Paid (or the appropriate portion of the bill in the case of a partially paid bill).
- Vendor Balance – The vendor balance is adjusted and the 1099 balance is affected if a 1099 amount was indicated.
- Cash Disbursement – An entry is made into the database recording the cash disbursement.
- General Ledger – A Payable-Type Vendor-Type journal entry is made and the G/L account balances are updated.
| Vendor Journal Entry | Debits | Credits |
| Net amount of the check | Designated Checking Acct. | |
| Gross figure owed Vendor | Accounts Payable (for Vendor location) | |
| Discount dollars taken (if any) | A/P Discount Acct (Setup / Location / Preferences) |
