More information on AP Bills in Agvance SKY can be found here.
Add a Bill Window
Vendor Invoices for services or items not for resale are entered at A/P / Add/Edit Bills. This action adds to the vendor balance, the appropriate expense accounts, and the Accounts Payable account.

- Vendor – Double-click in this field to display the list of existing vendors. The selected vendor's current balances display. Check the Favorite Vendors option to only display Vendors set up at Hub / Setup / Favorite Vendors.
- Bill Date – Enter the Invoice date.
- Due Date – Enter the date the bill is due.
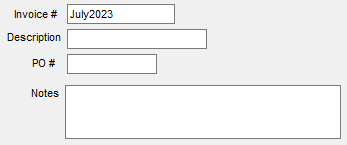
- Invoice # – An Invoice number that is unique to this Vendor must be entered. The system will not allow an Invoice number to be re-used during a two-year fiscal period.
- Description – A notation or comment about this bill may optionally be entered.
- PO # – A Purchase Order number may optionally be entered. This does not require that a Purchase Order with that number exist in the computer.
- Notes – Notes may optionally be entered.
- Use Prepay – If vendor Prepay is to be reduced by the amount of this bill, check this option.
- On Hold – By selecting this option, the bill is withheld from the list of bills to be paid.
- 1099 Amount – If the Vendor has a 1099 Type selected at File / Open / Vendor on the 1099/Payment Info tab, then this will automatically be filled out for the net amount of the check. This figure may be changed if necessary.
- 1099 Pay – If a vendor is marked to receive a 1099, this defaults as checked with the 1099 Amount field enabled. If the payment to the Vendor should not be included in the 1099 amount, uncheck this option.
- Post to Prior Month – If this bill should be posted to the prior month, mark this option. If the current month is fiscal month 1 and the prior month is archived into a prior year dataset, select Last Year’s Dataset.
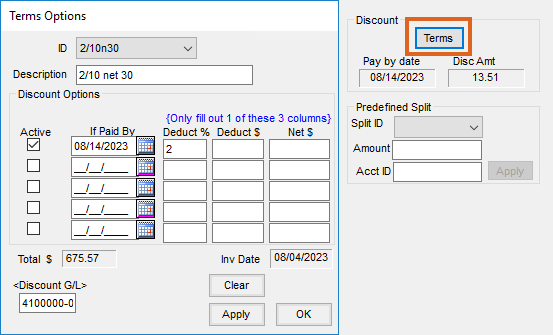
- Discount – If discounts are offered on the Invoice, after entering the information in the Expense Breakdown grid, select Terms. Use either a predefined payment terms option or enter it directly. Either flat or graduated discount offerings (up to five levels) may be entered. Key in a percentage or flat dollar amount of discount. If the vendor has a standard discount structure, it may be set up at Hub / Setup / Payment Terms, and then set on the Vendor’s file at Accounting / File / Open / Vendor on the Profile tab.
- Predefined Split – to use this area, the splits must be defined at Setup / G/L / G/L Splits.
- Split ID – Choose from the list of predefined splits.
- Amount – Enter the total amount to be divided between the accounts named in the split.
- Acct ID – Used only if using the Wild Card option of the Split Out feature. Enter a complete valid account and the corresponding group of related accounts is split according to the predefined split. For example, enter 61* in the Acct ID and all 6100 accounts will be split out according to the selected Split ID arrangement.
- Import File – This option imports A/P bills from the Enable software program to help manage convenience store inventory.
- Import PO – When entering a bill associated with an A/P PO, this will import the PO into the A/P Bill.
- Expense Breakdown Grid – If not using a Predefined Split, manually select the G/L account(s) for this grid.
- G/L Account – Double-click to display the list of available accounts. Choose the accounts where this bill is to post. Although it is possible to type into the account column, selecting from the list of accounts ensures that the accounts are valid.
Hint: To select multiple accounts, hold the Ctrl key down while selecting desired accounts. This allows multiple accounts to be selected. - Description – By selecting the account from the Select a G/L Account screen, the description of the account automatically displays. Typing in this field is not permitted.
- $ Amount – Enter the dollar amount to be expensed to each account listed.
- Comment – Optionally enter a comment per line. These comments are included on the journal entry and may be seen on some A/P and G/L reports.
- Quantity – If a quantity should be recorded in the general ledger for this expense, enter the quantity in this column.
- Vehicle ID – If this amount is related to a vehicle, double-click and select the vehicle from the list. Expenses associated with vehicles are included on the Vehicle Expense report in the A/P Status reports. Once a vehicle is added, the Copy Down function is available by right-clicking on the vehicle. The Copy Down function copies the vehicle to all lines below.
- G/L Account – Double-click to display the list of available accounts. Choose the accounts where this bill is to post. Although it is possible to type into the account column, selecting from the list of accounts ensures that the accounts are valid.
Add an AP Bill Process
Vendor Invoices for services or items not for resale are entered as an A/P Bill. This action affects the vendor balance, the selected expense accounts, and the Accounts Payable account.
- Navigate to Accounting / A/P / Add/Edit Bills.
- Select Add on the Select an A/P Bill window.
- Highlight the vendor and choose Select. Check the Favorite Vendors option to only display Vendors set up at Hub / Setup / Favorite Vendors.
- On the Add a Bill window, select the Bill Date and Due Date.

- Enter the Invoice # from the vendor’s bill. The Description, PO #, and Notes entries are optional.
- In the Expense Breakdown grid, double-click in the G/L Account column to select one or more general ledger accounts. For each general ledger account, enter the amount in the $ Amount column. The Comment, Quantity, and Vehicle ID entries are optional.

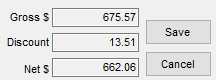
- Confirm the Gross $ amount matches the vendor’s bill. If the vendor offers Discount Terms, select Terms, enter the discount information, select Apply to calculate the discount, and choose OK to return to the AP Bill.
- Select Save to create an unpaid bill for the vendor.


Posting Notes
- Accounts Payable Bill File – An unpaid A/P bill is created if the bill is not prepaid.
- Vendor Balance – If the bill is not prepaid, the vendor balance increases if it’s a positive overall bill and decreases if it’s a negative. If the bill is prepaid, the Regular balance is unaffected and the Prepay balance is reduced.
- General Ledger – A Payable-Type Vendor-Type journal entry is made and the G/L account balances are updated if the bill is not prepaid. If the bill is prepaid, then a Payable-Type Vendor-Type journal entry is made marking the Prepay indicator.
| Vendor Journal Entry | Debits | Credits |
| Gross figure owed Vendor | Accounts Payable (for Vendor location) | |
| Dollars listed for each expense | Expense accounts |
