When the billing season ends, there are different options available for handling money left in Customer Prepay accounts, including:
- Allow the balance to remain in the Customer’s Prepay so that it may be used on future Invoices (no action required).
- Transfer the Prepay balance to the Customer's Regular balance.
- Transfer the Prepay balance to the Customer's UAC balance.
- Refund the Prepay balance to the Customer.
- Transfer the Prepay balance to another Customer’s account.
The Transfer Customer Prepay function, found at Accounting / A/R, is designed to help streamline the process used to handle leftover Prepay money. Whether transferring the balance or issuing a refund, an Invoice is created to move the selected Prepay dollars to the Regular balance, as a credit. If the Issue Refund option is used, a Quick Check is generated before the Invoice is printed.
Prior to using the Transfer Customer Prepay function for the first time, setup is required. See the Setup tab for details.
Setup
This is a one-time setup required prior to using the Transfer Customer Prepay function for the first time.
The system needs two pieces of information to automate the Prepay transfer:
- What non-inventory miscellaneous Product to use on the Invoice.
- What Vendor to use on the Quick Check.
Note: Best practice is to designate a specific Prepay Refund Vendor so all refunds affect the same Vendor. This makes for easier research in the future if the need arises.
To designate the Vendor and Product, go to Accounting / A/R / Transfer Customer Prepay.
- Select a Customer from the Customer list.
Note: For these purposes, the Customer selected does not matter. The system needs to advance to the next screen to access the Setup option and that is done by loading a Customer. - On the Transfer Customer Prepay screen, select Setup.
The Transfer Customer Prepay Setup window opens, and each Location will list.
- For each Location that will process refunds:
- Double-click in the corresponding Prepay Product field. Identify and Select the Prepay Product to use for that Location.
- Double-click in the corresponding Prepay Vendor field. Identify and Select the Vendor to use for that Location.
The Use User’s Current Location instead of Customers Location option allows the user’s current Location to override the Location and Product used on the Invoice created by the Transfer Customer Prepay utility.
![]()
- When complete, select Save.
- Back on the Transfer Customer Prepay window, select Cancel.
Transfer Customer Prepay Window
![]()
- CustID – The ID for the selected Customer is displayed.
- Current Prepay $ Balance – This displays the selected Customer’s Prepay balance.
- Date – This will be the date of the Invoice that is generated to accomplish the movement of money.
- Salesperson ID – The Salesperson ID may optionally be selected from the drop-down list. If selected, it appears on the Invoice generated by transferring Prepay.
- Transfer to Regular Acct – This removes the money from the Customer’s Prepay account and places a credit on the Regular account for the amount of the transfer.
Note: One Invoice is created with two line-items, one negative and one positive that offset each other. The positive line item is marked as Paid, stealing enough paid Booking to cover the dollars in the Total Amt of Refund. The Product used for the Invoice is the Prepay Product for the Location at the Transfer Customer Prepay Setup window found by selecting Setup. - Issue Refund – This removes the money from the Customer’s Prepay account. Selecting this option enables the Check # and Checking Account fields for the check that will print.
Note: This option transfers the Total Amount of Refund dollars to the Regular account as described above, makes a negative Payment on Account against the Credit Invoice, and follows with a Quick Check using the Vendor entered under Setup as the Prepay Vendor for this Location. The Quick Check debits the General Ledger Account specified for the Adjustment payment method to offset the posting to the same account by the payment. The name and address of the Customer involved is substituted on the check for the Vendor Name. The Invoice, Payment, and Quick Check post to the Customer’s Location. - Description – Optionally enter a description to appear on the Transfer Prepay Invoice.
- Checkbox – Check the box(es) to select the Booking to transfer the Prepay $ for that Product.
- Refund Amount – Optionally, a portion of a Booking may be refunded, or transferred, by editing the amount in the Refund Amount column.
Transfer to Regular Account
- Navigate to Accounting / A/R / Transfer Customer Prepay.
- Highlight the appropriate Customer and choose Select.
- On the Transfer Customer Prepay window, select the Date.
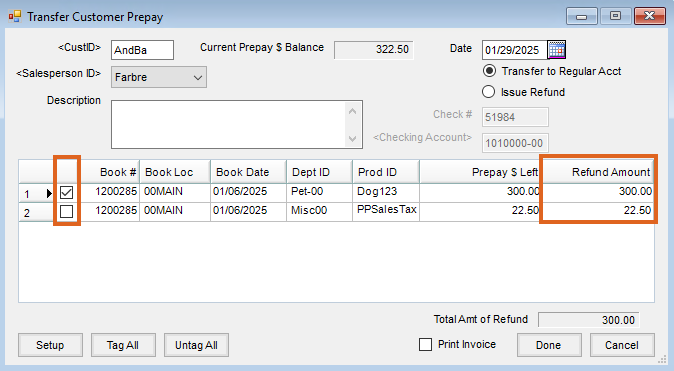
- Choose the Transfer to Regular Acct option to create a Credit Invoice.
- Optionally select the Salesperson ID and enter a Description.
- Select the option for the Booking line item to be transferred. If necessary, edit the Refund Amount column.
- Optionally choose Print Invoice.
- Select Done.
- A Credit Invoice is created on the Customer’s Regular Account.
Note: In the event that a Prepay Transfer was entered in error, and the End of Prepay Season process has not been run, the Credit Invoice created can be voided or reversed. Doing so will put the Prepay dollars back to the Booking.
If a Customer requests a Refund Check be issued, after the Prepay balance has been transferred to the Regular account, information regarding that process can be found here.
Transfer to Unapplied Cash
There are times it may be necessary to transfer a Customer's Prepay balance to their Regular balance. More specifically, it may be desired to transfer the Prepay balance to the Customer's Unapplied Cash.
- At A/R / Transfer Customer Prepay, select the Customer whose account holds the Prepay balance.
- Select the Booking line item(s) to be used for this transfer. Edit the Refund Amount column if desired to specify the dollar amount to be transferred for each line item.
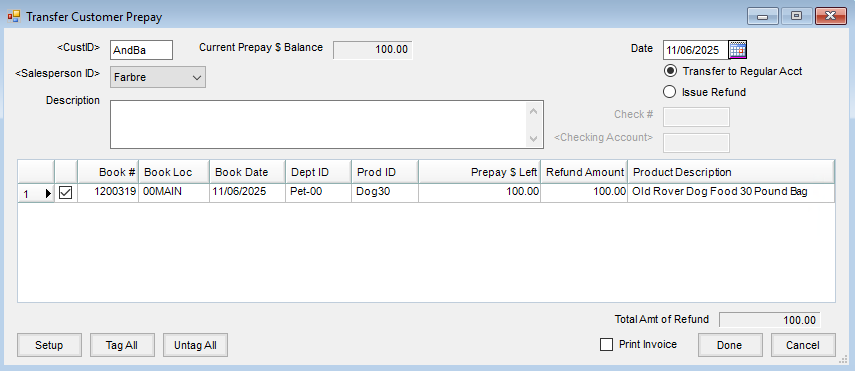
- With the Total Amt of Refund reflecting the amount to be transferred and the option set to Transfer to Regular Acct, choose Done to save the transaction.
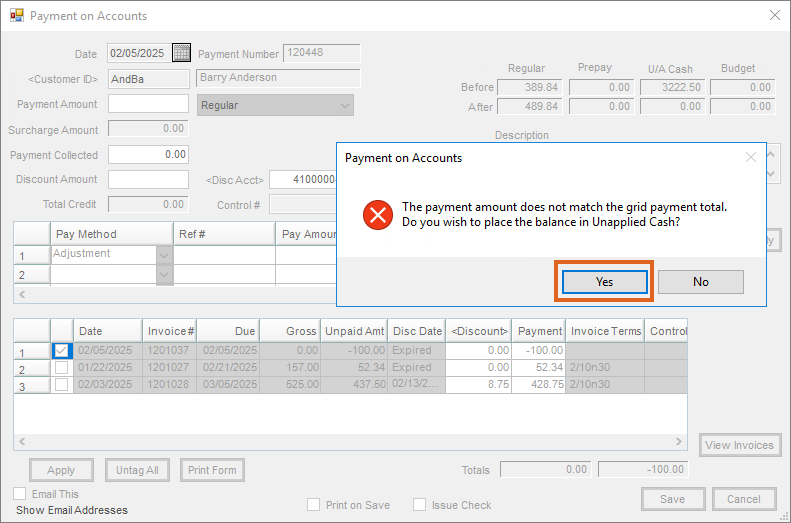
- Go to the Payment on Accounts screen (A/R / Payments / Add) for the Customer selected in Step 1. There should be a credit on the Customer’s account for the amount that was transferred. Deselect all items in the grid except the Credit Invoice created by the Transfer Prepay process. Best practice is to change the Pay Method to Adjustment. Do not enter a payment amount, and select Save.
- Once the below message displays, select Yes to move the credit to Unapplied Cash.
Issue Refund
- Navigate to Accounting / A/R / Transfer Customer Prepay.
- Highlight the appropriate Customer and choose Select.
- On the Transfer Customer Prepay window, select the Date.
- Choose the Issue Refund option to issue a check to the Customer.
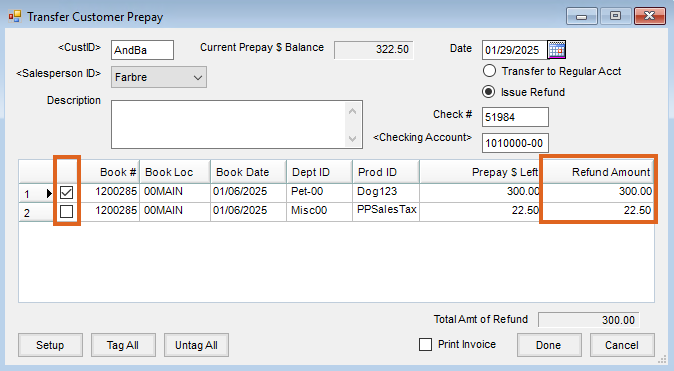
- If necessary, edit the Check Number or the Checking Account listed.
- Optionally select the Salesperson ID and enter a Description.
- Select the option for the Booking line item to be transferred. If necessary, edit the Refund Amount column.
- Optionally choose Print Invoice.
- Select Done.
- The Transfer Prepay Invoice is created.
- The Adjustment Payment is created.
- The refund check, issued to the Customer, is created and printed automatically.
Note: In the event the refund was issued in error, the refund can be backed out by voiding the 3 entries created during the Transfer Customer Prepay process:- Void the Disbursement under the Vendor selected on the Transfer Customer Prepay Setup window.
- Void the Transfer Prepay Invoice.
- Void the Adjustment Payment.
Transfer Customer Prepay Setup must be completed before it is available. See the Setup tab for more information.
Transfer to Another Customer
Sometimes it is necessary to transfer one Customer’s prepay money to another Customer. The following steps remove Prepay from one Customer and add it to another Customer’s Prepay in the form of a Paid Booking.
Although not necessary, it is suggested to have a non-inventoried Product in a Miscellaneous Department called Transfer Prepay that has the Sales Account pointing to a miscellaneous Income Account.
Step 1
- At A/R / Transfer Customer Prepay, select the Customer whose account holds the Prepay balance.
- Select Transfer to Regular Acct.
- Select the Booking line item(s) to be used for this transfer.
- As needed, edit the Refund Amount column to specify the dollar amount to be transferred for each line item.
- Choose Done to save the transaction.
Step 2
- Go to the Payment on Accounts screen (select Add at A/R / Payments) for the Customer selected above.
Note: There will be a credit on the Customer’s account for the amount that was transferred. - Deselect all items in the grid except the Credit Invoice created by the Transfer Prepay process.
- In the Payment Amount, enter a negative amount equal to the transferred amount.
- In the Description field, enter information, such as the other Customer's account, noting where the funds are being transferred to. This step is extremely important, as it will create a paper trail in the event of future questions regarding the transfer.
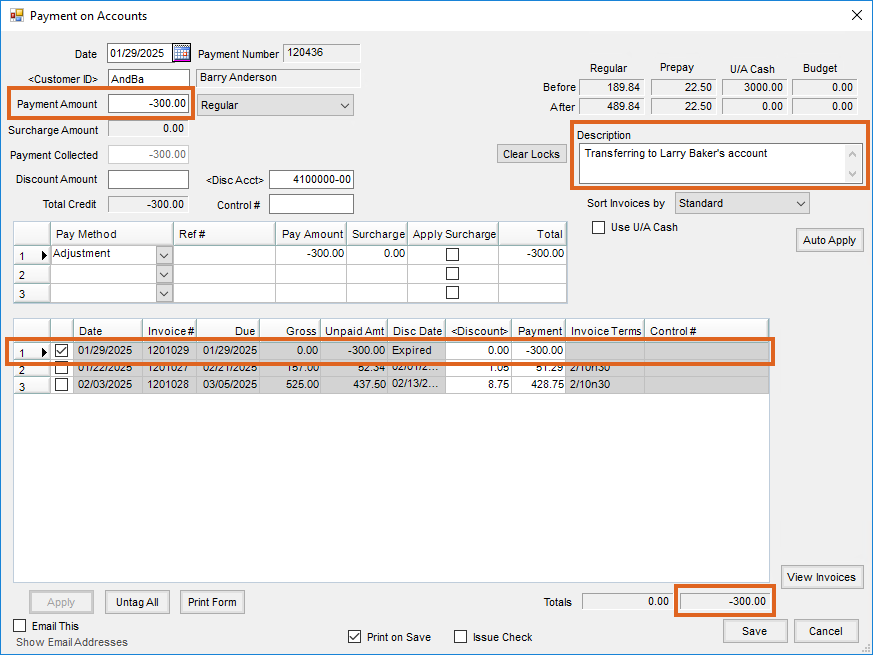
- Change the Pay Method to Adjustment.
- Save the payment.
Step 3
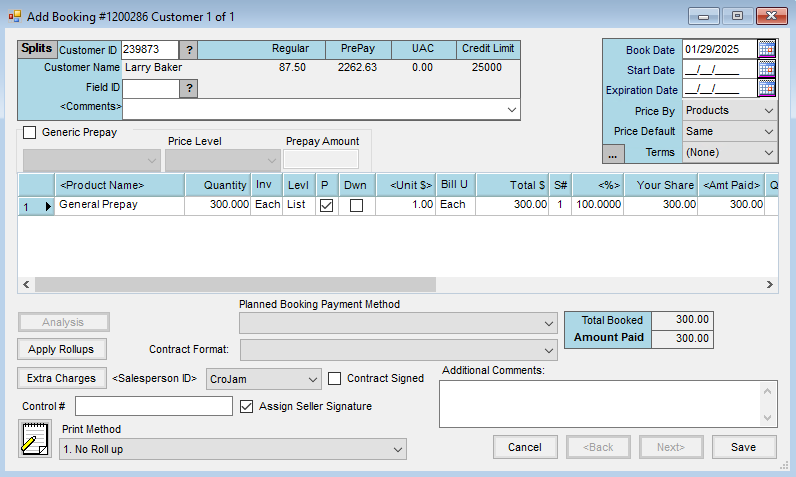
- If the Customer receiving the Prepay money does not have an existing Booking for the money to be applied, enter a Booking for this Customer.
- Mark the Booking as Paid.
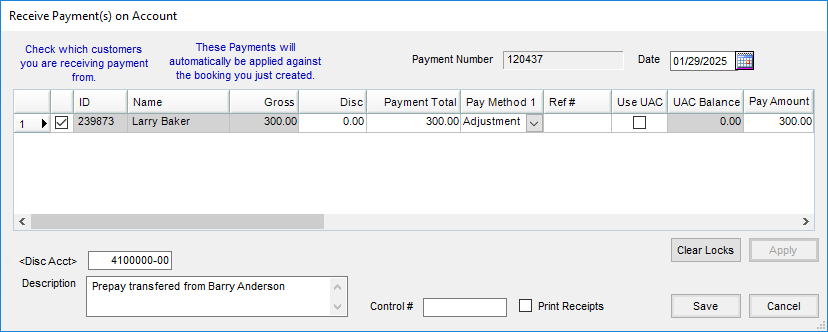
- Change the Pay Method in the grid to Adjustment before saving the positive payment.
- In the Receive Payment(s) on Account window, in the Description field, enter information, such as the other Customer's account, noting where the funds are being transferred from. This step is extremely important, as it will create a paper trail in the event of future questions regarding the transfer.
Transfer Customer Prepay Setup must be completed before it is available. See the Setup tab for more information.
