This utility was designed to simplify the process of transferring vendor Prepay to the Regular account or receiving a refund Prepay check from the Vendor.
The Transfer Vendor Prepay utility is found at Accounting / A/P / Transfer Vendor Prepay.
Overview
![]()
- Vendor – Select the Vendor that has vendor Prepay.
- Current Prepay Balance – This displays the Prepay amount from the Vendor file.
- Transfer Amount – Enter the amount of Prepay being transferred or refunded.
- Transfer Balance to Regular – This option removes the amount from the Vendor’s Prepay account and adds it as a negative to the Vendor’s Regular balance.
- Refund Check Issued – When a Vendor refunds the balance of Prepay by sending a check, this option may be selected. By using this option, Prepay is removed from the Vendor’s account and the check is posted into the General Ledger Account specified.
- Checking Account/Cash on Hand – When using the Refund Check Issued option, the General Ledger Account specified in this area is increased by the amount of the refund.
- JE Description – A description for this transaction may optionally be entered.
- Mark POs as “Order Invoiced” – If the Vendor Prepay was associated with a Purchase Order, the Purchase Order(s) are listed in the grid. By marking the checkbox, the Order Invoiced option on the Purchase Order is marked. This indicates that the order is a closed Purchase Order and it will no longer be available for entering Purchase Receipts or Purchase Invoices.
- Bill Date – Enter the date for the A/P Bill.
- On Hold – This option may be selected so the Bill is entered in the system but is not available at the Pay Bills screen.
- Due Date – Enter the due date for the A/P Bill.
- Invoice # – An Invoice number that is unique to this Vendor must be entered.
- Description – A description for the Bill may optionally be entered.
- Amount – This displays the amount of Prepay being transferred.
- G/L – The General Ledger Account to be used on this negative Bill is displayed.
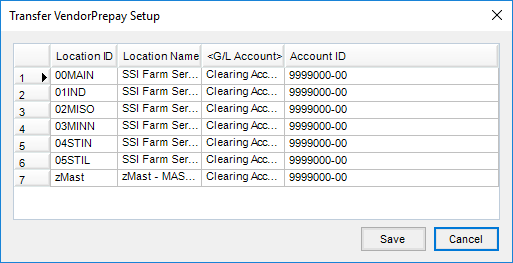
- Setup – The General Ledger Account to be used for the Transfer Vendor Prepay A/P Bill for each Location is set in this area. It is suggested to use a Miscellaneous Expense account or a Clearing account, not the Accounts Payable account. The transactions made during this process will debit and credit this account and therefore have no lasting effect on the balance of this General Ledger Account.
Transfer Balance to Regular
Vendor Prepay can easily be transferred to the Vendor’s Regular account by going to A/P / Transfer Vendor Prepay.
- Select the Vendor for the transaction. The Prepay balance displays on the screen.
- Setup is required prior to using this utility. If this utility has not been previously used, select Setup. Choose the G/L Account (typically a clearing or miscellaneous account) to be used for the transaction for each Location listed. Save the selections.
- Enter the amount to be transferred into the Transfer Amount $ field. The Transfer Balance to Regular option moves the amount from the Vendor’s Prepay account to the Vendor’s Regular account. The amount will show as a credit on the Vendor’s Regular account.
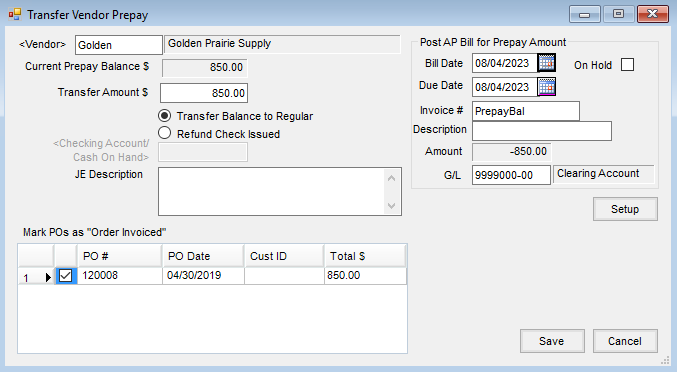
- A JE Description may optionally be entered.
- If the Prepay being transferred is associated with a Purchase Order, select the Purchase Order in the grid to mark it as Order Invoiced so it is then considered a closed Purchase Order.
- Enter the Bill Date, Due Date, and Invoice # for the negative A/P Bill.
- Save the transaction.
Refund Check Issued
When a check is received from a vendor refunding Prepay, it can be recorded by going to A/P / Transfer Vendor Prepay.
- Select the Vendor for the transaction. The Prepay balance displays on the screen.
- Enter the amount of the check received in the Transfer Amount $ area.
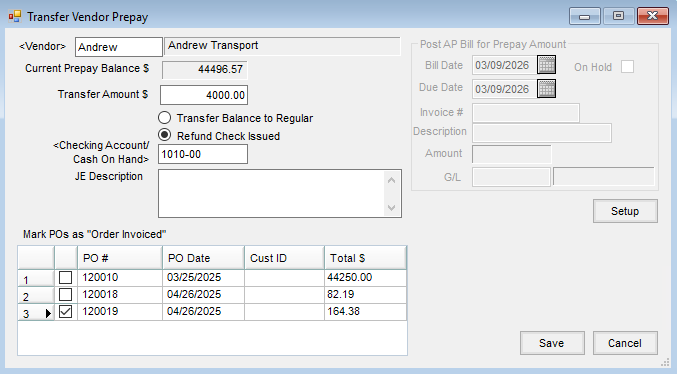
- Select the Refund Check Issued option. Double-click in the <Checking Account/Cash on Hand> field and select the account. If this check is being deposited by itself and a deposit ticket does not need to be printed, the checking account could be selected. If this check is being included on the regular deposit or if a deposit ticket is to be printed, select the cash account.
- A JE Description may optionally be entered.
- If the prepay being transferred is associated with a Purchase Order, select the Purchase Order in the grid to mark it as Order Invoiced so it is then considered a closed Purchase Order.
- Choose Save.
Alternatively, add a Vendor Type GL entry debiting cash on hand and crediting AP. Make sure the Prepay box is checked at the top of the window. It is now in the cash account, ready to be deposited.
