A Sales Order may be created by Customer or by Field. Unlike the Nutrient Recommendation or Field Plan, the existence of a Field is not required.
This feature allows adding a Sales Order for a Customer or Field that can later be imported into a Delivery Ticket, Booking, or Field Plan. Once imported, the Sales Order is then marked as processed and cannot be automatically imported again.
The Sales Order is intended to be a quick document. No setup is required.
For more information on Sales Orders in Agvance SKY, see Sales Orders - SKY Customer and Sales Orders - SKY Order.
Adding a Sales Order
A Sales Order may be created when a Customer orders Product from a salesperson (or other employee), but the company is not ready to ship the Product immediately. One key element of the Sales Order is an Estimated Delivery Date, which allows the orders to be entered in advance and staged for delivery on the given date. This is also valuable in tracking the potential movement of Product through the sales pipeline.
Adding prices to the Sales Order makes the document a priced Sales Order. A price may be manually entered. If not entered, the prices that default into the Sales Order come from the Customer’s Pricing Level specified in the Customer Profile. Prices may optionally print on the document.
Sales Order Splits
Select the Add a Sales Order shortcut in Planning or go to File / Open / Sales Order and select Add then choose the Customers or a Field for the order. After selecting the Customer or Field, verify or edit the billing split arrangements for this Sales Order.

Add a Sales Order Window

- Order Number – This is numbered by Location. Each Location’s counter sequence can be set by selecting Document Counters at Setup / Location Preferences.
- Terms – Select the terms that apply to the Products on this Sales Order. After Products and Terms are selected, choosing the Ellipsis displays the details of the terms.

- Order Date – This defaults with the system date. This date prints on the Sales Order.
- Estimated Delivery Date – This is required for the save of the Order. This date prints on the Sales Order.
- Offer Expires Date – This is used on Sales Orders with an Offered status. Populating this date helps keep some preferences true at Planning / Setup / Location Preferences on the Sales Order Prefs tab. If the Offer Expires date passes and the preference is set to Disallow Approval of an Expired Sales Order, the Status option of Approved will become disabled. However, expired Sales Orders can still be imported into a Booking if it was approved prior to that date. This date prints on the Sales Order.
- Payment Date – Enter the date the payment is to be made for the Sales Order.
Note: If a Payment Term uses a graduated discount based upon the date of payment selected for the Sales Order, the appropriate Payment Terms discount is reflected in the Products’ Unit Price in the Net Price Summary. - Start Date – Enter the Start Date for the Sales Order. This date defaults from the Sales Allocation, if selected. If this order is imported into a Booking, this date becomes the Booking Start Date.
- Expiration Date – Enter the Expiration Date for the Sales Order. This date defaults from the Sales Allocation, if selected. If this order is imported to a Booking, this Expiration Date imports into the Booking Expiration Date.
- Check Number – If paying by check, the Customer’s check number may optionally be entered.
- Processed – To prevent the accidental duplication of transactions, this is automatically checked after a Sales Order has been imported into a Delivery Ticket, Booking, or Plan. This may not be manually unchecked once the Sales Order is saved as being processed.
- Order Type – Select Pickup, Deliver, or Booking from the drop-down. This is required to save. Pickup and Deliver types may be imported into Delivery Tickets and Field Plans. Only Booking types may be imported into Product Bookings.
- Status – Select to set the order status to Offered, Approved, or Declined. The Sales Order Journal report filters by this status to enhance Sales Order follow-up.
- Comment – Optionally add comments.
- Apply Prices to All – For Fields with Billing Splits, this allows pricing changes entered on the displayed Customer to be copied to all Customers on the Field.
- Customer – This displays the Cust ID for the selected Customers. Additional Customer IDs may be viewed in the drop-down if the order has splits.
- Product Grid – Double-click the Product Name column heading to select Products. The Product Name may be edited if necessary. The Quantity may be entered at the Select Products window or in the Sales Order grid. Price may be keyed into the Price column. The Lot # may be selected from the drop-down or manually entered. There are also options on the Product line for entering a Tech License Number, a Rollup Kit, and an Allocation # that applies to the Product. If a Sales Allocation exists for the Product, the Sales Allocation area displays red.
- Price Level – This sets the sales prices to use on all Products in the Product grid. The hierarchy for the pricing is department override first then the grower override levels. If these Price Levels are not set, List Price is used.
- Print Method – For Plans with Roll Up Kits specified, select the Print Method which determines the Products and prices on the printed Sales Order.
- Apply Tax – This allows estimated sale tax to be applied to the Sales Order when taxable Customers and Products are used on the Sales Order. To use this option, select the Use Sales Tax on Sales Order option found on the Preferences tab at Accounting / Setup / Locations, and choose a sales tax item in the Estimated Sales Tax Item area.
- Apply Rollups – Product Roll-Up Kits are designed for applying various treatments to bulk seeds. Using this feature allows the seed product to reference a Roll-Up Kit, which contains the treatment Products, on a Product line in the grid. When the document is printed, the Products contained in the Roll-Up Kit may be rolled up into the seed product using the desired roll-up Print Method. The Roll-Up Kit name is appended to the Product Description. In the case where inventory is relieved for a transaction, the seed and the Products included in the Product Roll-Up Kit affect inventory. The Roll-Up Kit selection is available on Sales Orders, Delivery Tickets, Bookings, and Invoices. Although these Product Roll-Up Kits were designed for seed, they may be utilized for other Product programs as well.
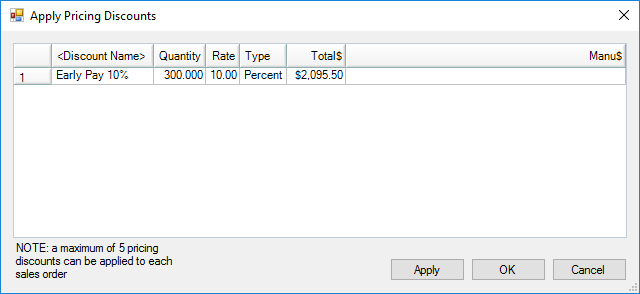
- Apply Discounts – Selecting this allows up to five predefined discounts to be applied to Products on the Sales Order. Double-click Discount Name to select the discounts to apply to this Sales Order. Choose Apply to calculate the discount and then select OK to close the Apply Pricing Discounts window. Sometimes a manufacturer covers a portion of a large discount given in order to retain a Customer. Recording this amount provides for tracking the reimbursement. Indicate if any money is expected from the manufacturer on that discount by entering the amount in the Manu$ column. This is just for reporting purposes and is not visible to the Customer.
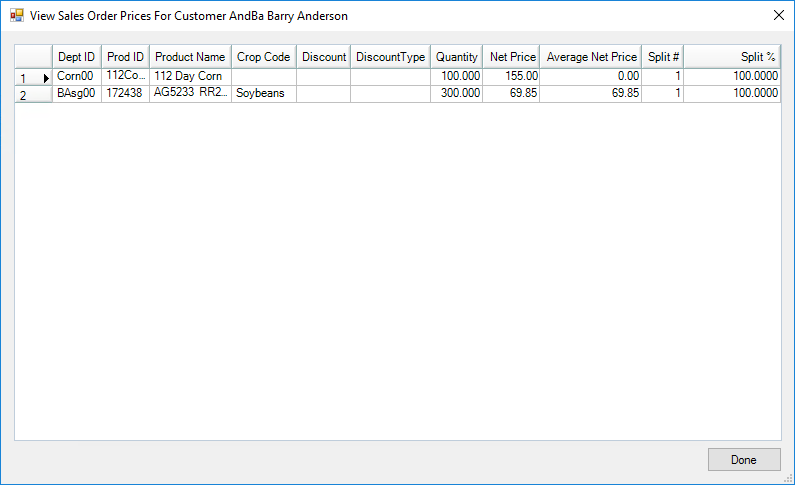
- View Net Prices – This view-only window displays the calculated Net Price for each item in the Product grid of the Sales Order. The line item price for the Products in the Sales Order continue to display the Price Level price, or the gross price. The net prices are only shown by selecting View Net Prices.
- Additional Info – Selecting this allows supplemental information to be entered such as Ship Via, Ship To, Customer PO #, Crop, Acres, etc.
- Cancel – Selecting Cancel exits the window without saving.
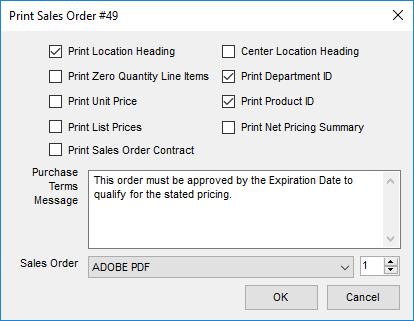
- Save – After information is entered, this saves the order and displays the Print Sales Order window where elements are selected to print on the document. A Purchase Terms Message field also displays on the Print window, allowing terms of the purchase to be entered. These terms print at the bottom of the document and, once entered, default in for printing on subsequent Sales Orders.


Once a Sales Order is saved it is available to be imported into a Delivery Ticket, Booking, or Field Plan. Sales Orders must have an Order Type of Booking to be imported into Bookings. The Booking Order Types cannot be imported into Field Plans or Delivery Tickets. The Products, quantities, prices, and splits are imported exactly as they are entered on the Sales Order, easing the process of creating those documents.
In addition, importing into a Delivery Ticket or a Plan marks the Sales Order transaction as Processed which restricts importing the same order more than once. See Prepay & Bookings more information on importing a Sales Order into a Booking.
Edit
Available at File / Open / Sales Order, this is used to edit an existing Sales Order. At the Sales Order Select window, highlight the appropriate Sales Order and choose Edit. Some options that may be edited are controlled by preferences found at Setup / Location Preferences on the Sales Order Prefs tab.
Delete
Because Sales Orders are non-inventory transactions, they may be deleted from the database. From the Sales Order Select window, highlight the Sales Order and choose Delete.
Important: Deleted Sales Orders are completely deleted from the database and cannot be retrieved.
Reprint
Available at File / Open / Sales Order, highlight the Sales Order and choose Reprint to print a copy of the Sales Order.
Start With
By first selecting the Sales Order in the grid to be used, choosing Start With brings the Products from that selected Sales Order into a new Sales Order. If the Import Quantities option is selected when the Field or Customer is chosen on the following window, the quantities of the Products are also imported into the new Sales Order. Otherwise, the Product quantities must be set manually.
