The playlist below covers viewing and entering AP Bills in Agvance SKY Vendor. Separate videos are also available within each relevant section of this article. It is recommended to expand the videos to full screen to ensure all details are visible.
Viewing Bills
View a listing of AP Bills. Bills displayed will adhere to the Vendor Restrictions from Agvance Windows. In Agvance SKY Admin, the Vendor toggle can be turned on or off for each User to allow or deny access to Agvance SKY Vendor.
The AP Bills grid displays Vendor Bills with the option to search by Vendor Name, Vendor ID, Bill #, Bill Date, Due Date, Gross Amount, or Status. Choose the Expand button to view up to three line item details for each Bill.

Select the Ellipsis to Edit, Void, or Reverse a Bill. Download Kwiktag Docs is available under the Ellipsis if a KwikTag document is attached to a Bill. These documents are also available when editing a Bill.
Note: Only Users tied to a User in Agvance Windows with access to Kwiktag with Purchase Invoices and AP Bills checked have the option to view Kwiktag documents in Agvance SKY Vendor.
Select the Filter button to filter the grid by Vendor Status (Active, Inactive), Status (Open, Paid, Voided, Reversed), or Date Range (Due Date).
Choose Export to export the AP Bills based on selected filters as a CSV file.
Select the Vendor name or icon to display more information for that Bill including the Bill Date, Due Date, Gross Amt, Discounts, Amt Paid, Balance Due, Status, User, Description, and Approval Details in a collapsible panel.
View and search for specific line items by G/L Account, Description, Amount, Quantity, Vehicle, and Comment. Select the Vendor Name to open the Vendor's profile in a new tab. The Ellipsis can be selected to Edit, Void, Reverse, or Download Attachments if applicable.

Add an AP Bill
Adding AP Bills is available for those with Add/Edit AP Bills turned on in Agvance SKY Admin. Start by selecting the + Add Bill button. See the tabs above to walk through the process of adding an AP Bill.
General Info
- Choose the appropriate Vendor from the drop-down.
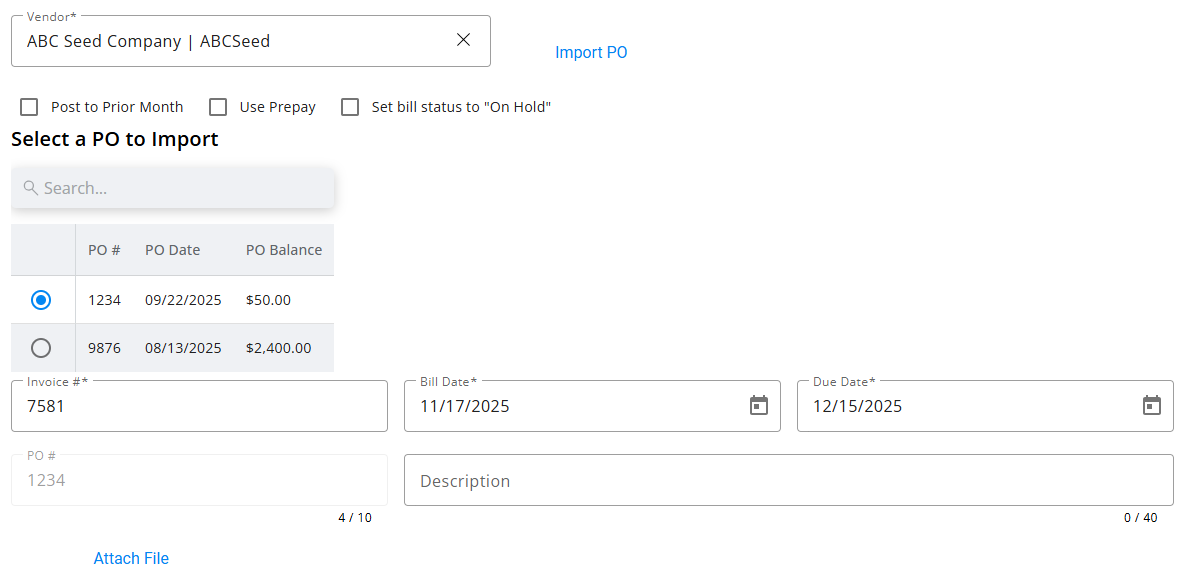
- Indicate if this Bill should Post to Prior Month, Use Prepay, or Set bill status to “On Hold”.
- Optionally select Import PO and choose the appropriate PO in the area that displays below. The PO must already be saved in Agvance Windows and cannot have already been brought into an AP Bill to be available here for the Vendor selected. Use the Search field to filter Purchase Orders by PO #, PO Date, or PO Balance.
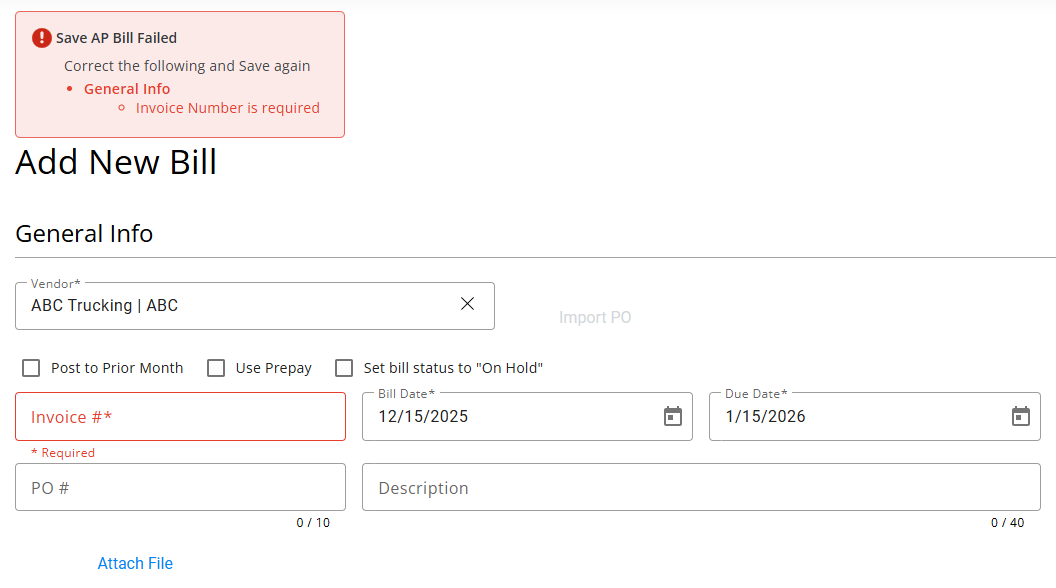
- Enter the Invoice #, then indicate the Bill Date and Due Date.
Note: The Bill Date defaults as the previous entry. The Due Date defaults based on the Invoice Due Date on the Invoice tab at Accounting / Setup / Location Preferences. - The PO # and Description fields are optional. If a PO was imported, the PO # and Description default and the PO # cannot be changed. The Due Date defaults with the previous entry before a Term is selected. However, Terms selected with a due date will have that date reflected in the Due Date field.
- Choose Attach File to upload an attachment. Select the Delete icon to remove the attachment(s). For those with KwikTag access, KwikTag images can also be added here by selecting Add KwikTag. Agvance SKY Vendor supports adding a new KwikTag image but does not support linking to an existing KwikTag image.
Note: For any issues with seeing KwikTag images, please verify the API IP address (54.209.30.54) is whitelisted so it can reach the Kwiktag server.

Expense Breakdown & Predefined Split
- Indicate the Split ID and Amount if the Bill is to be split across multiple accounts.
- Choose Apply. This will apply the split and remove any existing lines.
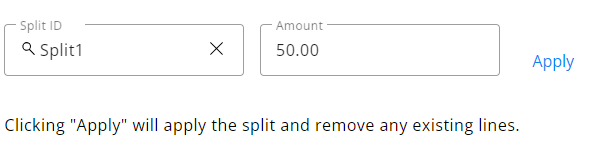 Note: Split IDs must first be set up in Agvance Windows at Accounting / Setup / G/L / G/L Splits.
-OR-
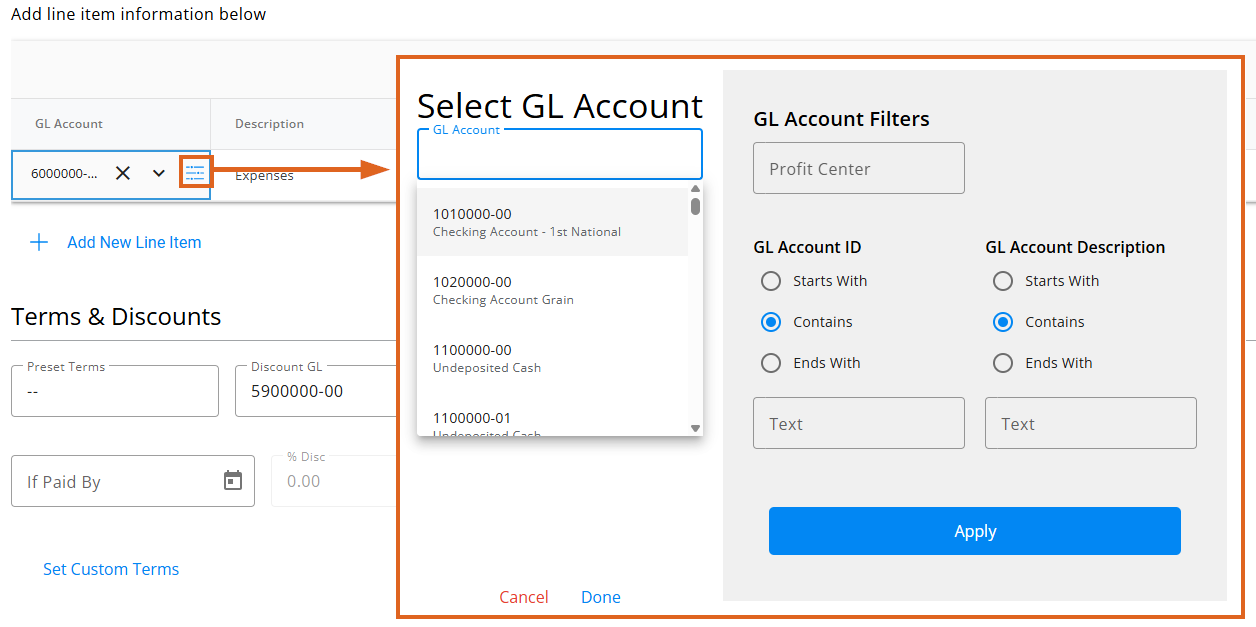
Select in the GL Account* field and choose the appropriate account for this Bill. The Description defaults in as the description entered on the account. Optionally enter the Amount, a brief Comment, and the Quantity. Select a Vehicle Location and/or Vehicle from the drop-down. Select Add New Line Item to create additional lines. If a Purchase Order was imported, some line item information will be populated but can be changed if needed. Optionally select the Filter icon within the GL Account field to filter the GL Account drop-down. Filter by Profit Center, GL Account ID, and/or GL Account Description. Once filters are indicated, choose Apply. Select in the GL Account drop-down on the left to display GL Accounts matching the filters applied. After choosing the appropriate GL Account, select Done.
 Note: Split IDs must first be set up in Agvance Windows at Accounting / Setup / G/L / G/L Splits.

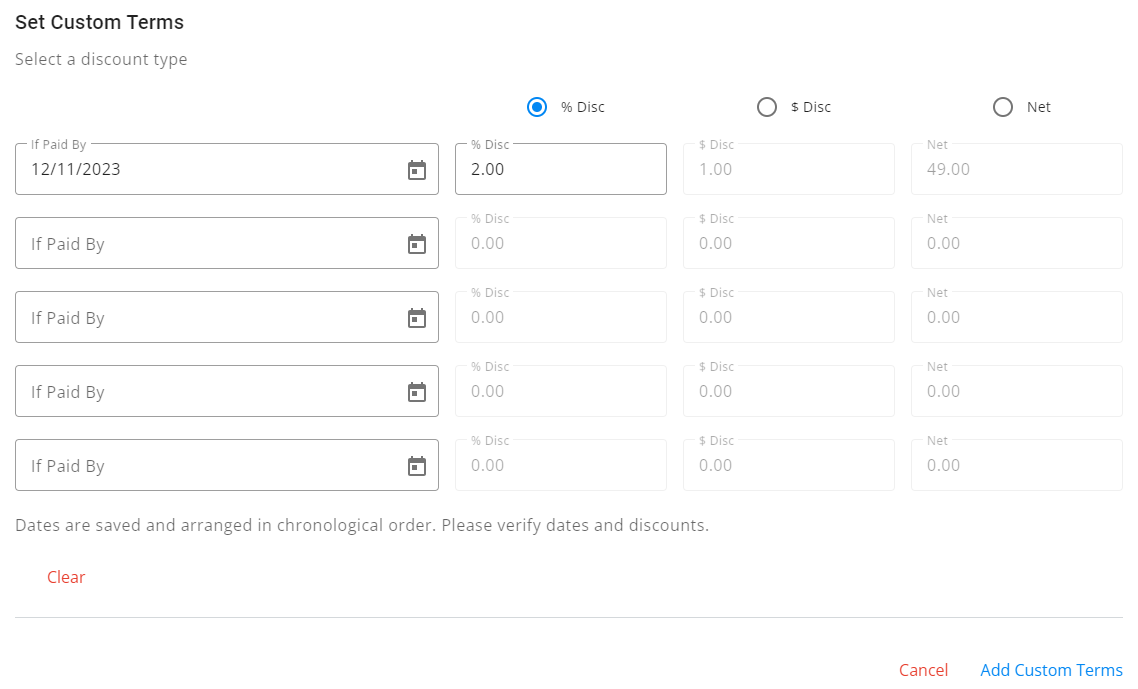
Terms & Discounts
- Select in the Preset Terms field to set terms for this Bill. The Discount GL defaults from the Location setup but can be changed by selecting from the drop-down.
Note: An Amount must be present in the Expense Breakdown & Predefined Split section for this option to be available.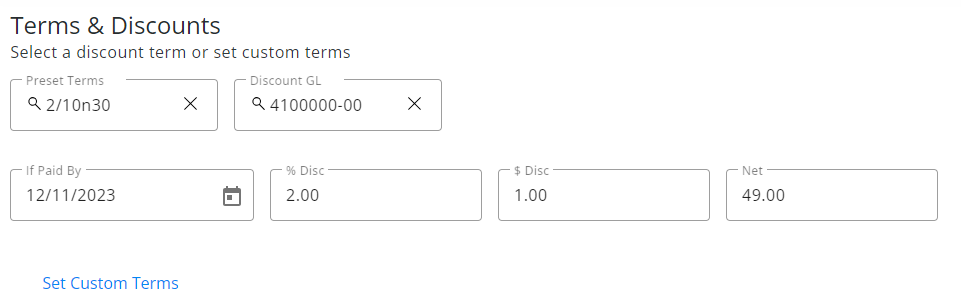
- The If Paid By date(s) default if a Preset Term is selected but can be modified. If a Purchase Order was imported, any applicable discount information will be populated but can be altered.
- Alternatively, select Set Custom Terms to enter discount information not currently saved as Preset Terms.
- Choose Add Custom Terms to apply this discount to the Bill.


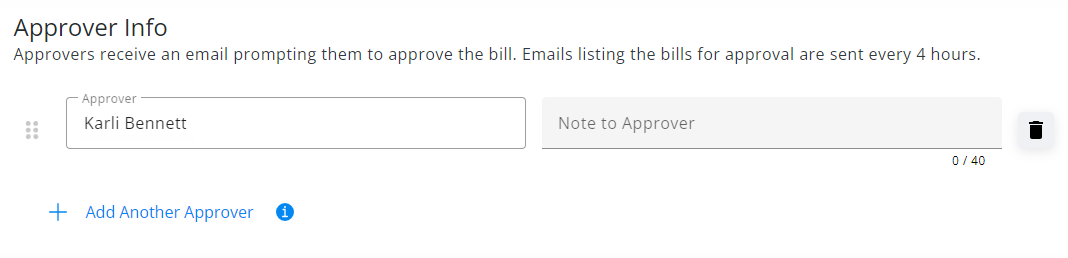
Approver Info
The Approver Info section is available if the Enable AP Approval process for my company is enabled and Approvers are selected in Agvance SKY Admin under Vendor.
If AP Approval Rules have been set up in Agvance SKY Admin under Vendor, choose Apply Approver Rules to automatically bring in Approvers if any Rules apply to the Bill being entered.
Approvers can also be added manually.
- Select the Approver from the drop-down and enter an optional Note to Approver. Remove the Approver by selecting the Delete icon.
- Choose a Reminder option from the drop-down. Options available are No Reminder, Every 4 hours, Every 24 hours, Every 2 days, Every 3 days, Every 4 days, or Every 5 days. The Approver will receive a SKY notification and email on the selected intervals. See here for on-demand reminders.
- Additional Approvers can be added by selecting + Add Another Approver.
- Choosing Reset Approvers removes all Approvers, Reminders, and Notes.
- Reorder Approvers by selecting the grid of dots next to the Approver drop-down and dragging to the appropriate place. The order Approvers are listed is the order in which the AP Bill will be sent for approval.
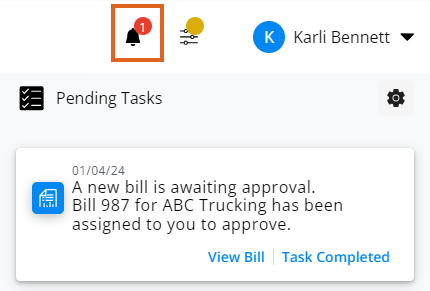
- A notification will be sent in Agvance SKY to the Approver indicating a Bill is ready for review.
 Note: Editing the dollar Amount in the Expense Breakdown & Predefined Split section will require the approval process to start over.

 Note: Editing the dollar Amount in the Expense Breakdown & Predefined Split section will require the approval process to start over.
Notes & Review
- Enter any additional Notes (notes from an imported PO will populate here as well).
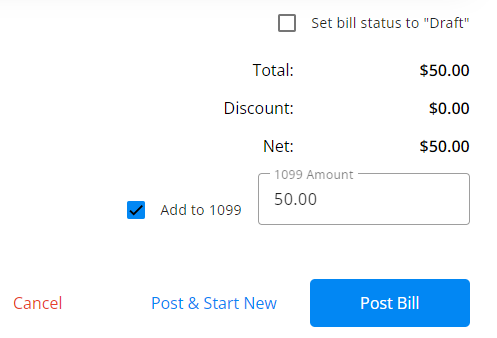
- An option is available to Set bill status to "Draft". Check this box prior to saving and the Bill will display on the Drafts tab. The Vendor, Invoice #, Bill Date, and Due Date must be populated before saving.
Note: The Bill will not be sent through the Approval process until Set bill status to "Draft" is unchecked. - Review the Total, Discount, and Net amounts. Select Post & Start New to post this Bill and enter another or Post Bill to post the Bill and return to the AP Bills screen. Upon posting, an imported PO is marked as Paid.
- Only Vendors designated as 1099 Vendors on the 1099/Payment Info tab of the Vendor profile will have an option to Add to 1099 and a field to enter the 1099 Amount.
- If not all required fields are populated and Post or Save is selected, a message will display at the top of the form indicating what is missing, and that field will be shown in red.
- Only Vendors designated as 1099 Vendors on the 1099/Payment Info tab of the Vendor profile will have an option to Add to 1099 and a field to enter the 1099 Amount.


