The Tonnage Tax method is the original method available in Agvance for reporting tonnage taxes and requires the Products that appear on the report be set up by selecting Setup on the report criteria screen at Accounting Reports / Accounts Receivable / Tonnage Tax for each state.
A report is generated in a format that can be filed directly with the state. It is possible that, as some states change their filing requirements, the Agvance report printout may not be compatible with the state's required report format. If the state's format no longer works with the report printed by Agvance, contact SSI Support for further assistance. This method works well for many and is the method of choice for companies that do not have an excessively large number of Products subject to tonnage tax in the database.
Note for CA
- An Invoice for applicable Customers must have a minimum of 1000 lbs of eligible Product on it for it to show on the report.
- In the Setup on the report, if the Product is selected for Report Line X97 - Mixed Blend - No Code, the Invoice must be priced by Analysis for it to show on the report.
- Product weight is rounded to the nearest ton.
Note for MO
- There is no minimum weight on an Invoice for it to display on the report IF the Product is selected in the Setup AND it has an Analysis on the Invoice OR the Report non-guaranteed analysis invoice products if they are part of the product setup is checked when running the report.
Setup for Report
There are three basic steps in the process of setting up data for the Tonnage Tax report.
- Make sure Products that are eligible for tonnage tax are in an Inventory Department that is set up as a Nutrient Contributor.
- Set up the Products with the proper consistency and nutrient contribution information.
- Set up the Tonnage Tax report.
Note: When running the Tonnage Tax report over multiple years, the setup must be completed in all years to be able to pull the Products into the report.
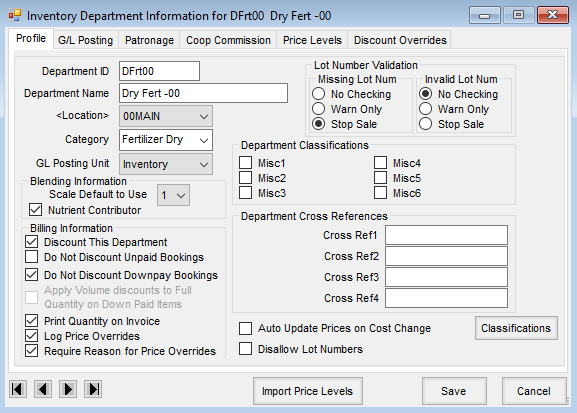
Step 1 – Set Up Department
The Inventory Department(s) holding the tonnage tax Products must be set as a Nutrient Contributor department. Make sure this department is set up correctly by editing the department or adding a new department at Accounting / Setup / Inventory Departments.
Step 2 – Set Up Products
Each Product contributing to the Tonnage Tax report must be set up with an Inventory Unit, Unit Weight, the proper Consistency (Solid (dry) or Liquid), the proper Nutrient Contributor Information, and the proper Package Unit (only applicable on bagged fertilizer).
From the Hub or Accounting, open the appropriate Product.
- On Profile tab, enter the Inventory Unit and Unit Weight.

- On Blend Setup tab, under the Consistency heading, select Solid (dry) or Liquid.
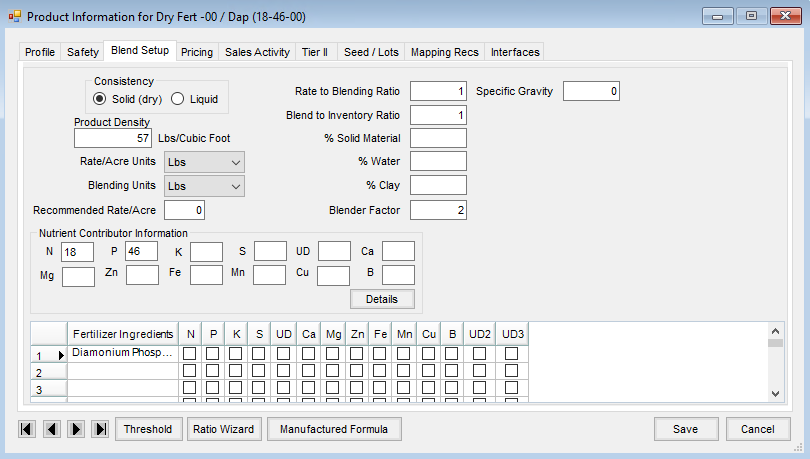
- Under the Nutrient Contributor Information heading, fill in the appropriate fields with the percentages of each element the Product provides.
- If the Product is a bagged fertilizer, go to the Profile tab and make sure the Package Unit is set to bag or bags. This will tell the report to break these Products out into the Bagged Fertilizer Category (may not be required in all states).


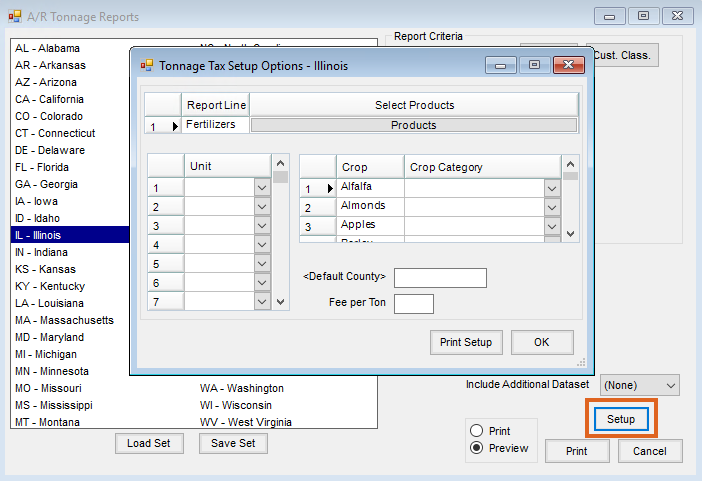
Step 3 – Set Up The Tonnage Tax Report
The Agvance Tonnage Tax report is designed on a state-by-state basis to meet the specific tonnage tax report requirements of each state. The report is based on sales of fertilizer products during the reporting period.
- Navigate to Accounting Reports / Accounts Receivable / Tonnage Tax.
- Select the appropriate state and choose Setup.

- Select the appropriate Default County. All Invoices that are billed without a valid county are then reported to this county.
- Choose the Products button to select what Products to include in the Tonnage Tax report.
- Select Add to open the Select Products window.
Note: All Products selected at this screen need to be in an Inventory Department marked for Nutrient Contributors, and each Product must be set up with the correct percentage of Nutrient Contribution for each element. This is done in the Product file on the Blend Setup tab. - Select the Products that should be included in the report and choose Done. To run the report, select OK to return to the A/R Tonnage Reports window, select the range, and choose Print.
County Hierarchy
The hierarchy that determines which state and which county is associated with an Invoice on the Tonnage Tax report is as follows:
First the program determines if the amounts belong on the report for the selected state:
- If the Invoice is by Field, use the County from that Field.
- If the Invoice has a Ship To address, look at the state for that address and see if the County entered on the Additional Info tab is a valid county for that state. If so, use that county.
- If no County has been selected with the Ship To address or the County selected is not valid for that state, then use the default county.
- If a Field and Ship To are not in use, then use the State on the Customer's profile. Validate the County on the Additional Info tab against that state. If it is a valid State and County, use that county. If the combo is not valid, use the default county.
If the program determines through the above hierarchy that the amounts belong on the selected state’s report, then it will determine the county to apply the amounts to, as follows:
- If there is a County entered on the Additional Info tab of the Invoice that is also in the selected state’s list of counties, then it will use that county (even if the Additional Info county was populated from another state that happens to have a county with the exact same county name that is in the list of counties from the selected state).
- If there is no County entered on the Additional Info tab of the Invoice, or the county is not in the list of counties from the selected state, then it will use in order:
- The county on the Field.
- The county on the Ship To if it exists and is a county in the list of counties for the selected state (even if the state on the ship to is another state).
- The county on the Customer if it exists and is a county in the list of counties for the selected state (even if the state on the Customer is another state).
- If no county from the selected state is found using the above hierarchy, then it will use the default county set up on the state.
