Add Customers by going to File / Open / Customers and selecting Add.
Customers can also be seen in Agvance SKY Customer.
Profile

- Customer ID – Enter a unique ID consisting of up to six characters. The ID is used throughout the Agvance modules to call up or refer to this Customer. The first three characters of the last name followed by the first three characters of the first name is a suggestion for the ID format. Another option might be to enter a 1-digit location number followed by 3 characters of the last name and 2 characters of the first name.
Once saved, the ID cannot be edited. To update an ID, a new Customer will need added with the desired ID then the old Customer will need to be merged with the new at Hub / Utilities / Admin Utilities then Hub / Combine Customers.
Note: SKY Mapping customers should reach out to SSI Support before using the Combine Customers utility. - Grower – Select this box if the Customer is considered the primary Grower of any Fields to be entered into the system.
Note: The Grower designation on the Profile tab found at File / Open / Customer has a significant impact on some of the A/R and Inventory reports. It is important that the Grower status of the Customers is maintained in order for these reports to be accurate. On some Accounts Receivable and Inventory reports, there is a 100% to Grower option. This causes the subtotaling of product to go to only the Growers on the Invoice and disregards the landlords. In the case where there are multiple Growers on one Invoice, the total Invoice is split among the Growers according to the percentage relationship that is present.
Example: If a father and son farm together for a landlord in a 40/10/50 arrangement (where the father is 40, the son is 10, and the landlord is 50), then an Invoice for this arrangement when run 100% to Grower would be split 80/20 between the father and son. The landlord would not be listed on the report for this Invoice.
Important Note: On all Invoice reporting except the Sales Analysis report where the 100% to Grower option is available, the absence of a grower on the Invoice causes the Invoice to be skipped. On the Sales Analysis report, the absence of a Grower causes the first Customer in the divide to be considered the Grower. - Location – Select the location where this Customer does business.
- First Name/Last Name – Enter the first and last name of the Customer as it is to appear on documents and reports. If the Customer is a business, enter the business name in the Last Name field, leaving the First Name blank.
- Address 1/Address 2/Address 3/City/State/Zip – Enter the address as it is to appear on documents. There are three address lines available in addition to City/State/Zip for each Customer. If the Customer has two address lines, input their mailing address in Address 2 and their shipping address (or Attention to) in Address 1. Address 3 would not print in this example, as it was left blank.
- Payee – When checked, information in the Address 1 field will be included in the Positive Pay Format 2 export file on a check issued for the Customer at Accounting / A/R / Payments with the Issue Check option selected, on checks issued from the Accounting / Patronage / Pay menu, and on Grain Settlement checks. This field has an 80 character limit.
Note: When the Customer's Address 1 is checked as a Payee and the check is to be paid by ACH, the information in Address 1 will default into the address information for the check. If Pay Via ACH is unchecked, Address 1 information will move to the Paynames grid. - Phone 1/Phone 2 – Enter the primary and secondary phone numbers (optional).
- Territory/County/Country – These are optional inputs that may be used as filters in Customer queries. Double-click to display the list of counties that correspond with the state chosen. Optionally double-click to choose the country name. If selected, the country name prints along with the address on Labels, Invoice and Statement documents.
- Notes – Use this area to enter any special, internal notes about this Customer. This does not print on any report or paperwork the Customer receives.
- Quotes – This area allows recording and/or viewing product quotes and terms specific to a Customer file. This area is different than Product Bookings (in Accounting) or Sales Orders (in Planning or Mobile Sales) because a quoted price may be recorded for a product without specifying a quantity or specific field arrangement. These quotes are accessible from several areas in the program where pricing decisions are entered.
- Inactive – Check this option if the Customer is no longer active. It renders this ID/Customer unavailable from most Customer selection lists.
Note: If the Customer is connected to SKY Mapping, the Customer cannot be marked as Inactive. - Group – Optionally use this input to help categorize Customers.
- GLN – Enter the Global Location Number assigned to the Customer. This number is required to be 13 digits. Examples of where this may be used include:
- Purchase Order – When the Use Address and GLN from customer profile option is checked on the Ship To tab of the PO, the GLN value is populated with the GLN entered on the Customer Profile tab. If unchecked, the GLN on the Ship To tab of the PO is used. This GLN value is saved with the Purchase Order.
- Purchase Order Request – Only the GLN entered on the Ship To tab is saved. It does not go back to the Customer or Location to pick up a GLN no matter what.
- Manage Agvance Import – The GLN is loaded from the Customer import file at Admin Utilities / Hub / Agvance Import on the Import tab and is saved to the Grower tables.
- Meppel Export – The GLN is a part of the export functionality.
- Export to EZTrack – The GLN is a part of the data export functionality.
- Preferred Language – Select either English or French as the Customer's preferred language. Delivery Tickets, Booking documents, Invoice documents, and Payment receipts will print labels in the chosen Preferred Language. When running reports such as Budget Billing Statement or Combo Statements, the preferred language on the first Customer in the list of selected Customers determines the language of the labels on the report for the entire run. If the report needs to be run for Customers with differing preferred languages, enter separate Customer Classifications and run the report by Customer Classification.
- Pricing – Set the price level to default for this Customer at the Agvance Planning, Blending, and Accounting programs. These price level headings are set at Setup / Inventory Departments on the Price Levels tab.
- Dept. Overrides – Optionally select to set up price level defaults for this Customer based on Inventory Departments.
- Salesperson – Optionally assign this Customer a specific salesperson. Choose the arrow to select from the list of sales staff set up at the Setup / Sales Staff window.
- Sales. Override – Selecting Sales. Overrides opens the Department Salesperson Overrides window listing all departments with the Salesperson selected in the Salesperson field defaulted for every department. An alternate Salesperson can be selected for each department from the drop-down. For more information on multiple salespeople in Agvance, see here.
- Map – Selecting this allows viewing a map of the Customer address. The Latitude and Longitude boxes are populated once the address is geocoded for the map to display.
Note: The Agvance User must have Auto Geocode Address on Save of Customer checked on the User Profile in order for this button to be enabled. - Attachments – Files may optionally be attached to a Customer file.
- Classifications – Select this option to select one or more classifications for the Customer. Once established, these classifications are useful as filtering or selection tools. For example, use them to generate sets of mailing labels to targeted price lists. Classifications are set up at Setup / Company Preferences on the Customer tab.
- Attributes – Select this to choose Attributes for the Customer. Attributes are set up at Setup / Company Preferences on the Customer tab.
- Active Patron – Check if this Customer is an active Patron for the Patronage module.
Note: Active Patron, Birth Date, and SSN/Tax ID must be filled out for the Customer to receive patronage. - Birth Date – Enter the Customer’s birthday. This is a required field if the Customer is a patron.
- SSN/Tax ID – Optionally enter the social security number or federal ID number of this Customer. Customers with patronage activity must have a valid number in this field. Enter numbers with dashes. This is a required field if the Customer is a Patron.
- Corporation – This checkbox is only available if the State is set to a Canadian province. When checked, there will be no values in Boxes 24 and 25 on the T5 form.
- Customer ID Cross Reference – There are four optional inputs that may help identify this Customer to other computer systems or numbering schemes. The headings for these miscellaneous inputs are set at Setup / Company Preferences on the Customer tab.
- Link Agrian Grower – When linking Customers between Agrian and Agvance, enter the Agrian ID here. The Agrian Grower Permit # is available for reference on the Select Agrian Grower window.
- Refresh – Selecting this option refreshes the Customer’s state permit information through the Agrian webservice.
- Federal Permits – This feature allows the Customer's Federal Permit numbers to be specified along with the permit number expiration date. The permit numbers print on the Invoice document when restricted products are sold.
Note: Be sure to remove any spaces at the beginning of a Customer's federal permit to ensure Delivery Tickets and Invoices save as expected. - Arrow Icons – Located in the lower left corner of the screen, these allow quick navigation through Customer records when viewing or editing information. The arrows on either end jump to the first or last record in the group.
- Influences – Influences link this Customer to other Customers by Business Influence Types established under the Setup menu. In the CRM module, the Business Influence may be selected to be able to consolidate information based on the Business Influences. For more on Business Influence setup, see here.
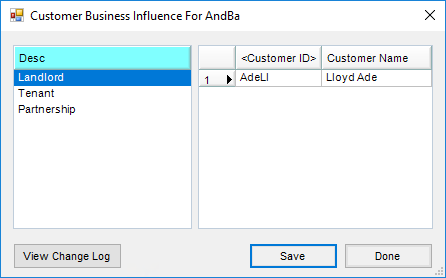
- View Change Log – This log lists any changes to the Customer business influences, including the type, date and time of the change, whether it was added or deleted, as well as the user ID who made the change.
- Tech Lic #s – This allows adding or deleting a technology license number for the Customer. This feature specifies the technology group or groups associated with the license number. The license number optionally prints on customer documents. For Technology Groups marked as Veterinary Feed Directives, entering an Effective Date and Expiration Date is required.
- State Permits – This optional feature is provided for those states (such as California) that require a valid permit number for the sale of specific state restricted products. This feature allows specifying the products associated with a given permit number and enter that permit number's expiration date. The permit numbers print on the Invoice document when these products are sold.
- Contacts – Optionally add addresses and email information for various people associated with the Customer. Authorized Agents for the Customer account and relationship to the account may also be established here. Information typed in the Contact Type or Relationship columns is available to select later.
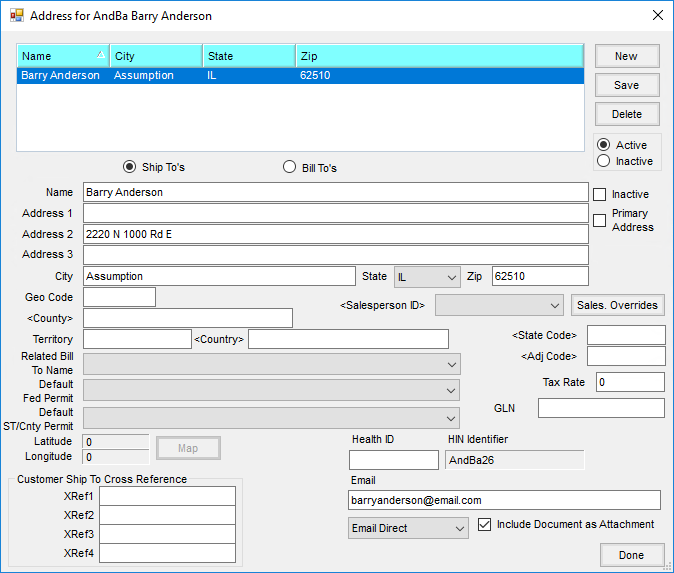
Note: Enter the Customer’s primary email address in the first row as future enhancements may use that address for special functions. - Addresses – This area allows adding multiple Ship To and/or Bill To addresses for the Customer. The Name line is typically used for the name of the individual or company being billed or the shipping location. In addition to the address, city, state, and zip of the Bill To/Ship To, each of these addresses may be assigned its own Salesperson designation and sales tax rate. If there are Customers who may be charged multiple tax rates because their Fields are in more than one county, set up additional Ship To addresses for each county with a distinct tax rate. The Agvance User must have Auto Geocode Address on Save of Customer and Auto Geocode Address on Save of Ship To checked on the User Profile in order for the Map button to be enabled.
Note: The Sales Tax Codes/Rates are informational only when entered on the Bill To address. If entered on a Ship To address, they can be defaulted on Invoices when the Use Tax rate from Customer and Ship To option is selected on the Invoice tab at Accounting / Setup / Location Preferences.
- A single Email Address can be added. If utilizing email capabilities in Agvance, indicate how to handle the email - Email Staged or Email Direct. When the full Mail Host information and the API Database ID are populated and an email is entered on a Ship To selected for an Invoice, the email will be included in the list of those receiving the email of this transaction. This allows Growers who have individuals responsible at each Ship To for billing to have separate setups and not have to include all of their billing managers on every Invoice being sent to the Grower.
- Selecting Sales. Overrides opens the Department Salesperson Overrides window listing all departments with the Salesperson selected in the Salesperson ID field defaulted for every department. An alternate Salesperson can be selected for each department from the drop-down. For more information on multiple salespeople in Agvance, see here.
- After being added to a Customer file, Bill To addresses may be used on a Delivery Ticket, Blend Ticket, or Invoice. Ship To addresses may be selected under the Additional Info option when adding a Blend Ticket, or on the Additional Info tab when adding a Delivery Ticket, or Invoice. Ship To addresses only print on the Invoice or Delivery Ticket if the Bill To/Ship To style is selected for those documents in the Setup / Location Preferences area of the Accounting module.
- A single Email Address can be added. If utilizing email capabilities in Agvance, indicate how to handle the email - Email Staged or Email Direct. When the full Mail Host information and the API Database ID are populated and an email is entered on a Ship To selected for an Invoice, the email will be included in the list of those receiving the email of this transaction. This allows Growers who have individuals responsible at each Ship To for billing to have separate setups and not have to include all of their billing managers on every Invoice being sent to the Grower.


Monthly Balances
The left side of this screen displays the Customer's current balances. The right side shows archived balances.

- Total Regular, Total Prepay, Unapplied Cash, and Budget Balances – These numbers are maintained as each A/R transaction is posted. Regular, Prepay, and Unapplied Cash balances may be printed by running the Customer Current Balance report. The Budget balance comes from the Energy module.
Note: Although Total Prepay and Unapplied Cash represent credits on the Customer account, they display as positive numbers. - Aging Balances – The lower left portion of the screen displays open item balances calculated by scanning unpaid Invoices. The total of this section should equal the Total Regular balance displayed above.
- Archived Balances – The right portion of the screen represents archived numbers. The Beginning Year number is saved at the Capture Online Balance function for new users or as the fiscal year is ended and the new year begins. The monthly figures are saved as the fiscal months are ended. These archived numbers are used for the Balance Forward statements.
Credit
This section is optional but is invoked on any Customer that has a Date Opened set. In that case, a Customer's credit is checked upon entering and exiting the Invoice, Delivery Ticket, and Blend Ticket screens. Existing charges as well as pending sales (loaded Blend and Delivery Tickets) are checked. As the sold/pending value approaches the percent of their credit limit (indicated at Setup / Preferences / A/R), the warning appears when processing transactions. In addition, there is a Credit Status report option available at Reports / Accounts Receivable / A/R Status / Customer Balances.

- Date Opened – Entering a date in this area indicates that credit checking should be done for this Customer based on the Credit Limit established. When an Invoice, Delivery Ticket, or Blend Ticket is entered and the selected Customer has a Date Opened set on the file, the credit is verified upon the selection of that Customer. If the Customer has met or exceeded the credit limit, a message displays.
- Last Financial Stmt – Note the last time this Customer provided financial statements.
- Credit Status – Select from the credit statuses set up at Hub / Setup / Credit Statuses. Hold keeps this Customer from receiving a charge on account without a special override password obtained by the owner/manager of the plant from SSI.
- Last Credit Review – Enter the date of the last review.
- Finance Charge % – There are three options that may be chosen here. If there is a zero, the program uses the default rate set as Finance Charges are run. If the number entered is >0 and ≤100, then this number overrides the percentage at the Finance Charge screen for this Customer. A 999 causes this Customer to be skipped when assessing Finance Charges.
- Never Send Collection Letter – This option allows a Customer to be excluded when processing collection letters. This might be used when notification has been received of a Customer filing bankruptcy and no collection letters are needed on the account.
- Days To Pay Since Invoice Date or Since Due Date – Selecting Calculate causes the average age of the Invoices in the Customer’s payment history to display.
- Credit Limit – The program displays a warning at the Blend Ticket, Delivery Ticket, and Invoice screens if the transaction would put the Customer over the credit limit.
- Available Credit – Displays the dollar amount left on a Customer’s credit balance. This would be the Credit Limit - Customer’s Regular Balance - Value of any Loaded Delivery or Blend Tickets (valued at cost). For more information on this calculation, see here.
- Months Over Limit This Year – This counter is updated when the credit limit is exceeded at any month end. It is reset to zero at year end.
- Months Over Limit Last Year – This is replaced at year end with the number of months from this year.
- High EOM Balance This Year – Set only at month end, this number reflects the highest balance at a month end for the year.
- High EOM Balance Last Year – At year end, the High EOM Balance This Year figure is transferred to this position.
- PO Required – With this option selected, an Invoice cannot be saved for this Customer without a PO entered on the Additional Info tab.
- Notes – Any credit notes may be entered here. These can optionally print on the Credit Status report.
- Credit Line – This may optionally be selected from the credit lines established at Setup / A/R / Credit Line.
- Credit Line Amount – The amount of a credit line from a bank or credit service may be entered.
- Credit Actions – This allows entries to be made in a Tickler File type area that can be pulled up as reminders to contact the Customer at a specified date. This could be used not only for collection calls, but could even be used as a reminder to call the Customer to request current financial statements if financing or to file a UCC1.
Miscellaneous Info
This screen holds a variety of optional Customer settings.

Some default settings can be entered that can help at billing.
- Sales Taxable – Indicate whether this Customer is taxable or not. If this Customer is ever taxable, select this option. If the Customer is marked as sales taxable and the Product that this Customer buys is also marked as a sales taxable Product, the sales tax defaults in at invoicing.
- Sales Tax Rate – If this Customer is to receive a tax rate other than the default rate set at the Location level, enter the tax rate here. This rate is used only if the Use Tax rate from Customer and Ship to option is selected at Setup / Location Preferences.
- State Code/Adj Code – If the optional state tax and/or adjustment tax codes are being used, these may be set for the individual Customer to have the tax automatically calculated on the Invoices at the rate of these codes.
- Tax Exemption Reason – If the Customer is not sales taxable, choose from one of the reasons entered at Accounting / Setup / A/R / Sales Tax Exemptions. These reasons are also available to select at invoicing by right-clicking in the Tax column for each line item that is tax exempt.
Note: At the time an Invoice is generated, if either the Customer or the Product billed is set to No for taxes, there will be no sales tax automatically calculated. If both the Customer and the Product are set to be sales taxable, then sales tax is automatically calculated. These automatic calculations may be manually overridden as necessary. - Expiration Date – The expiration date of the tax exemption may be entered in this area.
- Tax Exempt ID – Enter this Customer's tax exempt ID number.
- Default Terms – This setting overrides any Default Terms set at Setup / Location Preferences. If the Default Terms selection is set to None at the Customer level, then the setting at the Location Preference screen takes precedence.
- Extra Charges – After selecting this, double-click the <Extra Charge ID> heading and choose the extra charges that relate to this particular Customer and select Done. When invoicing or booking, the extra charges are brought into the Invoice or Booking if the Extra Charge exists on the Customer, Product, and Location.
- Bank Accounts – This is for future development. Any bank account information entered is informational only.
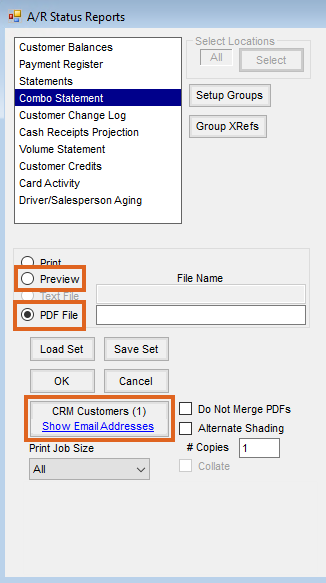
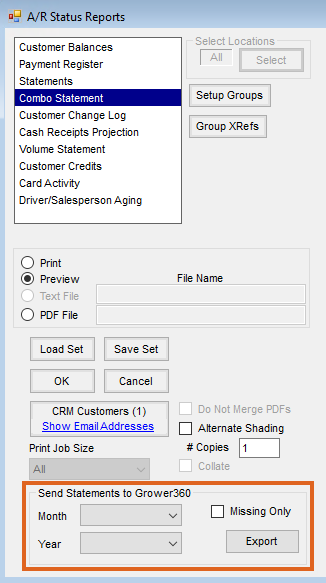
- Print Statement – Set the default to Yes to always print a statement, No to never print a statement, or If 30 days Past Due to print a statement only when this Customer's Statement is 30 days past due.
- Choosing No or If 30 days Past Due options both apply not only to printing but also previewing Statements, creating a PDF file, using the CRM Customers button (for emailing), or sending Statements to Grower360.
- API Database ID NOT present at Hub / Setup / Company Preferences but using CRM:
- API Database ID present:
- API Database ID NOT present at Hub / Setup / Company Preferences but using CRM:
- Choosing No or If 30 days Past Due options both apply not only to printing but also previewing Statements, creating a PDF file, using the CRM Customers button (for emailing), or sending Statements to Grower360.
- Print Budget Statement – This controls whether or not the Customer gets a printed statement from the Energy Budget Billing option.
- Health ID – Optionally enter the Health Industry Number for animal health Customers.
- Account Information Grid – Store JDF Multi-Use card information if using the JDF Multi-Use add-on.
- Company Name to Print on Form 1099 – If the name to include in the 1099 file is different than the Customer’s name on the file, enter it in this area. Leaving this area blank pulls the Customer name from the Profile tab.
- Print $ per acre on Invoice – Select to print the Price per Acre found on the Additional Info tab of the Invoice on the Invoice document.
- Payment to ACH Account Information – For Customers who pay via ACH payments, enter their banking information in this area.
- Name on Acct – This is specific to NMI and must be populated in order for NMI ACH to process.
- ACH Routing # – Enter the routing number for the Customer’s bank.
- Bank Account # – Key in the account number for the account from where the payment will be drawn.
- Account Type – Choose from Checking or Savings to notify the bank the type of account from where the payment will be drawn.
- ACH Type – PPD is the default, but CCD or CTX can also be selected. The type selected here will be used in the AR ACH file when using the Standard or Royal Bank of Canada ACH file types.


Activity
This screen displays invoicing and payment activity for the Customer. Invoices and Payments can be voided or edited from this screen. Choose List to display the activity in either section. By highlighting any entry, limited edits or voiding that entry (if it occurred in the current fiscal month) may be done.

- Include Additional Dataset – Selecting a dataset in this area causes the Invoices and Payments from the selected dataset to display in the list.
- List – Select to display the Customer Invoices or Payments.
- Print – Choose to preview a report that may be printed which shows a list of Customer Invoices.
- YTD Sales – Selecting will display the sum of the Customer’s sales for the entire fiscal year.
- Show Open/Show Paid – Select the status of the Invoices to be listed.
CRM
General Tab

- Customer Relationships – Add any members of a family/work relationship with the Customer.
- Significant Dates – Add dates and a description of those dates here. This could be used to record important Customer dates such as anniversaries, birthdays, etc.
- Prospect – Check this option to designate a Customer as a Prospect.
Business Details Tab

- Additional Details – This grid allows entering and tracking the types of work the Customer is involved in and to what extent. Double-click <Value> to add a row. For example, if a Customer had 1000 acres of field corn planted, then the value = 1000, category = Corn, subcategory = Field Corn, description = Mr. Smith planted 1000 acres of field corn in the north field.
Document Auto Delivery Tab

- Notifications – Double-click on <Doc Type> to select the type of document to send, how to send, and the email address to use for sending the document. For example, choose to send a Booking directly through email to the Customer. Check Include Document As Attachment to include transactions as PDFs rather than only a link.
Note: The Include Document As Attachment option is currently only available for Invoices, A/R Statements, and Budget Billing Statements.
Grain Information

- Grain Tax Exempt – Grain Customers may be marked as exempt from grain assessments. Customers marked as Grain Tax Exempt will not have grain taxes/assessments taken off of checks.
- 1099 Amount
- 1099 Type – If the Customer is to receive an interest 1099 for patronage, select Interest as the 1099 type.
- 1099 Amt Paid To Date – The amount of the interest paid through the patronage module displays in this area.
- Pay to ACH Account Information
- ACH Routing # – Used when paying the Customer by direct deposit, enter the Customer’s bank routing number.
- Bank Account # – For direct deposit grain payments, enter the Customer’s bank account number.
- Account Type – Define if the account being used for direct deposit is a checking or a savings account.
- Condo / Leased Storage
- Customer Leased Units – The number of units a Customer has for condo/leased storage displays here.
- Customer Associate Grower – If sharing another Customer’s leased storage, select the Customer where the units are stored.
- MN Lien Holder ID – If applicable, enter the Minnesota Lien Holder ID in this area. This number is used when grain settlement checks are written as a comparison against liens on file with the Minnesota Secretary of State.
- Scale Interface Non-Contract DPR Override – Set the Non-Contract DPR to be used when getting a contract overfill.
Note: Assembly overrides are checked first, then Customer, and finally the company global setting. - Authorized to use Grain Bank – Include the Customer names who are authorized to use from this Customer’s grain bank account.
