Overview
View a listing of AP Payments from Agvance data. Payments displayed will adhere to the Vendor Restrictions from Agvance. In Agvance SKY Admin, the Vendor toggle can be turned on or off for each User to allow or deny access to Agvance SKY Vendor.
The AP Payments grid displays Vendor Payments with the option to search and filter to find specific Payments.
Options are available to Reprint or Void at the far-right of the grid. Select the Filter button to filter by Vendor Status, Payment Date, Payment Number, and/or Status. After filters have been selected, choose Apply Filters.
Selecting the Vendor Name opens that Vendor's profile as view-only information.

Select a Payment # in the grid to view additional Payment details. The AP Bill # link opens that Bill in a new tab. Selecting the Vendor Name opens that Vendor's profile as view-only information. The Search field can be used to filter the AP Bills listed.

Add an AP Payment
Adding AP Payments is available for those with Add/Edit AP Payments turned on in Agvance SKY Admin.
AP Payments can be added in Agvance SKY Vendor using the process below.
Note: Currently, PrintBoss is not available for AP Payments. Right now, the payment file is sent to a PDF and can be sent to a printer from there.
Note: It is very important to allow popups for the page to ensure PDF files are able to load/open properly.
- Select the + button to add an A/P Payment.
- Choose the appropriate Location from the drop-down then indicate the Payment Method. The method selected here determines the Vendors that display. Optionally select a Vendor from the drop-down to only display bills for that Vendor.
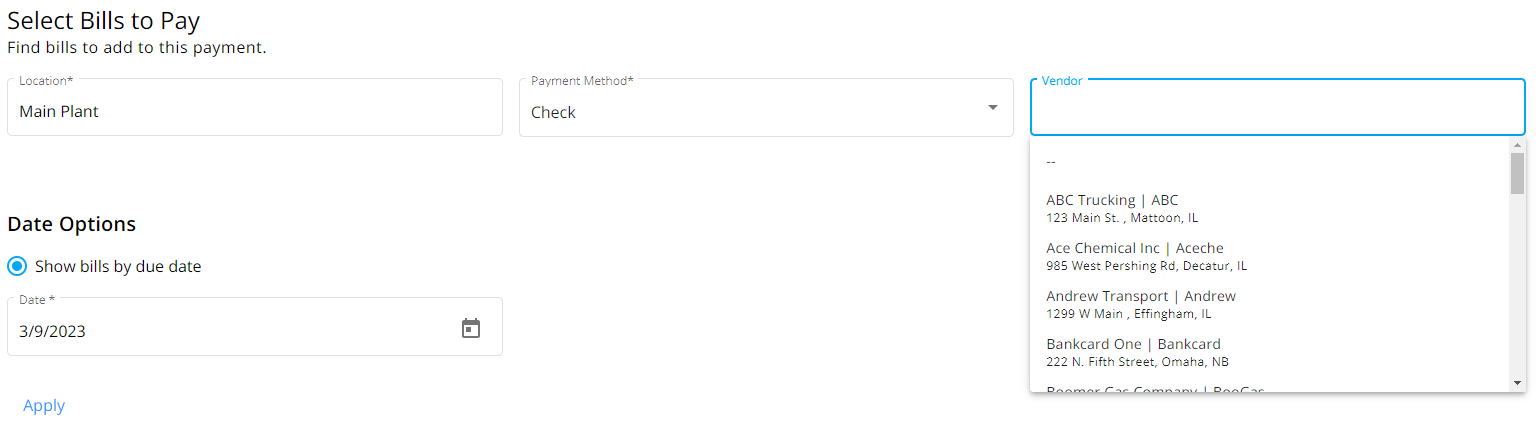
- Select the due by Date and choose Apply. Today's date defaults but can be changed.
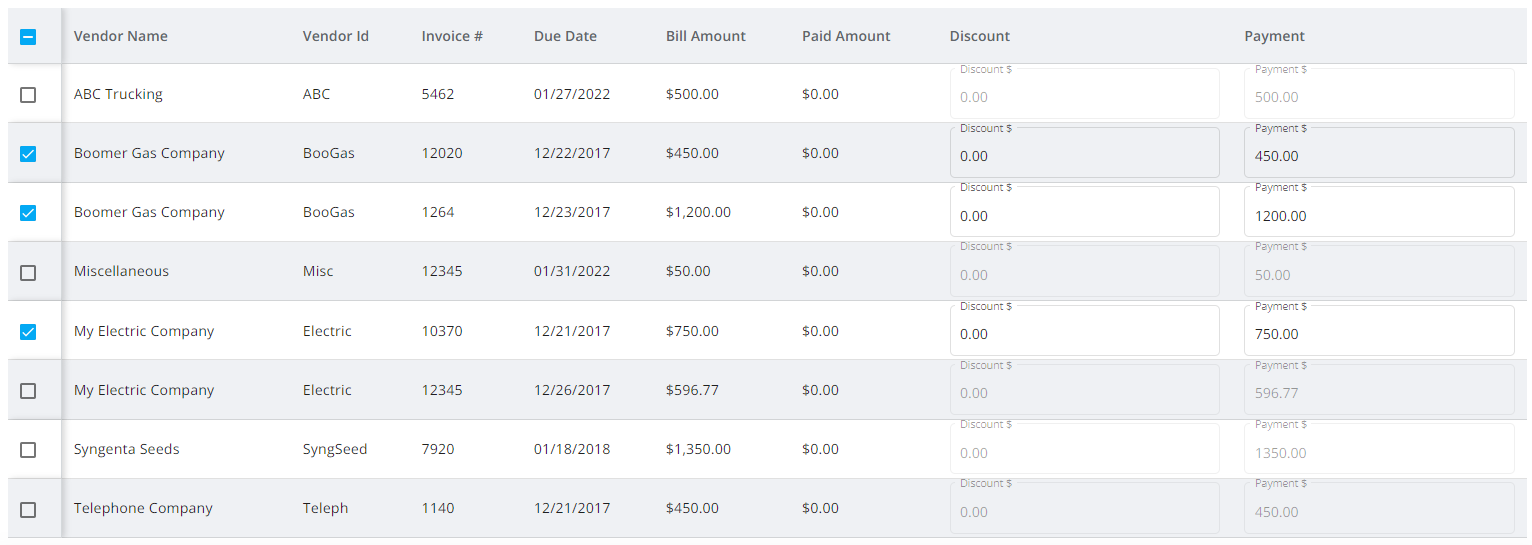
- Choose the checkbox(es) for the Bill(s) to pay. All Bills can be selected by choosing the checkbox in the header row. Once Bills are selected, the Discount and/or Payment amounts can be edited.
- In the Payment Details section, indicate the Check Date. Today's date is the default but can be changed. If the date is changed, discount and payment amounts will be updated accordingly. The Starting Check # also defaults as the next available check number but can be altered. The Checking Account defaults based on the Location selected, but an alternate checking account can be chosen if applicable. The checking account name and Balance are provided.

- Select the appropriate Printing Options.
- With ACH selected in Step 2:
- Choose Print as Check to print the payment to a PDF file and print a check for this vendor. Email ACH Payment Advice to Vendors is available when the One report per vendor for payment advice option selected in Agvance Windows at Accounting / Setup / Preferences on the A/P tab. Emails will be sent to Vendors with information populated in the Pay to ACH Account Information section of the 1099 / Payment Info tab of the Vendor profile.
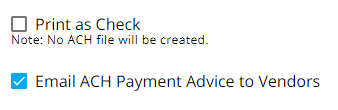
- Choose Print as Check to print the payment to a PDF file and print a check for this vendor. Email ACH Payment Advice to Vendors is available when the One report per vendor for payment advice option selected in Agvance Windows at Accounting / Setup / Preferences on the A/P tab. Emails will be sent to Vendors with information populated in the Pay to ACH Account Information section of the 1099 / Payment Info tab of the Vendor profile.
- With EFT selected in Step 2:
- Memo Checks (print) prints to a PDF file which can then be sent to a printer. Memo Checks (no printing) posts the payment without sending the Memo Checks to a PDF file. Select Print as Check to send the checks to a PDF to then be sent to a printer.
- Memo Checks (print) prints to a PDF file which can then be sent to a printer. Memo Checks (no printing) posts the payment without sending the Memo Checks to a PDF file. Select Print as Check to send the checks to a PDF to then be sent to a printer.
- With Check selected in Step 2:
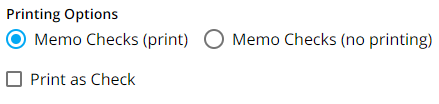
- Checks (print) and Memo Checks (print) print the checks to a PDF file which can then be sent to a printer. Memo Checks (no printing) posts the payments as memo checks and does not print the memo checks to a PDF file.
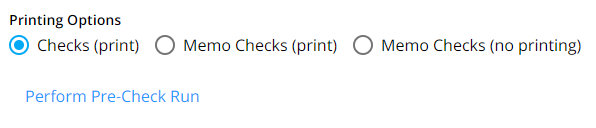
- Checks (print) and Memo Checks (print) print the checks to a PDF file which can then be sent to a printer. Memo Checks (no printing) posts the payments as memo checks and does not print the memo checks to a PDF file.
- With ACH selected in Step 2:
- Optionally select Perform Pre-Check Run and review the PDF that opens in a new tab.
- Select Post & Start New to post the payment and make another or Post Payment to post the payment and return to the AP Payments screen.


