- Set up Agvance to work with the Vertical import at Hub / Setup / Company. After entering the password to open this window (password can be obtained from SSI Support by a user on the password authorization list), press the Shift key on the keyboard and right-click on the <Background Color> label. In the Grain Interface Code field that appears, enter VSI. Select Save.

- Add customers in Vertical. They will import into Agvance.
- Add G/L accounts in Agvance. G/L account codes cannot be greater than seven characters. If Profit Centers are used, denote them with the last two characters of the G/L Account ID.
- Add other data files as needed (Vendors and Employees) in Agvance.
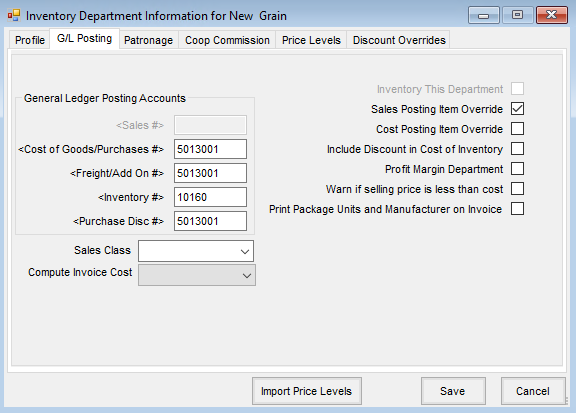
- Add a Grain Department with an ID called New. It is recommended to make the Grain department non-inventoried with the Sales Posting Item Override option checked. This allows the option to post each grain sale to its own sales account in the G/L.

- Add Products in the Grain department at File / Open / Products that represent various grain-related billing items. The Product ID must be identical to the Product Code used in Vertical. These codes are made up of the one character commodity code (B for beans for example) and one digit descriptor that makes it unique.
Note: In Vertical, these 2-character codes for each Commodity are found by going through the following menu choices: Day End/Upload Invoices to A/R, Maintain Product Codes. Press Enter on the Commodity to view the product codes.
- One inventory item will be needed in Agvance for each Commodity’s account shown above. The Agvance Product ID must be the Product Code shown above. In Agvance, these Products will have the appropriate G/L Account named as the Sales Account on the Sales Analysis tab.
- The following shows how the Agvance Products will be defined.


- In GrainTrac, be sure the correct purchase G/L accounts are defined for each commodity. To do this, go to Day End / GL Interface / Maintain Account Numbers. Fill out sales and purchase items that apply. If there are miscellaneous charges not listed, add them by pressing F8 and following the instructions on the pop up screen to add, edit, or delete some miscellaneous account numbers.
Note: If the Agvance G/L Account numbers have a Profit Center suffix separated from the root account number with a dash, slash, or period, that separator must be included with the account number in GrainTrac. For example, if the corn sales account numbers are 4100-01, 4100-02, 4100-03, etc., then at the Maintain Account Numbers screen in GrainTrac, enter 4100- so that the separator will be included in the export file and will match up with the Agvance account numbers. - In Agvance, there is an important step called Capture On-Line Balances that must be performed after all the account balances are set and before any transactions are either imported or entered directly into Agvance.


Transfer Process
It is recommended to transfer at least weekly to make the prove-out process more manageable. Best practice is exporting just after the Start a New Day function is complete.
- In GrainTrac, perform the Upload Invoices to AR function. This can be found at:
- Day End
- Upload Invoices to AR
- Choose #1 (Upload Invoices to AR)
- Input the date range of transactions to be exported. The file that is created is called ARTRNSFR.ASC and will be stored on the grain drive in a directory called \SSI. For example: G:\SSI\ARTRNSFR.ASC
Note: The program will not allow exporting the same range twice. There is an override to this. Call Vertical if this override is necessary.
- In GrainTrac, perform G/L Interface. This can be found at:
- Day End
- G/L Interface
- #3 "Print Report of Settlement JE"
- #2 "Create Settlement Journal Entries for SSI GL"
- Select a date range of un-posted G/L entries. The file that is created is called RWBSTRN6.DAT and will be stored on the grain drive in a directory called \SSI. For example: G:\SSI\RWBSTRN6.DAT
Note: The program will not allow exporting the same range twice. There is an override to this. Call Vertical if this override is necessary.
- In Agvance, import the data from the Accounting module.
- Back up the Agvance \avdata directory.
- Go to Transfers / Import / Vertical Ascii files.
Check both the journal entries and invoices and either type in the path or select the Ellipsis button to locate and select the transfer files created in Steps 1 and 2 above. Choose OK when ready to import.
Note: Be sure to do Step 3 for one date transfer before performing Steps 1 and 2 for the next transfer. Files in G:\SSI are overwritten during Steps 1 & 2.
- In Agvance, run a Sales Register for the range of Invoices transferred at Reports / Accounts Receivable / Sales.
- In Agvance, take payments for any sales where money has been received and mark the Invoices imported from Vertical as Paid.
