Designed to allow the transfer of Blend Ticket information to programs other than SSI’s Agvance modules, the file created is saved in the data folder, which is often named AVDATA, with the rest of the Agvance data. Optionally enter the full file path and Filename.
ASCII Transfers are found at Blending / Utilities.
Blend Plant Transfers
The Blend Plant Transfer utility allows a Location that does not have a blending facility to create Blend Tickets for a Customer and Field, and then export the ticket to a facility that will make and edit the blend. The facility physically making the blend sends the ticket back to the original Location where the ticket is imported back into the Customer and Field. Some setup is required to facilitate this process.
Note: Both companies must have the Agvance Blending module to use this feature.
Setup Procedure
- Facility A has the Customer and Field set up.
- Facility A has the Products from Facility B set up with the same Blend Factors or Attributes as Facility B.
- Facility A sets up a folder on the C drive and sends the files created from the Blending program to that folder.
- Facility A sets up a Product Set using Products from Facility B. On the Blender Interface tab, Blender Type should be set to SSI – Standard ASCII and the Data Storage Path directed to the folder created in step 3. The UNC naming convention is recommended for the path. For example: \\Computer\Drvc\Blending Transfer.

- Facility A sets up a Product Set using Products from Facility B. On the Blender Interface tab, Blender Type should be set to SSI – Standard ASCII and the Data Storage Path directed to the folder created in step 3. The UNC naming convention is recommended for the path. For example: \\Computer\Drvc\Blending Transfer.
- Facility B sets up Facility A as a Customer and creates a Field (usually an ALL field).
- Facility B sets up Products that match the Blend Factors or Attributes of those created at Facility A in Step 2.
- Facility B creates a folder on the C drive where the files from Facility A are placed.
Note: If the name of the folder created at Facility B is the same as the Customer ID assigned to Facility A, then the Customer ID defaults automatically at the import screen.

Creating a Blend Ticket to Transfer
- Create a Blend Ticket at Facility A using the Product Set made specifically for the blend plant transfer.
- Upon saving the ticket, the Print Blend Documents window has a Create Automated Blender File option. The Customer Name is included in the file unless the Suppress Customer Name in Export File option is selected. Marking the Create Automated Blender File box saves a file in the folder created in Step 3 of the setup procedure. This file contains a REQ extension.
- Facility A sends the REQ file to Facility B via email, FTP, or some other electronic means.
Importing the Ticket at the Blending Facility
- Facility B places the file received from Facility A in the folder created in Step 6 of the Setup Procedure section.
- Go to Utilities / ASCII Transfers / Blend Plant Transfers / Import. Choose the Import Directory (i.e. the folder created at Facility B). Browse to the folder by selecting the Ellipsis.
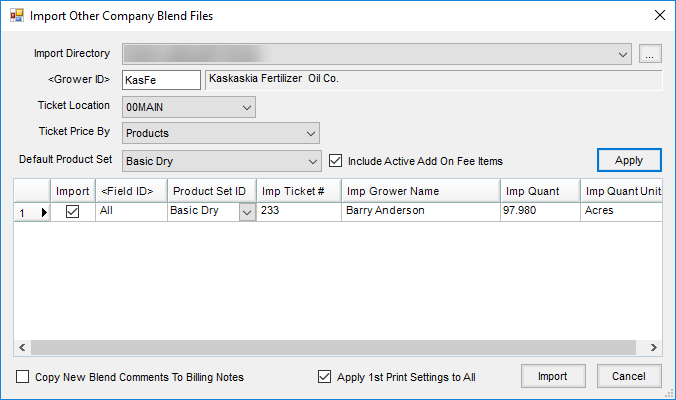
- The Ticket Location, Ticket Price By, and Default Product Set are options to determine how the ticket is handled at Facility B but do not affect the original Blend Ticket created by Facility A. Facility B chooses the appropriate options from the drop-down selections and chooses Apply.
- Check the box in the Import column for tickets that are ready to blend. The Ticket Number, Customer, and Acres of the original Blend Ticket appear on the new Blend Ticket created for Facility B.
- Choose Import and the new Blend Ticket is created for Facility B. The new Blend Ticket displays on the screen, followed by the Print Blend Documents window.
- After printing the Blend Ticket, Facility B mixes the blend, edits the ticket if necessary, and marks the ticket as Loaded.
Note: When the Apply 1st Print Settings to All option is marked, all documents set to import will retain the same print settings as specified on the first ticket.
Exporting the Ticket from the Blending Facility to the Original Facility
- Facility B goes to Utilities / ASCII Transfers / Blend Plant Transfers / Export to export the ticket. At the Export Other Company Blend Files window, select the path to the folder created in Step 6 of the Setup Procedure. Input the Grower ID if it does not default in. Select Export. A file with an ACT extension is created in the export directory. Facility B sends this file back to Facility A.

- When Facility A receives the file and saves it in the original folder, the process is completed by using Read Blender, Capture Blender, or Import Automated Blender Done Files.
Export Blend Tickets
This utility exports ASCII files to be imported into other software programs. For more information, call SSI.
