State Sales Tax
Sales tax is calculated per line item according to the tax rates/codes that apply to that line. Each line is calculated separately and then those line item sales tax totals are added together for the total sales tax amount that is displayed on the Invoice.
A default Sales Tax Multiplier can be established for each Location at Accounting / Setup / Locations on the Preferences tab. At invoicing, the Tax column on any line item that is taxable can be manually selected and it will calculate at the default rate set on the Preferences tab.
Note: If sales tax needs are not addressed by Agvance's standard functions, please contact SSI Support for assistance configuring alternative processes.
Automatically Calculate Sales Tax
Two things must be in place for sales tax to automatically calculate – the Customer and the Product must both be marked Sales Taxable. Therefore, if a Customer or Product is ever sales taxable, then mark them as such on the Customer/Product file. Line items may be deselected manually at the Invoice screen if necessary.

Agvance’s standard sales tax options can be controlled per line item on the Invoice.
- Check the Sales Taxable option at File / Open / Products on the Sales Activity tab.
- If the Location Preference to Use Tax rate from Customer and Ship To is selected (found at Setup / Location Preferences), the sales taxable state and a special rate can be set on the Customer file by selecting the Sales Taxable option at File / Open / Customers on the Miscellaneous Info tab, or by selecting Addresses found at the bottom of the Customer file. If a special Sales Tax Rate is set at this screen, this rate overrides the Location’s default rate.
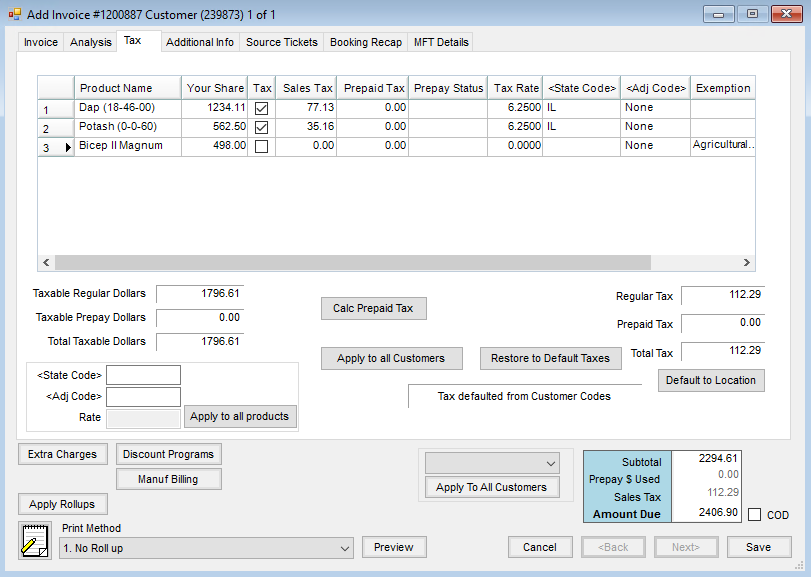
- If tax codes exist in the data, the tax calculates based on those codes. To change the sales tax calculated, at the Invoice screen, select the Tax tab and type in a different amount in the Sales Tax column of the grid. If no State/Adjustment Codes exist, to change the tax rate and have the computer recalculate automatically, enter the tax rate in the Rate field in the lower left corner and then choose Apply to all products. To edit the tax on the individual lines, the tax rate may be typed on each line of the Tax tab.
If a Customer is tax exempt on a Product that is typically taxable, the Exemption reason may be selected by line item on the Tax tab or on the Invoice tab by right-clicking the Tax option at the invoicing screen. This allows a selection from the Tax Exempt Codes that have been entered at Setup / A/R / Sales Tax Exemptions.
A summary of the tax exempt sales prints on the Totals page of the Sales Register (Reports / A/R / Sales / Sales Register) and on the Sales Tax Summary report found at Reports / A/R / Sales / Sales Tax Summary.
Sales Tax Codes
Sales tax reporting needs can vary significantly for companies depending on the number of taxing entities they report to or the number of different sales tax rate percentages their product line requires. This option offers more flexibility and detail than the flat tax rate per Location option.
This optional area at Setup / A/R / Sales Tax Codes allows any state, county, and municipal taxes that might apply to charges in the market area to be defined.

Setting up State Codes
To set up a State Code, select Add below the State Codes area. This will add a line in the grid. The following information will need to be filled out:
- Tax ID – The Tax ID can be up to 15 characters and identifies the tax code. Add a state code for each state from which sales tax will be collected. It is recommended to add a None option for situations where only the Adjustment Code is applicable to the sale.
- Rate Adjustment – This is the percent of tax the State Code represents. If the sales tax rate is 6.875%, then the Rate Adjustment would be 6.875.
- Tax Cap – The Tax Cap is the maximum dollar amount of sales tax which can be collected per line item for the State Code. The Tax Cap column is optional.
Setting up Adjustment/Sub Codes
An Adjustment Code is an additional tax which can be added to the State Tax Codes on an Invoice. This tax can represent items such as city tax, county tax, transportation tax, public safety tax, and more. The Adjustment Code can be added to an Invoice that does not have a State Tax Code.
To set up an Adjustment Code, choose Add below the Adjustment Codes area. This will add a line in the grid. The following information will need to be populated:
- Tax ID – The Tax ID can be up to 15 characters and is the link to what the Adjustment Code represents. Add an Adjustment Code for each city, county, or other taxing body for which sales tax will be collected in addition to the State Tax Code. It is also recommended to add a None option to be used in cases where only the State Tax Code is applicable to the sale.
- Rate Adjustment – This is the percent of tax the Adjustment Code represents. If the tax rate is 0.5%, then the Rate Adjustment would be 0.5. Additional codes can be added under the Sub Codes column by selecting Setup. This would be done if the Adjustment Code is composed of more than one tax.
- Tax Cap – The Tax Cap is the maximum dollar amount of tax which can be collected per line item for the Adjustment Code. This field is optional.
- Sub Codes – If an Adjustment Code represents multiple rates, Sub Codes can be used to layer on the additional Tax Codes to an Invoice. For example, if an area has a city, county, and transportation tax in addition to the State Tax Code, a Sub Code could be set up under the Adjustment Code so all three of the taxes display on the Sales Tax Summary report.
- Sub Code – The Sub Code can be up to 15 characters and will be the link to what the Sub Code represents.
- Rate – This is the percent of tax the Sub Code Represents.
The following are examples of Sub Codes that represent the combination of taxes. The Hennepin-Tran is a combination of a county and transportation tax that can be added to the State Tax Code. The Henn-Mpls-Tran is a combination of a city, county, and transportation tax that can be added to the State Tax Code.

Setting up the Location
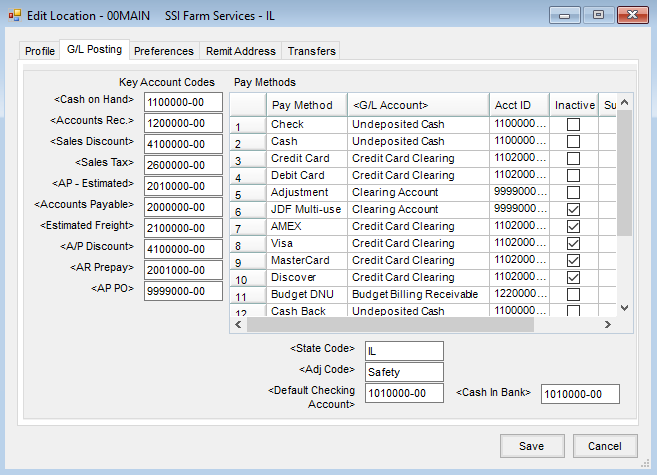
Once all of the State and Adjustment Codes are set up, select which State/Adjustment Codes to use for each Location. This is found at Accounting / Setup / Locations. Edit the desired location and choose the G/L Posting tab.
Select the default State and Adjustment Codes for each Location. If the Location does not have an additional tax to be collected, select the None Adjustment Code. This will need to be done for each Location.
Change Code on an Invoice
To change the Tax Rate or State/Adjustment Code, go to the Tax tab on the Invoice. Double click in the State and/or Adjustment Code columns to select the new codes to be charged to the Customer.
Changes made on the Tax tab apply only to the Customer on the split who is currently being viewed. To apply the changes to other Customers in the split, select Apply to All Customers.

Tax Code Adjustments
The optional Tax Code Adjustments allow State, County, Municipal, etc. tax codes to be defined and to have them accessible at the invoicing screen as needed.
Important: Once Tax Code Adjustment defaults are established at Accounting / Setup / Locations on the G/L Posting tab, they override any standard sales tax defaults in place.
Adjustment tax is calculated per line item according to the tax rates/codes that apply to that line.
Using Tax Code Adjustments
- Define the base taxes at Accounting / Setup / A/R / Sales Tax Codes. Enter any states in which sales might occur on the left and the various counties or local entities on the right. Sub Codes are available on the Adjustment Codes if the Adjustment Code is made up of multiple taxes. For instance, Rose County might have a 1% tax and Farmington, a city within Rose County, has a 0.75% tax. An entry could be made for Farmington for 1.75% with a Sub Code for the county and a Sub Code for the city tax.
- Tax Caps may also be defined on State Codes and/or Adjustment Codes. These are helpful if the taxing authority has a limit on the amount of tax applied to any single product. The entry into the Tax Cap field should be the maximum amount of tax that could be charged on the product. With this cap in place, the tax on the product will be the minimum of the calculated rate or the amount listed as the Tax Cap.

- Set the Tax Adjustment defaults for the State Code and Adj Code at Accounting / Setup / Locations on the G/L Posting tab. Double-click in each field and the corresponding setup list displays.
 Note: For Tax Adjustment Codes to be available for selection at invoicing, the default codes must be selected on the Location's G/L Posting tab.
 - At invoicing, to alter the sales tax rate that defaulted, go to the Tax tab. Each line item displays with its tax information. If the tax rate should be changed to a different amount on all lines, enter the rate in the Rate field in the lower left corner and choose Apply to all products. The amount may be edited by individual lines, or State and Adj Codes may be selected if those codes were previously set up. After all necessary changes have been made, select the Invoice tab to return to the regular invoicing screen.

Hierarchy/Rules
The following is the hierarchy for the sales tax rate used when invoicing and what general rules apply when using sales tax.
The sales tax calculated on Invoices is dependent on a number of factors. Because so many elements can influence the amount of tax charged on an Invoice, a hierarchy was established to control which component has precedence when more than one is present. This hierarchy changes when the Use Tax Rate from Customer and Ship To preference is selected at Accounting / Setup / Location Preferences on the Invoice tab.

Preference Turned On
- Tank Rent/Lease tax codes (found on the tank file in Energy), LP Tank Fuelware codes (found in the Setup Fuelware area under the Setup Taxes button), or Customer Ship To codes (found on the Customer file under the Addresses button) are three types of mutually exclusive codes, so Agvance will never apply more than one of these on a single Invoice. The code used on the Invoice depends on the function creating the Invoice.
- Customer tax codes are set up on the Customer's Miscellaneous Info tab. If more than one code is set on the Customer file, the rates should be added to determine the total rate.
- Location tax codes are set up on the G/L Preferences tab at Accounting / Setup / Locations. If more than one code is set up, the rates should be added to determine the total rate.
- The Ship To tax rate is set on the Customer file under the Addresses button. If this tax rate is used, no codes are captured on the Invoice.
- The Customer tax rate is set on the Customer's Miscellaneous Info tab. If this tax rate is used, no codes are captured on the Invoice.
- The Location tax rate is set on the Preferences tab at Accounting / Setup / Locations as the Sales Tax Multiplier. If this tax rate is used, no codes are captured on the Invoice.
Preference Turned Off
- Tank Rent/Lease tax codes or LP Tank Fuelware codes are mutually exclusive so Agvance will never apply more than one of these on a single Invoice. The code used on the Invoice depends on the function creating the Invoice.
- Location tax codes are set up on the G/L Preferences tab at Accounting / Setup / Locations. If more than one code is set up, the rates should be added to determine the total rate.
- The Location tax rate is set on the Preferences tab at Accounting / Setup / Locations as the Sales Tax Multiplier. If this tax rate is used, no codes are captured on the Invoice.
Other Rules Regarding Sales Tax
- If the Customer is marked Sales Taxable on the Miscellaneous Info tab in the Customer file and the Product is set as Sales Taxable on the Sales Activity tab in the Product file, the Product defaults as sales taxable on the Invoice.
- If the Customer or Product is not marked as Sales Taxable, the Product will not default as sales taxable at invoicing.
- Setting the Sales Tax Rate to 999 or blank on the Customer's Miscellaneous Info tab does not prevent sales tax from calculating. The Sales Tax Rate is used according to the rules of the hierarchy above.
