Plans are found under Agronomy in Agvance SKY Order and are displayed in a grid that operates much like an Excel spreadsheet. For more information on how the grid functions, see Using Grids in Agvance SKY.
For those with access to Agvance SKY Customer, selecting a Customer opens the corresponding Overview page.
Selecting a Plan Name opens the Plan as view-only with a button to Edit Order in the lower right if edits need made.

Note: Plans must be enabled in Agvance SKY Admin before they can be viewed in Agvance SKY Order.
Search for Plans and scroll to the right to access columns giving the ability to:
- Visible in G360 – Select the current label to show or hide the Plan in Grower360.
- Status – Select the current label to change to Offered or Approved.
- Convert to Blend – This imports the Plan into a Blend Ticket, retaining all the Plan properties. This column indicates if the Plan has been converted to a Blend. Select the Converted to label to see the Blend Tickets or Bookings converted from the Plan. Selecting the Ticket # navigates to that Blend/Booking in Order. To batch convert Plans to Blends, select individual or all Plans. Choose the Ellipsis on the search bar to Convert to Blend.

- Edit Plan – Edit multiple areas of the Plan.
- View PDF – Select to view a PDF copy of the Plan details in a new tab which can then optionally be downloaded or printed.
- Delete – Select to permanently remove the Plan. Once deleted, a Plan cannot be recovered.

To batch edit, check the desired Plans, choose the Ellipsis on the Search bar, then choose from the following bulk action items:
- Convert to Blend
- Change Approval Status
- Change Grower360 Visibility
Note: These columns can be reordered within the grid, placing them where they are most convenient as described in Using Grids in Agvance SKY.
A new Plan can be added by selecting the blue + Add Plan button in the lower right-hand corner. Use the navigation on the left to move to different sections of the Plan.
Plan
Location

- Indicate the Location from the drop-down.
- Optionally select a template from the Template drop-down. Some Product information will default into the Plan. If using a Template that is company-wide and has Products from a Location other than the Ticket Location, Agvance SKY Order will find the matching Product(s) for the Location where the Template is being applied using the Product ID and Inventory Department Category.
Scenario 1: All Products Have One Exact Match
- All Products on the Template have one exact match.
- No dialog will display, and the Products will be added to the Blend.
Scenario 2: No Matching Products
- A window will display indicating there are no matching Products.
- Close/cancel this dialog. The Template will be removed from the Blend (no Products will be added/removed).
Scenario 3: Multiple Matching Products
- A window will display giving the ability to choose the correct Inventory Department from where the Product should be pulled.
Scenario 4: Combination of Scenarios 1-3
- In this scenario, there are Products with no match and Products with multiple matches. Products with an exact match will be added to the Blend automatically and will not be included on the dialog. The Acknowledge and Continue checkbox must be selected before selecting Replace Products and will remove that Product from the order.


Field
- Choose + Add Field.
- Use the Search field to find a specific Field or scroll through the list. Up to 50 Fields can be added to a Plan. The Filters button to the far right of the Search bar can be used to narrow down the list of Fields.
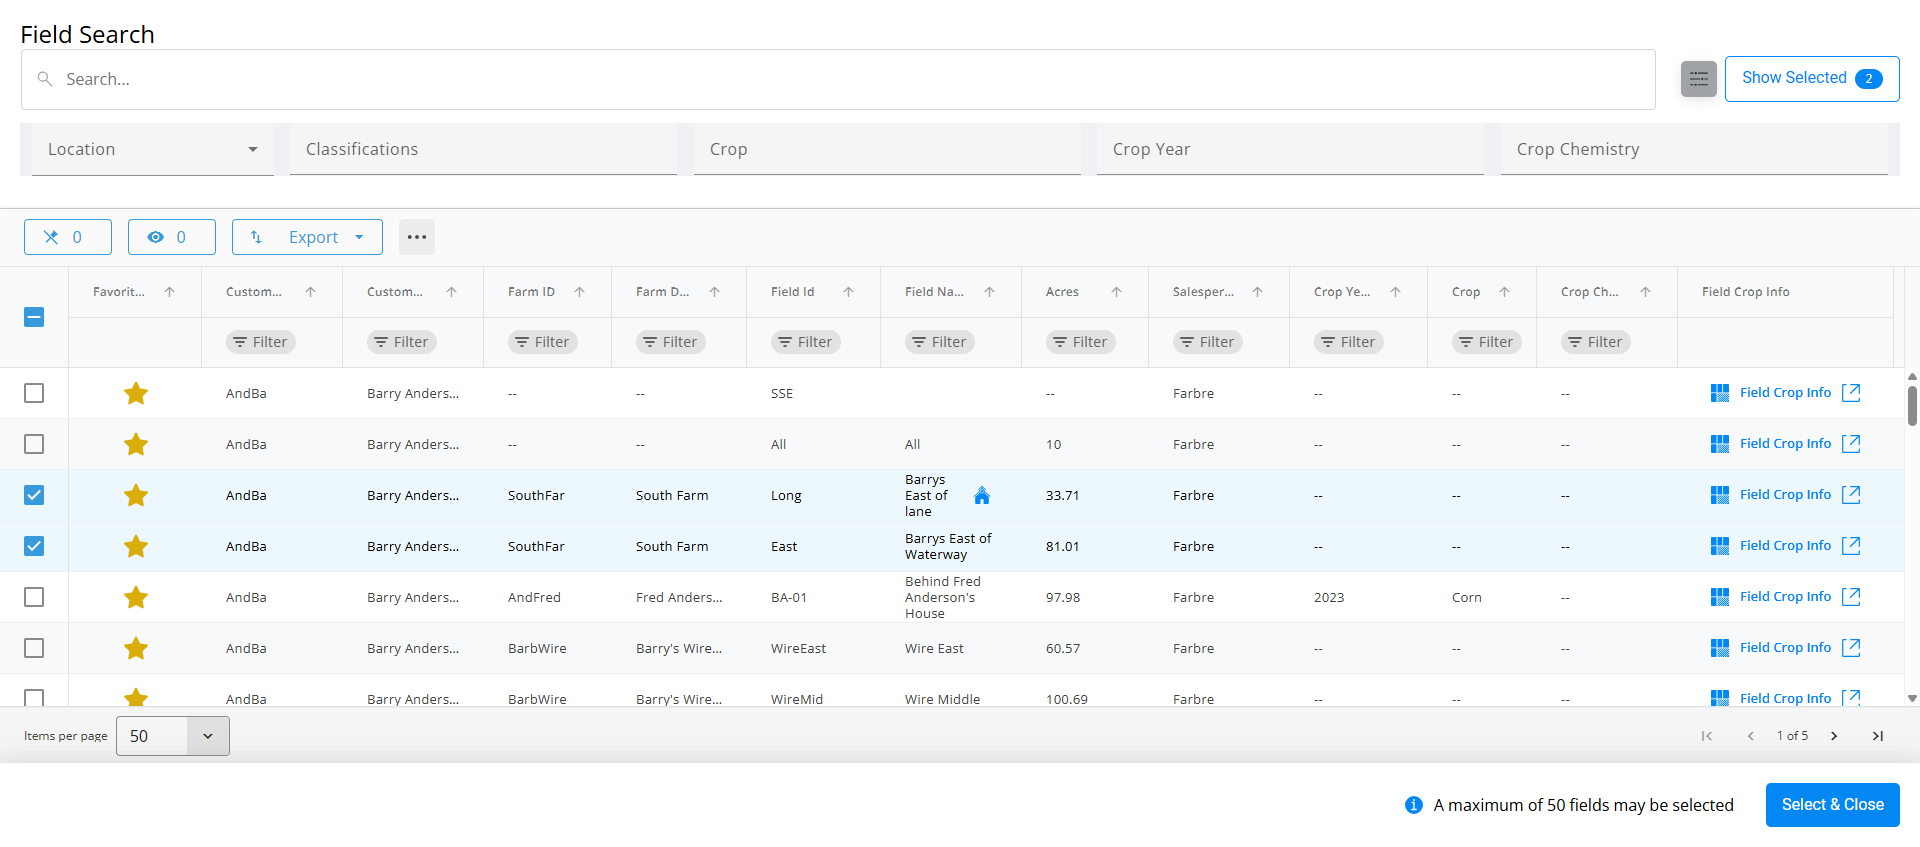
- The Show Selected button next to the Search bar is enabled after choosing the Field. The number indicates how many Fields are currently checked. Selecting the button filters the grid to show only the selected Field.
- Once the Field is selected, choose Select & Close.
Note: Choose Remove Field to remove the currently selected Field and choose another. - The Amount and Unit of Measure default but can be changed if needed.
- If more than one Customer exists on the Field, optionally update the Split %.
- For single Plan transactions only (not batch), a split Customer can be added by selecting + Add Split Customer. The Delete icon removes the Customer(s) from the transaction. The primary Customer cannot be removed.
Note: For those with access to Agvance SKY Customer, selecting a Customer opens the corresponding Overview page. - Additionally, a Ship To can be selected from the drop-down on the first Customer if applicable. Ship Tos must first be set up on the Customer's file.


Order Details

- Enter the Plan Name. If applicable, indicate the Plan is Approved and/or should Show In Grower360.
- The Salesperson defaults depending on the setting selected in Agvance SKY Admin under Order but can be adjusted. More information on this setting can be found here.
- The Ticket Date defaults as today's date but can be changed. Optionally indicate the Start and End Dates.
- Optionally enter brief Billing Comments that will be displayed to the Customer.
- Indicate the Product Set from the drop-down. Choosing Edit Product Set opens the Edit Product Set screen to make any needed changes. Select Update Product Set to save changes and return to the Plan. Changes made to the Product Set will be saved for the current order as well as future orders.
Note: If editing the Product Set after formulating by analysis in the Products section and the changes made will produce a different result, it will be necessary to select Formulate again. - Under the Price By drop-down, choose to price by Products, Blended Analysis, or Guaranteed Analysis.
- If available, enter the Registration #.
- The Crop, Crop Chemistry, and Placement drop-downs are all optional but can be helpful if this information is known.
- Additional options of Repacked, Mini Bulk, VRT, and Custom Applied, are available.
Products
Products can be added manually or via formulation.
Note: If an inactive Product has been added either manually or by formulating, the inactive Product name will display with a tooltip indicating the Product needs to be removed or the Product activated to save. If trying to save without removing the Product, a window will display requiring the Product to be activated or giving the option to go back and remove the Product. If multiple Products are inactive and not all should be activated, go back to the order, remove the Product that should not be activated, then choose Create Order again to view activate the needed Product(s).
Formulation
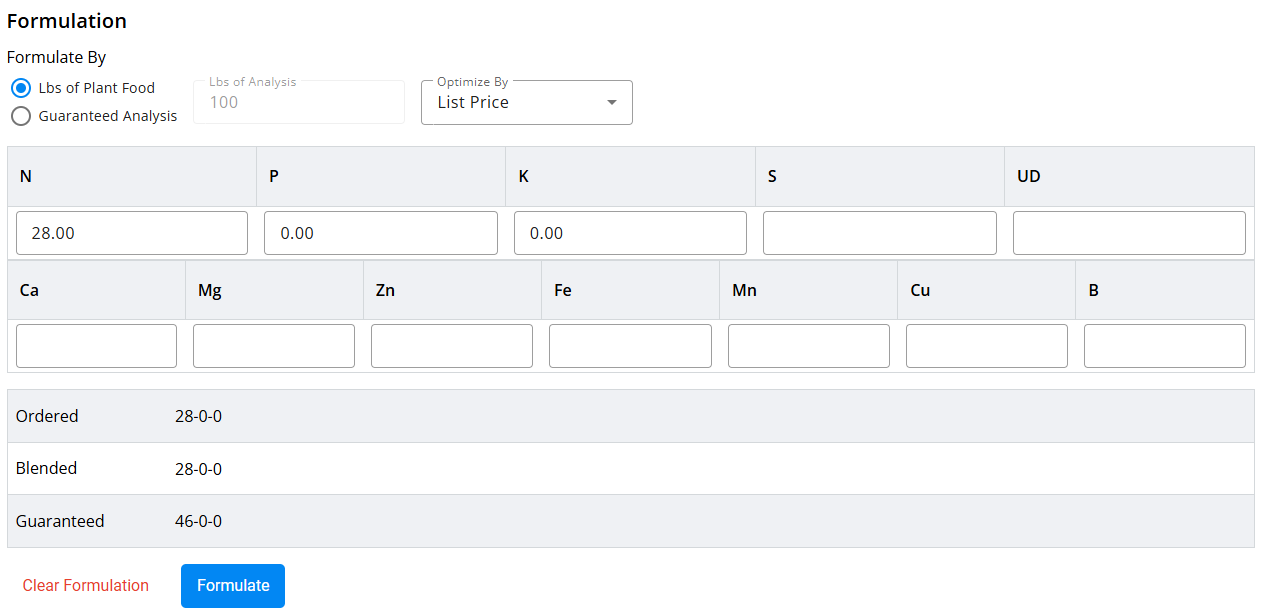
- Indicate if formulating by Lbs of Plant Food or Guaranteed Analysis. If choosing Guaranteed Analysis, enter the Lbs of Analysis.
- Select the appropriate Optimize By option from the drop-down.
- Enter requested nutrients in the Ordered area.
- Select Formulate then review the Calculated Analysis. To redo the formulation, select Clear Formulation and re-enter the correct values.
- Additional Products can be added by selecting + Add Product. See the Add Products Manually section below for more details.

- The Products display in a grid below.

Add Products Manually
- Select + Add Product.
- A grid of Products displays. Use the Search field to find the appropriate Product(s) or scroll through the list.

- The Filters button to the far right of the Search bar can be used to narrow down the list of Products. The Show Selected button displays only Products that have been checked for the Plan.
- In the Products section of the Sales Order, indicate the Quantity for each Product.
- Products can be reordered by selecting the grid of dots on the left and dragging to the appropriate position.
- Choose + Duplicate to add another line of that Product.
- The Delete icon can be selected to remove a Product line.

Product Grid

- Under the Calculate By column, choose Rate/Unit, Total Product, or Blended.
- Enter the Calculate By Amount for each Product then select Recalculate.
- The Exclude from Mix File option can be selected for products that should not be sent to the automated blender. If the VRT checkbox was selected in the Order Details section, the Mix Group can be edited to indicate what should and should not be blended together.
- If applicable, a Lot Number can be selected from the drop-down.
Note: Only existing Lot Numbers can be selected. - To add another line of the same Product, choose + Duplicate.
- The Delete icon can be selected to remove a Product line item.
- Review the totals below the Products grid.

- To recalculate the Plan accommodating for water, filler, or carriers, choose an Adjust By option which is based on the Product Set selected for the Plan. Enter the Amount then select Adjust to update the Plan. Use the Carrier checkbox in the grid to identify which Product is the carrier.


Pricing
Single Field
- A Payment Term can be selected for the Field from the drop-down and will flow through to the Invoice. Payment Terms must first be set up in Agvance Windows.
Note: Those with access to Agvance SKY Customer can select Price History to open Customer in a new tab and review the Product's previous Costs for that Customer.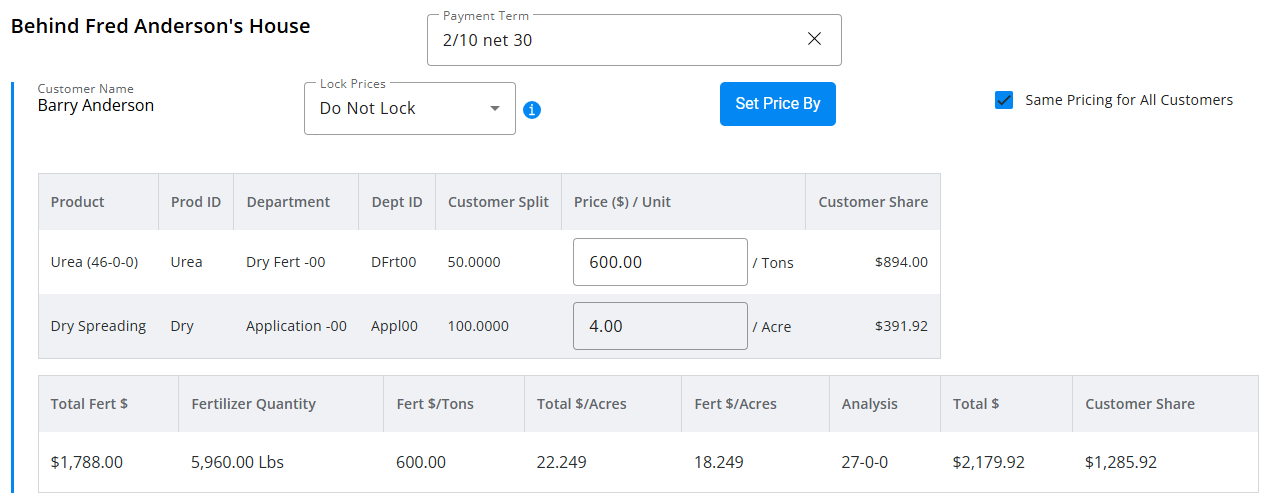
- For each Customer, choose the Lock Prices option (Offered, Analysis Offered, Quoted, Analysis Quoted, Do Not Lock).
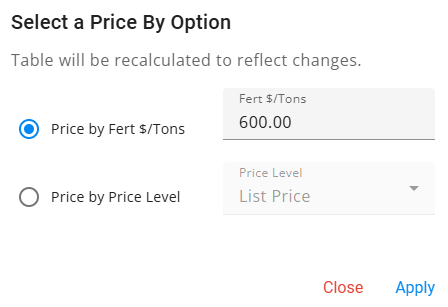
Note: Quoting a Plan will carry the pricing from the Plan to the Invoice. - Select Set Price By and choose to Price by Fert$/Tons or Price by Price Level. Depending on which option chosen, enter the Fert$/Tons or choose the Price Level from the drop-down, then select Apply.
- Under Price ($)/Unit, select the price from the drop-down. Alternatively, enter a custom price then choose + Add.


Multiple Fields
- A message is displayed in the Pricing section stating Pricing for each field will be handled in the next step. Choose Save and Add Pricing.

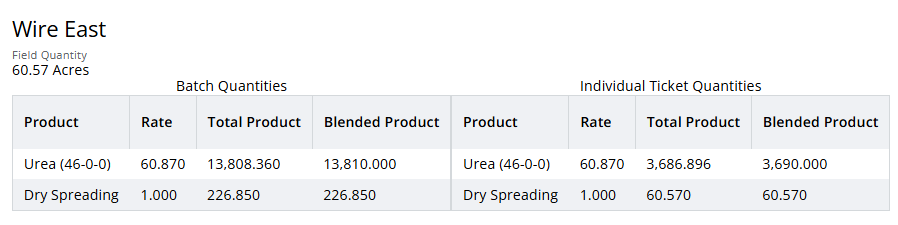
- The first Field displays with Batch and Individual Ticket Quantities available for review.
- The first Customer on the Field is listed below the Batch and Individual Ticket Quantities. Here, the Fert$/Tons, Lock Prices, and Price ($)/Unit can be indicated. If Permits or Tech Licenses are required on the order, they can be indicated at the bottom of the screen.
Note: Those with access to Agvance SKY Customer can select Price History to open Customer in a new tab and review the Product's previous Costs for that Customer.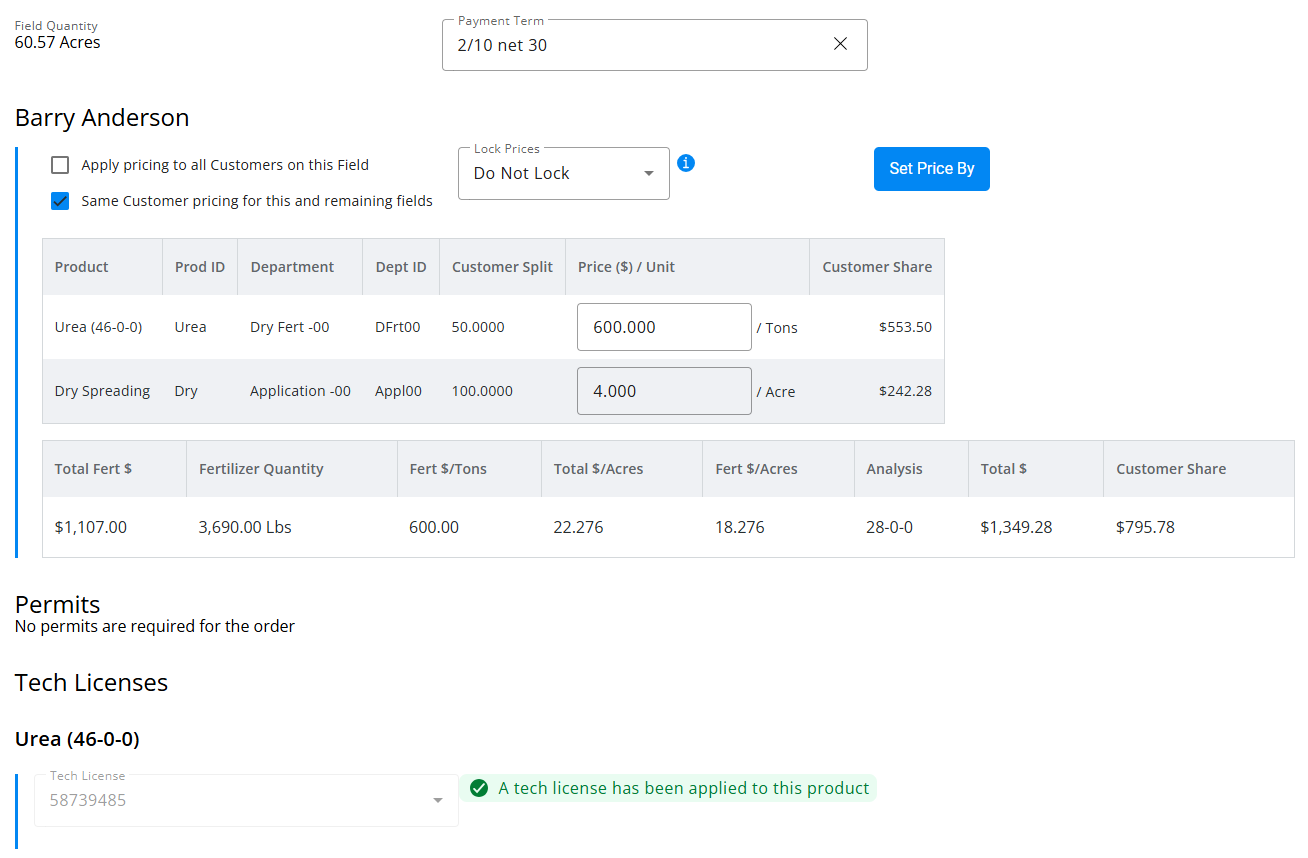
- Optionally Apply pricing to all Customers on this Field. The Same Customer pricing for this and remaining fields option is available for all Customers on the Field. The Same Customer pricing for this and remaining fields option gives the ability to set pricing on a Customer and have that pricing carry through for that Customer for the remaining tickets created within the batch. The Apply pricing to all Customers on this Field option applies the pricing set on the first Customer to all other Customers on that Field.
Note: The Apply pricing to all Customers on this Field and the Same Customer pricing for this and remaining fields options cannot be used at the same time. - A Payment Term can be selected for the Field from the drop-down and will flow through to the Invoice. Payment Terms must first be set up in Agvance Windows.
- For each Customer, choose the Lock Prices option (Offered, Analysis Offered, Quoted, Analysis Quoted, Do Not Lock).
Note: Quoting a Plan will carry the pricing from the Plan to the Invoice. - Select Set Price By and choose to Price by Fert$/Tons or Price by Price Level. Depending on which option chosen, enter the Fert$/Tons or choose the Price Level from the drop-down, then select Apply.
- Under Price ($)/Unit, select the price from the drop-down. Alternatively, enter a custom price then choose + Add.
- Choose Cancel Remaining to cancels the transaction completely and return to the Plans page. Move to the next Field without editing pricing by selecting Do Not Save Order for this Field. No Plan is saved for that Field. To save pricing here and move to the next Field, choose Save & Next Field. This saves the Plan for that Field.
Note: Separate Plans are saved per Field rather than having a multi-Field Plan.
- On the last Field, Save & Next Field changes to Save & Close. This saves pricing on the current Field and finalizes the Plan with pricing saved on previous Fields in the Order. If Skip Pricing for this Field is selected on the last Field, pricing is saved on previous Fields where Save & Next Field was selected, and the last Field is not included in the Plan.


Notes
- Enter any Blend or Additional Comments.
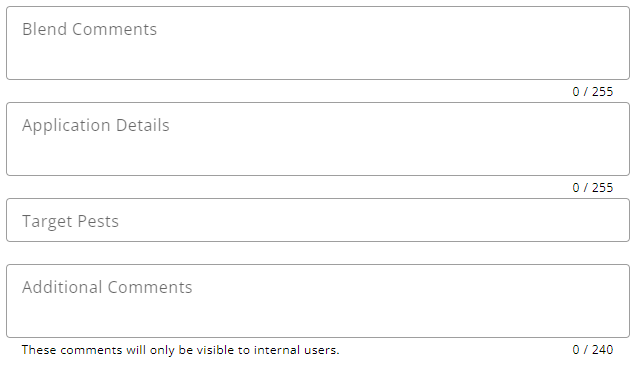
- Target Pests can be selected from the drop-down.
- The Plan can be saved by selecting Create Order. However, Permits and Tech Licenses can be added on the Additional Info tab.

Additional Info
- If only one applicable permit exists, it will be automatically selected. If the Customer has more than one applicable permit, select the appropriate one from the drop-down.

- Under Additional Info, the following fields are available.
- Customer PO # – This information can be entered if the Customer provides a Purchase Order number for the order.
- Control Number – This number is used to reference an internal control number (such as hand ticket numbers) associated with the Plan.
- Authorized Agent – This person is associated with the Customer who is authorized to make decisions. Agents are set up in the Customer file under Contacts.
- Territory – This defaults from the Customer setup and is optional information to be used as needed.
- State – This determines which counties are populated in the County drop-down.
- County – This defaults from the Ship To address. If none are set up, it defaults from the Field, and then from the Customer's setup. If there is more than one Customer on the ticket, it defaults to the settings for the first person listed.
- Ship Via – Enter the method of shipment. The methods are defined at Hub / Setup / Ship Via.
- In the Applicator grid, Applicators/Vehicles/Acres can be entered. Choose the Delete icon to remove the Applicator or + Add Row to include additional Applicators/Vehicles.
- Applicator – Applicators are set up at Hub / Setup / Applicators. The Applicator also imports into the Invoice in Agvance Windows Accounting.
- Vehicle – Vehicles are set up at Hub / Setup / Vehicles and also import into the Invoice in Agvance Windows Accounting.
- Acres – Enter the number of Acres for each Applicator involved.

Batch Breakdown

- Indicate the Breakdown Unit, Breakdown Type, and Calculate By.
- Breakdown Unit – This indicates the blender capacity unit. It does NOT change the Blending Units in which the materials are mixed. It only applies to the capacity of the blender and determines the number of batches needed to mix the job. This defaults from the Product Set used to make the blend. If gallons are chosen, the batch breakdown is done in gallons. Likewise, if the capacity is entered in pounds or kilograms, the batch breakdown is in pounds or kilograms respectively.
- Breakdown Type – Indicate if the batches are to be calculated in equally sized loads or all full loads except the last one, which might be smaller. This setting defaults from the Product Set.
- Calculate By – Indicate if calculating by Capacity or # of Batches, then enter the appropriate amount.
- Capacity – This defaults from the Product Set used to make the blend. It has a direct effect on the number of batches calculated. Either of these numbers may be changed and the other recalculated by choosing the appropriate option. The effect displays in the batch breakdown box to the right.
- # of batches – This number is calculated by dividing the total product on this ticket by the blender capacity. Either of these numbers may be changed and the other recalculated by selecting the appropriate option. The effect is displayed in the batch breakdown box to the right.
Note: Only those items with a unit weight greater than zero affect the batching of tickets.
- Choose Calculate # of Batches for Capacity, then review the Weight and Acres for each Batch.
Edit a Plan
To edit a Plan, select find the Edit column and choose Edit for that Plan.
- Under Order Details, update any information except for the Location.
The following are available for editing in this section:- Salesperson
- Plan Name
- Crop
- Crop Chemistry
- Start Date
- End Date
- Approved
- Visible in Grower360
- Blend Comments
- Placement
- Custom Applied/VRT
- Application Details comments
- Target Pests
- Product Set
- Price By
- Additional Comments
- Billing Notes
- Area
- In the Products section, add/remove products manually or via formulation.
The following are available for editing in this section:- Formulate By
- Lbs of Analysis
(if Guaranteed Analysis is selected) - Product Set
- Optimize By
- All quantities
- Pricing
- Carrier
- Exclude from Mix File
- Adjust by
- Lock Price options
- Fert $/UOM
- Lock Prices
- Once all edits are complete, select Save Plan.
