The same invoicing function is used whether importing tickets (Delivery, Blend, or Energy) or invoicing directly. The method by which the Invoicing screen is reached may vary. After selecting the Invoice button (or go to A/R / Invoice and choose Add), the Customer/Field Selection screen appears. The method to process the next Invoice can then be selected.
There is a preference on the Invoice Printout tab at Setup / Location Preferences of Agvance Accounting that controls whether or not the Salesperson's ID prints on an Invoice.
Note: Be sure any spaces are removed from the beginning of the Customer's federal permit on the Customer Profile tab at File / Open / Customers to ensure the Invoice can be saved as expected.
For the same price to default for all customers on an Invoice, change the Default Price To preference to Same at Accounting / Setup / Location Preferences. After changing this preference, editing the price for one Customer on an Invoice will change the price for all Customers.
For more information on Invoices in Agvance SKY, see Invoices - SKY Customer.
Invoice

- Split – This allows any predefined splits that might have been set at the Customer Selection screen or Field file to be viewed. In a split situation, the first customer (usually the grower) is displayed on the opening screen.
- Customer ID – The Customer ID for the Customer displays along with the Regular, PrePay, and Unapplied Cash Balances, and Credit Limit from the Customer file. To view another customer in the split, expand the Customer ID menu and choose the ID of the Customer to be viewed or select Next at the bottom of the screen. Information from the Customer file may be viewed by selecting the Question Mark icon to the right of the ID.
- Grain Balances – This displays the Customer’s Grain Balances.
- Field ID – If billing by Field, the Field ID is filled out and Field detail can be accessed by selecting the Question Mark icon.
- Tickets – When importing Delivery Tickets, Blend Tickets, or Energy Tickets, this area is filled out automatically. If tickets are not being imported, any control numbers could be keyed here for a cross reference.
- Comments – Key in any comments to be conveyed to the Customer(s). By selecting the chevron at the end of the Comments field, saved comments may be selected. To add a new comment to the list of saved comments, double-click the <Comments> label.
- Invoice Date – This date defaults based on settings at Setup / Location Preferences (Previous Entry or System Date). If billing from Delivery or Blend Tickets, the date can optionally default to the Ordered or Loaded Date from the ticket.
- Due Date – The ultimate date the bill is due is displayed here. This may also be defaulted based on settings found at Setup / Location Preferences. The aging of the Customer account can be based on either the Due Date or the Invoice Date.
- Price By – Related only to fertilizer Invoices, indicate whether to price (and display) each product separately or show and price by analysis on the Invoice. The default is set at Setup / Location Preferences with options being Products (show all the individual items), Analysis (Lbs/a), or Analysis (%).
- Price Default – Only applicable in split situations, this Same or Individual setting determines how the editing of prices on one customer affects the others in the divide. With Same, any editing of Unit $ causes all customers' prices to be changed to the new price. With Individual selected, a change to a price affects only that customer's Invoice.
Note: If the Invoice uses Prepay or Bookings, the Price Default is set to Individual and cannot be changed. - Terms – Discount options are defined at Hub / Setup / Payment Terms where flat rate or graduated tables, either based on percentage or volume, are created. Discounts expire in either a certain number of days (from the Invoice Date) or by a particular date. Choose from all discounts available or None. The default discount for the Invoice screen can be set at Accounting / Setup / Location Preferences. Default terms can also be set by Customer at File / Open / Customer on the Miscellaneous Info tab which overrides the Invoice preference default.
- The Ellipsis icon to the left of the Terms displays the discount for the selected customer so the effect of the payment term can be viewed before printing the Invoice.
- Selecting A next to the Ellipsis icon applies the terms of the customer being viewed to all customers in the split.
- Product/Pricing Grid – If invoicing from Delivery, Blend, or Energy Tickets, this grid has the items entered from the imported documents.
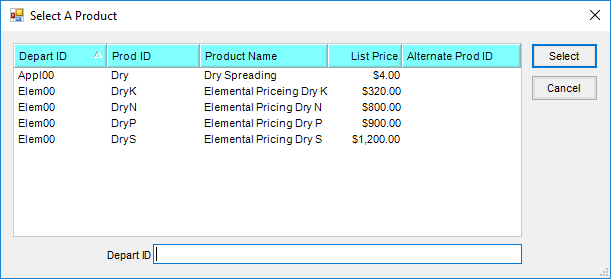
- Product Name – To add to the grid (or select all the products if direct invoicing), double-click the column heading and select the items at the Select Products screen.
- Quantity – The quantity may be set at the Select Products screen or may be entered here. This quantity is always in Inventory Units as defined at the Product’s Profile screen.
- Inv Unit – Displayed automatically, these are the Inventory Units from the product's Profile screen.
- Level– This displays automatically based on several variables. Below are the options in the order they are defaulted.
Note: When viewing the Booking Detail screen after selecting under the Level column on a line item, some Bookings show in red font and some show in bright green font. Bookings with an Expiration Date which has passed or a Starting Date in the future will display in red. Bookings attached to a Grain Sales Contract will display in bright green. These Bookings may still be selected and used. Normal Booking rules apply. The color display serves as a visual reminder. - Quote – If invoicing from a Blend Ticket with quoted prices, the prices are brought forward and the Quote indicator set. If importing more than one Blend Ticket (or a Blend Ticket with a Delivery Ticket), any quotes set are nullified.
- Book – If the program finds that this Customer booked the product, then Book is displayed in the Level column and the Unit $ is set accordingly. In addition, if the product was also prepaid, then Paid shows in the Status column.
- View – This displays if there is a Booking for the product but not enough to cover this quantity or if more than one Booking for this product exists. Select View and the Booking Detail for Line Item screen displays.
- Price Level – If none of the above apply, the Customer profile is checked for special pricing levels. If a special price level applies to this product, the label for the appropriate level defaults (L1, L2, etc.).
- List – If none of the above options are invoked, then list price defaults.
- Status – If the item has been prepaid, Paid is noted in this area. This area can also note Book, DwnPmt, or Book/Paid.
- Unit $ – Units default in the same order and manner as the Level column explained above. In addition, double-clicking here brings up the pricing levels showing the various prices and costs from which a level may be selected or type in any pricing.
- Bill Unit – Automatically displayed, these are the Billing Units as defined at File / Open / Product on the Pricing tab.
- Total – The dollar extension ((Quantity / Billing Divisor) * Unit $) displays here. The Billing Divisor is set at File / Open / Product on the Pricing tab. This extension may be overridden by selecting (or double-clicking) on the existing $ amount and typing over it.
- Split – This area indicates which predefined split option applies to this line item. Predefined splits are set at Hub / Setup / Bill Split Arrangements. Those settings and any defined at the Customer Selection screen preceding the Invoice screen can be overridden by changing the percentage in the % column next to this one.
- % – In a split arrangement, this column displays the percentage for this line item that applies to the Customer displayed in the upper left portion of the screen. This is 100% if there is only one Customer on the Invoice. In a split arrangement, double-clicking in this area allows modification to the split percentages to each Customer for this specific line item.
- Your Share – In a split, this column displays the Customer's portion of the line item.
- Tax – If the item is set to be taxed at the product’s Sales Activity tab and if the Customer is set to Sales Taxable at the customer’s Miscellaneous Info tab, then this defaults with a checkmark to indicate the line item is taxable. If the item doesn’t default as sales taxable, this box may be checked manually to add sales tax to the Invoice. If the sale is tax-exempt, the tax-exempt reason may be indicated by right-clicking in this column and selecting from the list of exemption options set up at Setup / A/R / Sales Tax Exemptions.
- Container ID – Refillable container tracking may be done by selecting the refillable container on the Invoice. Selecting the container enters a tracking record at Hub / Refillable Container Management.
- Dept ID – The Department ID for the product is displayed.
- Prod ID – The Product ID is displayed.
- Tax Exempt Reason – If the sale is tax exempt and a reason is set on the Miscellaneous Info tab of the customer file at File / Open / Customers, then the tax-exempt reason displays in this area.
- Prepay Amt – This displays the amount of Prepay being used on this line item.
- Lot # – This displays the lot number selected at the Product Selection screen or the number can be selected from the drop-down menu of available lots.
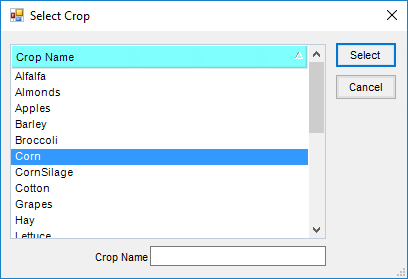
- Crop Code – Optionally choose the arrow to display a drop-down menu of crops.
- Container – This is used by some companies who link invoicing information to other databases.
- Addon Code – Optionally add charges from Item Groups that apply to the Invoice such as motor fuel taxes. The Item Groups are set up at Hub / Setup / Item Groups.
- CommCode – This is used by some companies who link invoicing information to other databases.
- Technology License # – If set on the customer file, the technology license number defaults for products with a Technology Group specified.
Note: The reason we do not populate the technology license number on the add of an invoice, allow typing in that field, or offer a dropdown list selection, is to allow for the situation where a user might be in the middle of adding an invoice and realize the technology license has not been entered yet. By having the program behave this way, the user can leave the invoice they are adding open and go add the tech license number in the customer file. On the save of the invoice, the technology license list will be updated so the appropriate one will be selected automatically or the user will be given a list to choose from (if there are multiple ones) that will include the newly added license. If the program did not behave in this way, the user would be forced to cancel out of the invoice without saving, losing all the information they already set up, go add the tech license number and then start the invoice over again. - Direct Ship – Items on the Invoice from a Direct Ship Purchase Order are noted with a checkmark.
- Bin – If the product on the Invoice is linked to a commodity in the Grain module, the bin number associated with that product displays.
- Patronage –This determines if this line item is eligible for Patronage.
- Alternate ID – If the product has an Alternate Product ID listed on the product’s Profile tab, the Alternate ID displays in this area.
- GB Pool – If the Customer is pulling the product from an authorized grain bank, select the customer whose grain bank will be used.
- Print Lineitem – This displays the print order of the line items. If roll up kits are used, the same line number may appear on multiple lines.
- Rollup Kit – If a rollup kit should be included on this line item, select it here.
- Product Search – Search for products by Prod ID, Alt ID, or Prod Name. Searching for a product with the same characters opens the Select A Product window to specify which product should be included.
- Bar Code – Products with bar codes entered may be selected by bar codes. With the focus in this field, scan the bar code to select the product.
- Right-Click Product Name – Once the products are selected and displayed in the grid, right-clicking the Product Name brings up several menu options.
- View Tank Info – This option is available when importing Energy Tickets. Using this option displays the tank serial number.
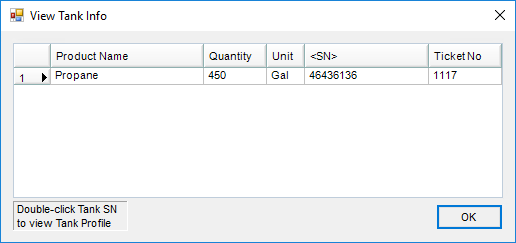 Double-clicking the tank serial number displays all the tank information.
- Apply Extra Charges – Apply all Extra Charges applicable to the Location, Customers, and Products on the Invoice.
- Apply Item Group Add-ons – If any add-on products were selected on the products, using this option brings those add-on products into the Invoice.
- Reorder Products – Indicate in the New Order column the row number for each product. When invoicing by Analysis (either Blended or Guaranteed), the Analysis line items are listed first on the Invoice document regardless of the order selected.

- Delete Selected Lines – Highlight the items to be deleted at the Invoice screen first by selecting the line number then select this option to delete those items.
- View Tank Info – This option is available when importing Energy Tickets. Using this option displays the tank serial number.

 Double-clicking the tank serial number displays all the tank information.


Analysis
When importing a Blend Ticket priced by one of the Analysis options, the analysis information is automatically populated on the Analysis tab.
All line items that are part of the analysis are checked under the A column on the Invoice tab. This information can also be manually entered if at least one line item on the Invoice is checked as Analysis and by selecting one of the Analysis options for the Price By selection on the Invoicing screen, then choosing the Analysis tab.

- Analysis – Both the Blended (Lbs/acre) and the Analysis (guaranteed analysis %) will be filled in from the imported Blend Ticket. If the Invoice is priced by Analysis (Lbs/a), then the Blended information defaults into the Customer grid. If the Invoice is priced by Analysis (%), then the Analysis information defaults in the Customer grid. Editing the information in the Analysis section changes the Analysis information in the Customer grid only if one of the calculation options is selected. However, it does not cause any other changes to take place on the Invoice. The information can also be manually entered if at least one line item on the Invoice is marked as Analysis and by selecting one of the Analysis options in the Price By selection on the Invoicing screen then choosing the Analysis tab.
- Calculate Analysis from Line Items – If pricing changed on the line items, this recalculates the Analysis price based on the price of the line items.
- Calculate Line Items from Analysis – If the pricing changed on the Analysis screen, this recalculates the prices on the line items based on the new analysis price.
- Customer Grid – This displays the quantity breakdown by customer as it will print on the Invoice if the Price By preference is set to Analysis (either Lbs/a or % option). The Analysis information can optionally print on the Invoice document and may be manually altered. If altered, the updated information will print on the Invoice but all other items will remain the same.
Tax
If sales tax is included on an Invoice, the tax information is shown on the Tax tab. Each line item displays with the applicable sales tax information for the sales tax amount, the Prepay status of the sales tax, the tax rate, the state and adjustment codes, and the sales tax exemption reason. This information can vary by line if one item has a different tax rate or has prepaid sales tax while another item does not.
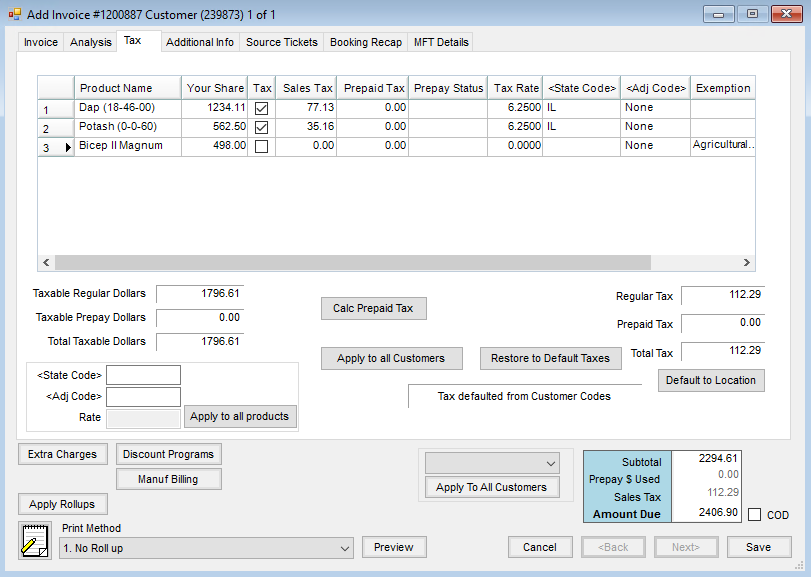
- State Code/Adj Code/Rate/Apply to all products – If a different State and Adjustment Code should be applied to all products on the Invoice, double-click in the State Code field and select the state, and then double-click in the Adj Code field, selecting the appropriate code. Choose Apply to all products and these codes are applied to all line items on the Invoice instead of having to change each line item individually. If no State Codes/Adjustment Codes exist, a rate may be entered in the Rate field and applied to all products.
- Calc Prepaid Tax – Sales tax may be prepaid if the original line items is prepaid. Use this to calculate the Prepaid Tax column in the grid, and then the Booking to be used to pay the sales tax can be selected in the Prepay Status column of the grid.
- Apply to all Customers – When the Invoice is split among multiple customers, this allows the change to be made to one and then applied to all customers.
- Restore to Default Taxes – If the tax amounts are changed, this returns all the taxes to the default amounts.
- Default to Location – This resets the State/Adj Codes to the ones selected at Setup / Locations on the G/L Posting tab for the current location or to the rate found at Setup / Locations on the Preferences tab if no State/Adj Codes are used for the current location.
- Default to Ship To – This resets the tax preferences to those of the Ship To location. This is only available when the Use Tax Rate from Customer and Ship To preference on the Location Preferences screen is not selected.
Additional Info

- Ship Via – Enter method of shipment. These can be defined at Hub / Setup / Ship Via. This prints on the Delivery Ticket document when printed from the Print Invoice Documents screen and can optionally print on the Invoice. To enable printing the Ship Via on Invoices, mark the Print Ship Via option found at Setup / Location Preferences.
- Control Number – This optional number could be used to note an internal control number (such as hand ticket numbers) associated with this sale. (Blend and Delivery Ticket numbers automatically display under Tickets on the Invoice). Optionally sort/search by this control number on the Select an Invoice screen or print this number instead of the Invoice number on statements if desired.
Note: Control numbers must be all numeric. No alpha characters, spaces, or other symbols may be used. Having fully numeric control allows Customer Statements to sort properly when run using the Control Number. If alpha characters, non-numeric characters, or spaces are used in the Control Number on an Invoice and a Statement or Sales report is run using Control Numbers, a pre-scan report will display detailing the Invoices that must be corrected before the report can run. - Ship To – Select from the Customer's Ship to addresses. This address then prints on the address along with a Bill to address if the Bill to/Ship to Invoice format is chosen at Accounting / Setup / Location Preferences on the Invoice Printout tab.
- Salesperson ID – The salesperson defaults from the Customer profile. If the Invoice is a split and there is more than one salesperson, it defaults to the salesperson of the first customer. Optionally select a salesperson from those entered at Hub / Setup / Salesperson. This can be imported from Blend or Delivery Tickets as well.
Note: The default order is Ship to customer’s salesperson first, then customer’s. The Bill to salesperson is ignored in the defaulting. - Auth. Agt. – If authorized agents are specified on the Customer file, the agent may be selected.
- Territory – The territory defaults from the Customer setup. Optional information may be entered as needed.
- County – This defaults from the Customer setup. If more than one customer exists, it defaults the county for the first person listed.
- Invoiced Units – If filled out, this is the number of units (generally acres) that prints in the upper right portion of the Invoice document. When billing by Field, it defaults to the selected Field’s number of acres.
- Customer PO # – If the Customer provided a Purchase Order number to be included on the Invoice, enter it in this area.
- Crop – This defaults to the crop entered on the source ticket if importing from a Blend or Delivery Ticket. Otherwise, a crop can optionally be selected from the list maintained at Hub / Setup / Crop Maintenance. If a crop is selected, it prints on the Invoice in the upper right portion of the document. Select from the drop-down or double-click the label to search.
- Federal Permit – The non-expired federal permits of all Growers associated with this Invoice will be available in the drop-down menu. If there is only one customer with only one valid federal permit, it defaults in. If multiple federal permits exist for a customer or more than one customer in the split has a valid federal permit, no permit will default. The appropriate federal permit must be manually selected. For more information on Agvance permit rules, see Regulation of Restricted Products in the Hub section of the manual.
Note: On the bottom of the Invoice document, the selected federal permit prints if the Invoice is NOT Custom Applied. The applicator’s permit number prints if it is Custom Applied. - Custom Applied – Imported blends are automatically set to Custom Applied. Imported Delivery Tickets are automatically set if the Delivery Ticket was marked as such. Otherwise, this indicator can be manually set. As mentioned above, this determines which federal permit (the Grower’s or the Applicator’s) prints on the Invoice. It is also used by the Product Rebate report found at Reports / Accounts Receivable / Sales.
- Use Type – Selection of 1 through 6 is used for reporting purposes in some states. This may be used for tonnage tax reporting or restricted use products as defined by the state. For example, a 1 is for farm use fertilizer and a 2 is for non-farm use fertilizer.
- Additional Comments – More notes will print on the Invoice (under the body of the Invoice on the left side).
- Applicator ID – Optionally select the applicator(s) from those entered at Hub / Setup / Applicators. If importing from multiple Blend and/or Delivery Tickets, all applicators are included with the total number of acres for each. There is a report in the Reports / Accounts Receivable / Sales area that summarizes acres by applicator. If importing from Energy Tickets and the drivers are set up in the Energy module, the Driver ID from Mobile Energy imports into this area.
- Vehicle ID – Optionally select a vehicle from those entered at Hub / Setup / Vehicles. If importing from one Blend Ticket and the vehicle was entered on the Blend Ticket, it defaults here. If importing from multiple Blend and/or Delivery Tickets, the Invoice Vehicle defaults as blank. If importing an Energy ticket and the vehicle is setup in the Energy module, the Vehicle ID imports into this area.
- Acres – Enter the number of acres for each applicator involved. This information imports from Blend Tickets and Delivery Tickets.
- Permit # – Some states require every sale of restricted use product have a state/local permit associated with it. This permit prints in addition to the federal permit on the Invoice, Delivery and Blend Tickets. For more information on Agvance permit rules, see Regulation of Restricted Products in the Hub section of the manual.

Source Tickets

If tickets were imported to create the Invoice, this tab displays information on those imported tickets: the Ticket Type, Ticket Number, Ticket Location, Ticket Date, and whether the ticket was designated as picked up or delivered.
Booking Recap

If Bookings were selected on line items, the Booking Recap tab displays the Bookings used on each line item. The Invoice lines are cross referenced with the Bookings used.
If sales tax was prepaid, the Booking information pertaining to the sales tax is designated by a check in the Tax column.
MFT Details
The MFT Details tab is used by companies that have the optional module for reporting refined fuel activity to state regulators.

- Origin City – Enter the city where the shipment is originating.
- Origin State – Select the state from the drop-down menu.
- Destination City – Enter the city where the product is being delivered.
- Dest. State – Select the state receiving the product from the drop-down menu.
- Mode of transportation – Select from the drop-down. This list is from the Modes of Transportation set up in the Motor Fuel module. This defaults on Invoices imported from the Energy Force Daily Clear (Energy / Transfers / Import / Energy Force / Daily Clear) based on the Mode of Transportation set up in Agvance (Accounting / Motor Fuel / Setup / General Info).
- Apply Add-Ons – Use this to apply add-ons to the line items and the MFT Details tab.
- Product Grid – This grid displays the product from the Invoice along with the Add-on Code, Schedule, and Tax/Fee type for motor fuel reporting. Also included in the grid are the Transaction Number, Transaction Type, Fill Date, Odometer, Vehicle ID, MI MF License Type, BOL Number, and BOL Date. These items are populated by CFN, CTM, and Gasboy imports but may be manually entered as well. This information can be displayed on the Card Activity report found in Accounting Reports / Accounts Receivable / A/R Status.
- Extra Charges – This applies the eligible extra charges to the Invoice. Extra charges are set on the location at Setup / Locations on the Preferences tab. For extra charges to be populated onto the Invoice, the extra charge must be set up on the Customer, Product, and invoicing Location. Often these are used for fertilizer taxes that are a set percentage of dollars or quantity billed.
- Discount Programs – If Discount Programs are set at A/R / Manage Discount Programs, the discounts may automatically be applied on the Invoice by selecting Discount Programs. The discounts are calculated using the products currently listed on the Invoice as well as considering past Invoices to give the appropriate discounts. The amount of the discount calculated could include discounts applicable to the past Invoice if the current Invoice puts the Customer into a new tier depending on how the Discount Program is setup. The calculation takes only the customer Invoices into consideration. If company policy is to include Bookings and Plans into the discount amounts, the discounts must then be added to the Invoice manually based on running the Program Reconciliation report.
- Manuf Billing – This is available when the Allow Manufactured Inventory Detailed Billing option is selected at Setup / Location Preferences. For Invoices containing manufactured products, this checks for Booking or Grain Bank available for the raw ingredient or a substitution product set on the raw ingredient. Two lines are added for raw ingredients with Booking or Grain Bank available. The first line is for a negative amount to credit the customer for the raw portion of the finished goods price. The second line is a positive amount, either charging the raw products portion to the available Booking or adding a Grain Bank line that depletes the customer’s Grain Bank for the corresponding raw product’s portion of the finished good.
- Apply Rollups – For lines with rollup kits selected, this applies the products from the rollup kit to the Invoice.
- Apply To All Customers – This drop-down menu allows the CommCode or the Container to be applied to all customers on split Invoices.
- Product Quotes – Quotes given to the customer and saved at File / Open / Customer by selecting the Product Quote icon may be called up at the Invoicing screen and displayed for reference. The product prices will not default based on these customer quotes, but if a quote exists for one of the selected products on the Invoice, the Quote icon displays red. By selecting the Quote icon, all quoted prices display or double-click the Unit $ price for the quoted product and the standard pricing options as well as quoted prices for this product to select.
Note: This Quote function should not be confused with quoted prices set in the Planning or Blending modules that default at invoicing.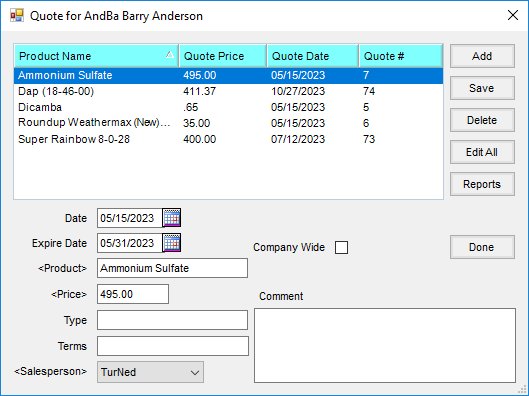
- Print Method – Line items and/or pricing may optionally be collapsed in a variety of ways on the printed document. The line item detail in the grid remains unchanged when viewing the Invoice on the screen.
- Preview – This allows the line item information to be previewed prior to printing. The preview includes any selected roll up.
- COD – This option is available for customers required to pay at the time of the Invoice. The Roll-Through Payment on Account screen appears and a payment must be taken. If the payment on account is canceled, the Invoice is automatically voided. When the Display amount due on roll thru POA window option at Location Preferences / Invoice is selected, the COD roll-thru payment with the Pay Method set to Credit Card will require an additional Pay Method for the remainder of the payment if the initial Credit Card payment returns a message stating the Invoice can only be partially paid due to credit card limits.

Posting Notes
- Invoice – Invoice tables are updated.
Inventory Updated
- Inventory Detail – A record is made for each line item to leave an audit trail of activity.
Note: If an item was imported from Blend or Delivery Ticket, then the Inventory Detail entry shows the original quantity coming back in and the quantity saved with the Invoice going back out so that the change is noted. In the case where no change was made, the net effect is zero.
Note: When the item has a Manufactured Formula and that formula is set to relieve inventory at invoicing, then the raw materials are affected with an outbound entry and the finished product is affected with an inbound and outbound (no net change). - Inventory Amount on Hand – is updated for each line item.
Note: If an item was imported from Blend or Delivery Ticket, then the inventory Amount on Hand has the original quantity coming back in and the quantity saved with the Invoice going back out so this figure is changed by the difference. In the case where no change was made, the net effect is zero.
Note: When the item has a Manufactured Formula and that formula is set to relieve inventory at invoicing, then the Amount on Hand of the raw material items are decreased and the finished product has no change. - Manufactured Products – If an item has a Manufactured Formula and that formula is set to relieve inventory at invoicing, then an entry is made to the manufactured product tables.
- Customer Balances – The following is done for each customer in the split.
- New Regular Balance = Old Regular Balance + Amount Due
- New Prepay Balance = Old Prepay - Prepay $ Used
- General Ledger – A Customer-Type Journal Entry is made and the G/L account balances are updated.
| Customer Journal Entry | Debits | Credits |
| Total of all customer shares of Invoice | Accounts Receivable (for this location) | |
| Sales for each line item posted separately. Sum of customer shares/line item.
These accounts defined at Depts. |
Sales accounts | |
| Sales Tax (if used) | Sales Tax Liability |
If using Transactional Inventory Valuation, this additional posting occurs with on the Journal Entry:
| Customer Journal Entry | Debits | Credits |
| Cost for each item posted separately to the Inventory account defined at the department level | Cost as defined at the Inventory Department
(Last, Average, Replacement, or Estimated Average) | |
| Cost for each item posted separately to the Cost of Goods account defined at the department level | Cost as defined at the Inventory Department
(Last, Average, Replacement, or Estimated Average) |
- Booking – If used, quantity and dollars left is updated. If this transaction completes the Booking, then it is marked as Invoiced.
- Invoice Counter – This is incremented by one.
If Imported
- Blend Ticket(s) – Blend Tickets are marked as Invoiced.
- Delivery Ticket(s) – These are marked as Invoiced.
- Energy Ticket(s) – The status on the Energy Ticket changes from Open to Complete. The Last Delivery Gauge percentage on the tank is updated. Saving the Invoice updates the tank history.
- Void – The Invoice is marked as Voided. All other posting is offset with opposite entries. The Invoice Counter is not changed.
