Track the ordering of product in Accounting at Inventory / Purchase Order. For regular purchases, this is an optional step. However, if prepaying a vendor for specific product, a prepaid Purchase Order is used to track the payment to the vendor and the receipt of the product.
Purchase Orders are optional but recommended when Prepaying the vendor for product at a specific price. This process helps track prices quoted and product received and invoiced.
Selecting Start With is helpful when adding several similar Purchase Orders. Enter one Purchase Order then use that as a template for entering the remaining loads changing the ticket number, quantity, etc. Start With is found on the Select A Purchase Order screen at Inventory / Purchase Order.
When a file is created for an electronic Purchase Order, the Estimated Freight Vendor ID, Name, Type, and Amount are included in the file.
See here for the process of including Add-On Charges on transactions.
See Purchasing 101 for more on the full purchasing process.
More information on Purchase Orders in Agvance SKY can be found here.
PO Detail

- Date – This date is when the order was placed.
- P.O. # – This number can either be automatically incremented or entered manually. Choose the preferred numbering option at Setup / Locations on the Preferences tab.
- Contract – A vendor contract number may be entered if the Purchase Order is a part of or fulfills a vendor contract.
- Vendor – Double-click to display the Vendor Selection screen.
- Customer – If this order is for a specific customer, optionally select that customer. If the Direct Ship option is selected, choosing a customer is required.
- Comments – Optionally enter any comments. By selecting the chevron at the end of the Comments field, saved comments may be chosen.
Note: To add a new comment to the list of saved comments, double-click the <Comments> label. - Notes – Additional notes may be entered. When using the Direct Ship option, the notes entered in this area transfer to the Delivery Ticket.
- Prepay – Indicate if this PO is prepaid.
- Order Invoiced – This option is set automatically when the Product is completely invoiced. It can be manually set on orders that are complete but may have fallen short of the original quantity.
Note: There is a preference (Restrict PP PO Order Invoiced Edit) on the Inventory Purchase tab at Setup / Preferences to disallow marking a prepaid Purchase Order as Order Invoiced. If this preference is NOT used or if the Purchase Order is NOT prepaid, the above steps work. If the order IS prepaid and the preference IS selected, the Order Invoiced option is not available.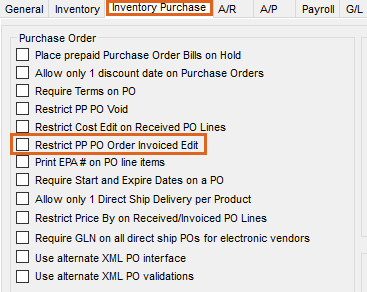
- Company Wide Use – This option is used by multi-site companies, particularly those working in a single database. Select this option if the Product ordered could be delivered to other locations within the company (therefore not an exact Product match at the Department level).
- Direct Ship – For orders that ship directly from the Vendor to the Customer, this option may be selected. Selecting this option requires that a customer be selected in the Customer area. When receiving is done against a Direct Ship Purchase Order, a loaded Delivery Ticket is created including the pricing for the specified Customer. Additional information regarding Direct Ship POs can be found on the Ship To tab of this article.
- Generic Purchase – Prepaid Purchase Orders can be marked as a Generic Purchase. This allows a Purchase Order and Bill to be generated and the money to be used on Products as necessary. When a Generic Purchase Order is selected on a Purchase Invoice, the Purchase Order is selected in addition to the Product that was received.
- Price By – Choose which column is the known dollar figure and which will be calculated. The chosen column can be edited and the other will be calculated. If $/Unit is selected, then enter the unit price or double-click in that column to display the pricing levels to choose from for that line item.
- Discount – If discounts are offered on the Purchase Order, select Terms once the Products are entered. Use a predefined discount option or enter the discount information directly. Either a flat percentage or graduated discount (up to five levels) may be used. Key in a percentage or flat dollar amount of discount. If the vendor has a standard discount structure, it can be set up at Hub / Setup / Payment Terms. The vendor default can additionally be set in the Terms Code at Accounting / File / Open / Vendor on the Profile tab. Any discounts used are prorated across all items on the Purchase Order based on percent of total dollars.
- Freight – If the freight charge is part of the bill from the product vendor, select either Actual Total$ or Actual $/Unit. If the freight charge will be billed through a third party, select Estimated Total$ or Estimated $/Unit. In either case, when the freight is applied, it prorates over all line items on the Invoice based on the total cost. If the products have mixed Inventory Units, prorate the cost manually by scrolling in the grid to the right and overriding the freight amounts.
- Total Weight – The total weight of all products on the Purchase Order is displayed as information only to aid in calculating freight for the transaction.
- Inco Term – Optionally select the Inco Term code applicable to this Purchase Order. If selected, the Inco Terms are included in the electronic PO file. Inco Term codes are established at Setup / Inventory / Inco Terms.
- Quote Icon – If quotes exist on the Vendor file, this icon displays as either white or red.
- Import – Select Import to open the Import Purchase Order window. The import must have a Product Attribute set up and then selected here. The file layout must be a tab delimited file with the following layout:

- Delivery Type – Select whether this Purchase Order will be delivered or picked up.
- PO Type – Optionally select the PO type.
- Date Requested – Entering the date the Product is requested is optional. This date is included in the electronic PO file.
- ETA – Optionally enter an Estimated Time of Arrival date. This can be edited after the Purchase Order is saved.
- Pickup/Delivery Location Name – Double-click to optionally select a Pickup or Delivery Location name. These pickup and delivery location names are established at Setup / Preferences on the Inventory Purchase tab by selecting P.O. Pickup / Delivery Locations.
- Reconcile Seed – When editing a Purchase Order, this is available. Using this on a Purchase Order associated with Grower Order searches the Grower Orders and displays the amount for each product on the Purchase Order.
- Accept Seed Amounts – This is only available when editing a Purchase Order. Once the quantities are displayed by selecting Reconcile Seed, the amounts may be verified and this can be selected to accept the quantities and overwrite the PO quantities with the new quantities found on the Grower Orders.
- Recalculate Add ons – When product information changes, this is used to recalculate the add-on charges on all line items.
- Select PO Message – For vendors set up for Delivery Confirmation messages in B2B at Setup / Purchase Order Confirmation Message, choose this to view and import previously downloaded messages as well as retrieve new messages from the FTP site. Choose to Accept a Delivery Confirmation on the Select PO Message window and save the Purchase Order or Reject to not create a Purchase Order. A message will be sent to the FTP site to return to the vendor the status of the order or to inform of the rejection.


Product Grid
- Product Name – Double-click in the <Product Name> column to bring up the Select Product screen. Choose the items for the Purchase Order.
- Ordered – Enter the quantity ordered in Inventory Units.
- Received – When viewing an existing PO, this column displays the quantity already received against it.
- Invoiced – This shows the quantity already entered on Purchase Invoices when viewing an existing PO.
- $/Unit – Enter the price per billing unit here. If the Purchase Order is set to price by $/Unit, type the price in this column or double-click to select the cost from a list of costs on the Product file.
- Bill Unit – This displays the Billing Unit for the Product.
- $ Total – This equals $/Unit * Ordered quantity. If the Purchase Order is set to price by $Total, key the total cost of each line item into this column. If set to price by $/Unit, this amount calculates upon selecting Apply.
- Deptid – This displays the Department ID for the product.
- Prodid – The Product ID is displayed.
- Add-On – If Add-On charges apply to the line item, they either automatically default here or may be manually added.
- Freight – If there is freight information in the bottom left Freight area, the freight cost for each line item appears in this column. This amount may be edited if necessary.
- Selling Price – For Direct Ship Purchase Orders, the selling price is entered in this area. This price will be transferred to the customer Delivery Ticket.
- Alternate Product ID – If an alternate Product ID exists on a Product, this ID can optionally display on the PO.
- EPA Num – If an EPA number exists on the Product, the number is displayed in this column.
- PO Request # – If this Product originated on a Purchase Order Request, after the approved PO Request is selected, the PO Request number displays in this column.
- Total Weight – The total weight of the Product (Amount * Unit Weight from Product profile) is displayed.
A/P Bill
If the Purchase Order is marked as prepaid, then information on the A/P Bill tab will be active. Additional details regarding prepaid Purchase Orders can be found on the Prepaid PO tab of this article.

Ship To

- ID – If a Customer is selected on the PO Detail tab and the Use Address and GLN from customer profile is selected, the address from the Customer file defaults. If the order is shipping to a company location, double-click to select the ID for the location receiving the product, or the name and address may be manually entered. The Ship To address entered prints on the Purchase Order document.
- GLN – If a customer is selected on the PO Detail tab and the Use Address and GLN from customer profile is selected, the Customer’s GLN from the Customer file defaults into this area or the GLN may manually be entered.
- Use Address and GLN from customer profile – Select this option if the Ship To name, address, and GLN should default from the Customer file when a Customer is selected on the PO Detail tab.
- Contact Name – The contact name for the Purchase Order may be entered here. This information is included in the electronic file if created.
- Contact Phone – The contact phone number for the Purchase Order may be entered here. If an electronic file is created for the Purchase Orders, the phone number is included in the file.
- Delivery Instructions – Enter any delivery instructions in this area. They are included if an electronic file is created.
Direct Ship
Product purchased for a Customer and delivered directly to the Customer’s site may be entered as a Direct Ship Purchase Order. Direct Ship Purchase Orders automatically create a priced Delivery Ticket when imported into a Purchase Receipt.
The Vendor invoices the company and the company invoices the Customer, but the product is never physically delivered to the company’s site. When a Purchase Receipt is entered against the Direct Ship Purchase Order, a priced Delivery Ticket is automatically created for the Customer.
A direct ship Purchase Order includes the selection of a federal and state/county permits to be used in the permit checking when the transaction is saved. This information is then passed onto the Delivery Ticket. These permits are from the customer selected for the direct shipment.
Purchase Orders marked as Direct Ship on the PO Detail tab will have the Customer's federal permit and/or state permits. Multiple permits can be selected from the Permit # drop-down(s) in the grid.
Direct Ship Purchase Orders have a few requirements:
- If the Direct Ship option is selected, a Customer must be chosen.
- Voiding the Purchase Receipt is only allowed if the Delivery Ticket that it created has not been invoiced.
- Voiding the drop ship Delivery Ticket is not allowed. (Voiding the Purchase Receipt voids the Delivery Ticket.)
- A preference is available to not allow a drop ship Purchase Receipt to be saved if there is an open drop ship Delivery Ticket for this product. This requires that the open drop ship Delivery Ticket be billed to the customer before receiving against another drop ship Purchase Order.
- A Direct Ship PO is not able to be selected on the Direct tab of the Purchase Invoice.
Release Numbers
Release Numbers may optionally be entered for the items on the Purchase Order.
Select Add Row to add a Release Number. When the Purchase Order contains multiple line items, enter the PO Line the Release Number references. Enter the Release Number and specify a Quantity.
Mark the row as Used when the load is received. Optionally add a Note to each row.
Use the Generate Release Numbers area to generate many Release Numbers at a time.
Note: Release Numbers may not be duplicated per vendor. If duplicate Release Numbers are entered upon saving, a message will display informing which lines are duplicates. After changing the duplicated values, the Purchase Order can be saved.
If a Purchase Order with a Release Number is selected when adding a Purchase Receipt, the Release Number is automatically marked as Used and the Actual Quantity and Ticket # (Purchase Receipt number) are populated in the grid below.

Printing the PO
Upon selecting Save, the Print Purchase Order window displays.
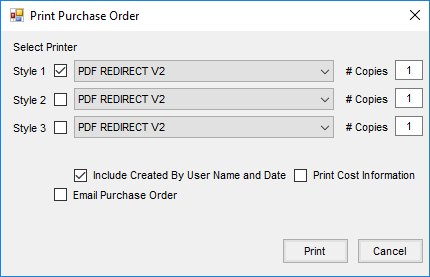
Indicate the Style, Printer, and # Copies.
- Style 1 – This style shows the PO with the Bill To, Ordered amount, Received amount, Product ID, and Product Description.
- Style 2 – This style shows the PO with the Ordered amount, Dept ID, and Product Description.
- Style 3 – This shows the PO with the Ordered amount, Received amount, Product ID, Product Description, and Product Weight.
Check Include Created By User Name and Date to print the User's name and the date created in the lower left corner of the PO.
Checking Print Cost Information will print the cost information on the Purchase Order if the User is not restricted on the General Restrictions tab at Hub / Setup / Users in the View Cost Information area.
Selecting Email Purchase Order opens a window to enter the Vendor Email Address, a Subject, and the Body of the message. Upon selecting OK then Print, an email will be sent with the Purchase Order attached as a PDF.
Only one Vendor Email Address can be entered. The Vendor Email Address defaults from the Vendor Profile if one exists but can be edited. If one does not exist, one address can be manually entered. No matter whether an address defaulted or was entered, an email can only be sent to one email address.
Note: The From email will be the Mail Host Email set up at Hub / Setup / Company Preferences. The Reply To email will be the one set on the Profile tab of the Agvance User entering the Purchase Order at Hub / Setup / Users.

Prepaid PO
If the Purchase Order is marked as prepaid, then information on the A/P Bill tab will be active. Select Add Row to enter the Due Date and Total amount for the Bill(s) to be created for the Prepay amount.
- Unpaid Bill – An unpaid Bill is created to be prepaid. It is suggested to go to A/P / Pay Bills to write the check for the Vendor.
- Terms – Terms used for a prepaid Purchase Order are carried forward to the A/P Bill created.
- Vendor Balance – The Purchase Order affects both the Regular (with the unpaid Bill to be prepaid) and Prepay balance (showing the credit on account) of the selected Vendor.
- General Ledger – A payable-type Vendor Journal Entry is made and the G/L account balances are updated.
- First Journal Entry – This entry affects the Vendor's Prepay balance. The entry to Purchase accounts cancels out the effect of the second JE. Cost will eventually be posted when the Product is invoiced.
Vendor Journal Entry
Debits Credits Total of Product on PO Accounts Payable (for this location) Purchase account for total of each department's POs. Purchase accounts - Second Journal Entry – A result of the unpaid Bill, the Vendor Regular balance will be cleared when the check is cut.
Vendor Journal Entry Debits Credits Total of Product on PO Accounts Payable (for this location) Purchase account for total of each department's POs. Purchase accounts
Voids
All the posting that occurred with the original entry is reversed with new and opposite entries.
Company-Wide POs
Multi-locations working in a single database might benefit from the Company Wide Use option. Corresponding departments of inventory for the various locations must be linked with a common Category and the Products must have matching Product IDs in order for this Company-Wide function to work.
- When adding the Purchase Order, if the material will be delivered to various company locations, choose the Company Wide Use option.
- As Product is received against the PO, select the receiving Location’s department of inventory for the Products that this particular delivery updates. The program relieves the original Purchase Order and brings the inventory into the Location’s department selected on the Purchase Receipt. If the Product is set with automatic Add-on Charges, these additional charges may need to be reselected to ensure correct posting.
