For more information on Bookings in Agvance SKY, see Bookings - SKY Customer and Bookings - SKY Order.
Add Booking

- Splits – This allows any predefined splits that might have been set at the Customer Selection screen or Field file to be viewed. In a split situation, the first Customer (usually the grower) is displayed on the opening screen.
- Customer ID – The Regular balance, Prepay balance,UAC balance, andCredit Limit displays from the Customer file. To view another Customer in the split, choose Next in the lower right portion of the screen. The Customer file can be viewed by selecting the Question Mark icon to the right of the ID.
- Field ID – If booking by Field, the Field ID is filled out and Field detail can be accessed by selecting the Question Mark icon.
- Comments – Type in any comments to be conveyed to the Customer(s). By selecting the chevron at the end of the Comments field, saved comments may be selected.
Hint: To add a new comment to the list of saved comments, double-click the <Comments> label. - Book Date – This date defaults based on settings at Setup / Location Preferences (Previous Entry or System date). The defaults used at the Invoicing screen work here.
- Start Date – A date may be entered for availability of this Booking. Bookings with a future start date show but display in red at invoicing as an indicator that the transaction is outside of the Start/Expiration date range. Even if the transaction is outside the range, the Booking may still be invoiced. A default of System Date, Previous Entry, or None may be established at Setup / Preferences on the A/R tab.
- Expiration Date – A date may be entered when the Booking expires. Expired Bookings display in red at invoicing as an indicator that the Booking is outside of the Start/Expiration date. Even if the transaction is outside the range, it may still be invoiced. A default for setting the Expiration Date can be found at Setup / Preferences on the A/R tab.
- Price By – Related only to fertilizer, indicate whether to price (and display) each Product separately or show and price by Analysis on the Booking. The default is set at Setup / Location Preferences with options being Products (show all the individual items), Blended Analysis (Lbs/a), Guaranteed Analysis (%), or Elements (N, P, K, S.
- Price Default – Only applicable in split situations, this setting determines how the editing of prices on one Customer affects the others in the divide. With the Same option selected, any editing of Unit $ causes all Customers' prices to be changed to the new price. With Individual selected, a change to a price affects only that Customer's Booking.
- Terms – Discounts are defined in the Hub at Setup / Payment Terms where flat rate or graduated discounts that are either based on percentage of dollars or volume may be created. Discounts expire in either a certain number of days (from the Invoice Date or by a particular date. Choose from all terms available or None. The Terms default may be set at Accounting /Setup / Preferences on the A/R tab.
Note: The Ellipsis icon left of the Terms displays the discount for the selected Customer in a window so the effect of the Payment Term may be seen before printing the Booking. - Generic Prepay – Select the Generic Prepay option to activate the options in this area. Expand the first drop-down menu to choose the appropriate Generic Prepay Type. These types are maintained at Setup / A/R / Generic Prepay Types.
- Price Level – Select the Price Level to be used on the Invoice when Prepay is used. If no Price Level is required, set this option to None. Setting the Price Level to None means no specific price level is required to default into an Invoice. When the generic prepay Booking is used on the Invoice, the pricing defaults from the normal pricing hierarchy with no influence from the generic prepay Booking. Also, setting the Price Level to None causes the generic prepaid Booking to automatically be used along with unpaid Product-specific Bookings on the same line item at the time of Invoice if no other Booking conflicts exist.
- Prepay Amount – Enter the amount of Prepay received.
- Business Influence – If the Use Business Influence Bookings location preference is enabled and the Customer has Influences set on the Customer file, this selection is available when adding a Booking. When selected, this Booking may be consumed by any Customer selected for that Business Influence Type on the Booking Customer's file.
- Product/Pricing Grid – If adding a Booking by selecting Import Plans/Sales Orders, this grid has the items entered from that previous document.
- Product Name – To add Products to the grid, double-click this column heading and select the items at the Select Products screen.
- Quantity – Set quantities at the Select Products screen or enter the quantities here. This quantity is always in Inventory Units as defined at File / Open / Product on the Profile tab.
- Inv Units – Displayed automatically, these are the Inventory Units as defined at File / Open / Products on the Profile tab.
- Levl – This displays automatically based on several variables. Below are the options in the order they default.
- Quote – If booking from a Field Plan or Sales Order that was set to Quoted, then the prices are brought forward and this indicator is set. If importing more than one Field Plan or Sales Order, any quotes set are nullified.
- List – If the above option does not apply, the Customer profile is checked to see if there is a pricing preference (List or Price level). If that is the case, Levl defaults to that Price Level or List Price. If no preference is set at the Customer Profile screen, then List is the default.
- P – This indicates the Prepaid status of this item. Any item with a checkmark in this column is considered prepaid.
Note: If this Prepay flag is not set at this screen, the Prepay payment may be entered at the Payment on Accounts screen to mark the Booking as Paid. - Dwn –If only a partial amount of the item is being prepaid, mark this column. This should only be used if the remainder of the Booking will not be prepaid.
- Unit $ – This defaults in the same order and manner as Levl explained above. In addition, double-clicking here allows selection from all the Price Levels along with the List and Cost prices for this item or manually entering any pricing.
- Bill Units – Automatically displayed, these are the Billing Units as defined at File / Open / Product on the Pricing tab.
- Total $ – This is the dollar extension ((Quantity / Billing Divisor) x Unit $). The Billing Divisor is set at File / Open / Product on the Pricing tab. This extension may be overridden by selecting (or double-clicking) on the existing dollars and keying over it.
- S# – This indicates which predefined split option applies to this line item. Predefined splits are set at Hub / File / Open / Field on the Bill Splits tab. Those settings and any defined at the Customer Selection screen that precedes the Booking screen may be overridden by changing the percentage in the <%> area.
- % – In a split arrangement, this column displays the percentage for this line item that applies to the Customer displayed in the upper left portion of the screen. This is 100 if only one Customer is on the Booking. In a split situation, double-click and modify the split percentages to each Customer for this specific line item if necessary.
- Your Share – This displays the Customer’s portion of the line item.
- Amt Paid – For use on down-payment Bookings, the amount defaults to the full amount of the line item. If the Customer is not paying the full amount of the line item, double-click to enter a partial payment amount by Percent of Total $, Per Billing Unit, or Dollars.
- Quant Left – This displays the quantity left on the Booking that has not yet been invoiced.
- Dollars Left – This displays the dollars left on the Booking that has not yet been invoiced.
- Invoiced Quantity – The quantity of the line item that has been invoiced is displayed.
- Print Lineitem – If Print Methods or Rollup Kits are used, this column displays the print order for each line item.
- Rollup Kit – If a rollup kit is included in the Booking, select the appropriate rollup kit. The Products from the selected rollup kit are included in the Booking.
- Low Unit $ – For unpaid Booking Products with fluctuating prices based on market price, enter the low unit price in this area.
- High Unit $ – For unpaid Booking Products with fluctuating prices based on market prices, enter the high unit price in this area.
- Alt Prod ID – The Alternate Product ID is available at the Add Booking window at A/R / Product Bookings.
- Control # – This is an optional control number to cross reference the Booking with another numbering scheme.
- Salesperson ID – If a salesperson is set on the Customer file, the Salesperson ID defaults into the Booking. If a salesperson is not set on the Customer file, a Salesperson ID may be selected.
- Additional Comments – Optional comments may be entered that will print at the bottom of the Booking document.
- Analysis – If Price By is set to Analysis and Import Field Plans/Sales Order was selected at the Select Customer(s) or Field for Booking screen, this is filled out for any fertilizer Products. This information can be manually entered by having at least one line item checked as Analysis and by selecting one of the Analysis options for the Price By selection on the Booking screen, then choosing Analysis.

- When fertilizer is imported from Blending, the analysis will be filled out. Blended refers to the actual pounds/acre applied. Analysis refers to the guaranteed analysis (% of nutrient in 100 pounds of Product).

If no tickets are being imported and the analysis is to appear on the Booking, the appropriate numbers may be typed here. In order for the analysis to print on the Invoice, the Print Analysis on Invoice option at the Setup / Location Preferences screen must be selected.
- Customer Grid – This grid displays the quantity breakdown by Customer as it will print on the Booking if the Price By preference is set to one of the Analysis options (either #/acre or % option).
- Apply Rollups – For lines with rollup kits selected, this applies the Products from the rollup kit to the Booking.
- Planned Booking Payment Method – Select from the drop-down the Booking Payment Method. These must first be set up at Setup / A/R / Booking Payment Methods. More information can be found here.
- Contract Format – Select the Contract Format from the drop-down. These must first be set up by going to Setup / Preferences and selecting Design Booking Contracts on the A/R tab.
- Contract Signed – Select this option to indicate the Customer has signed the contract. A notification is sent to SKY. Additionally, if the Disallow edit of a signed booking preference is selected on the A/R tab at Setup / Preferences, checking this option will prevent any edits to the Booking after saving.
- Assign Seller Signature – Check this option to capture the Seller Signature. A window will display to select the appropriate seller. If the Seller Signature Only From Logged In User option is selected at Setup / Preferences on the A/R tab, the signature of the user logged in will be added to the contract without the option to select another signature from the list. For more on setting up signatures, see here.
- Product Quotes – Quotes given to the Customer and saved at the File / Open / Customer screen by using the Product Quote icon may be pulled up at the Booking screen and displayed for reference. The Product prices do not default based on these Customer quotes. However, if a quote exists for one of the selected Products on the Booking, the Product Quote icon displays red. By selecting the icon, it displays all the promised prices or double-click the Unit $ price for the quoted Product. The standard pricing options, as well as quoted prices for this Product, are available to select.
Note: This Quote function should not be confused with quoted prices set in Planning and passed through as default pricing to the Booking.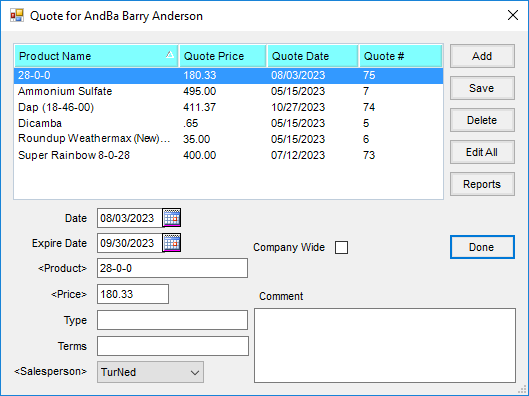
- Print Method – Line items and/or pricing may optionally be collapsed in a variety of ways on the printed document. The line item detail in the grid remains unchanged when viewing the Booking on the screen.

Edit Bookings
