Preferences for Patronage can be found at Accounting / Patronage / Setup / Preferences.
General

- Patronage Minimum – Select from one of the following options:
- Minimum Patronage – If selected, the minimum Patronage Earned amount is entered in the Minimum field, on the Patronage Checks window, found at Accounting / Patronage / Pay.
- Minimum Check – If selected, the minimum Check Amount is entered in the Minimum field, on the Patronage Checks window, found at Accounting / Patronage / Pay. Patronage earned dollars are allocated first, then a check is issued for any Patron whose check amount meets the minimum amount entered.
- Minimum Amount/Minimum Check – This option may only be used if Patronage Checks are processed at Pay / Patronage Checks and Deferred Payments are not included in the payout. When selected, first the Patronage amount is checked to ensure the Minimum Amount is met. If so, the process continues and the check is issued. If the Minimum Patronage amount is not met, the amount calculated is compared to the Min Check Amount entered. If the amount exceeds the minimum check amount, then a check is processed.
- Min Check Amount – If Minimum Patronage/Minimum Check is selected in the Patronage Minimum drop-down, enter a minimum check amount.
- Backup Withholding – Enter the Invalid TIN ID used to indicate Patrons who did not provide a valid Tax ID. In the Backup Withholding % field, indicate the amount to be withheld from those Patrons' checks. Optionally, select Withhold on Cash Portion only to calculate the backup withholding taxes on the cash portion of the Patronage paid versus the earned amount.
- Canadian Income Tax – If Canadian income tax is to be withheld, indicate the percentage to be used for the withholding.
- Canadian Income Tax Exempt – If any amount of the Patronage paid is exempt from Canadian income tax, enter the exempt dollar amount.
- US Foreign Tax % – Enter a percent to calculate the US Foreign Tax amount. The amount is included in the $ Withheld column on the PreCheck Run report.
- US Foreign Tax Account – Indicate the G/L account for the journal entry posting the tax amount from the Patronage Check.
- Cash to Primary Req % – To enable splitting the cash portion of the payout between the check and required stock, enter the percentage for the required stock. Entering an amount in this field always deducts from the cash portion and forces a required stock at the Patronage Checks window.
- AR Balance Product – When Patronage Checks are processed at Pay / Patronage Checks, a deduction may be made from the Patronage Check to apply to the Customer's Accounts Receivable balance. To use this option, enter the Product to be used when the Credit Invoice is generated by the deduction.
- Use Multiple Stock Classes To Calculate Required Amount – Selecting this option allows a Required Equity Amount and a Current Year Deferral to be defined. Additionally, a Secondary Stock Class may also be defined.
- Required Equity Amount – Enter an amount when using multiple Stock Classes to calculate the required equity amount to be used in the calculation.
- Current Year Deferral – From the drop-down, select the Stock Class for the current year deferral.
- Secondary Stock Classes – If secondary Stock Classes are to be used in the calculation of the required amount, select the Stock Classes.
- Patronage Checks - Defer/Payout – When selected, Stock Certificates are created before a Patronage payout begins. When Do Not Defer is checked, any Patrons under the minimum activity will not be shown on the Precheck run and will not have any patronage deferred when running checks at Pay / Patronage Checks.
- Pay X% of Equity From – Enter the percentage to be paid and select the Stock Class to use when calculating the percentage.
- Member Loan Stock Class – Select the Stock Class representing the member loan. When the Patronage payout is processed, this year's activity sends deferred amounts to the Member Loan or payout Stock Class.
- Minimum Activity Amount – Enter the minimum amount of activity. Patrons with less than this specified amount will have no new amounts deferred to this year's certificate but may still receive a check for the payout percent of previous years' certificates.
- Transaction/Comment – Comments entered here are saved to Stock History for the specified transactions and print on the Dem and Note 2 style of the Patronage Activity report.
Printer

- Patronage Check Printer – Indicate which printer to use to print Patronage checks.
- ACH Pay Stub Printer – Indicate which printer to use to print ACH pay stubs.
- Print Location Heading on Checks – Select this option if the checks have no preprinted company or location name in the upper-left hand corner. When selected, the Accounting module's default Location prints in the upper-left corner of all checks printed in the Patronage module.
- Print Options – Optionally check any of these options to Print SSN on Checks, Print Total Equity on Checks, Print Check Number on Precheck Run, and/or Print Check Number on Check Stub.
Note: The Print Total Equity on Checks option only applies to Patronage and Detail Patronage Checks. It will not print if only a payout. - Label for Total Equity Value – A custom label for the Total Equity value can be entered here. If blank, the label appears as Total Equity on the check stub.
- Top Margin Adjustment – This field defaults as blank, that represents a default setting of 385 (approximately 1/4"). This number may be changed if necessary. Any number entered that is greater than 385 shifts the check printing down and any value less than 385 shifts the printing up.
- Detailed Patronage Check Format – Indicate which format to use from the drop-down. If Format 1 is selected, the check stub prints the original check form. Selecting Format 2 splits Qualified and Non-Qualified into separate areas on the check stub.
- Check Message – The Check Message will display on Line 1 and Line 2 of the check. This is what will print on the check stub.
- Non-qualified document explanation – Up to 255 characters can be entered in this field to provide additional details regarding the non-qualified document.
- Print company heading on non-qualified document – If the company heading should be printed on a non-qualified document, check this option.
Cross References

- Stock Class Cross References – Used to establish Stock Class filtering options on selection windows.
Note: Cross Reference 1 and Cross Reference 2 are no longer used.- User Defined #1 - User Defined #6 – These 10-character limit alpha/numeric text boxes define the labels for Stock Class filtering options. To activate this option, select a User Defined checkbox on the Edit a Stock Class window at Patronage / Setup/ Stock Classes.
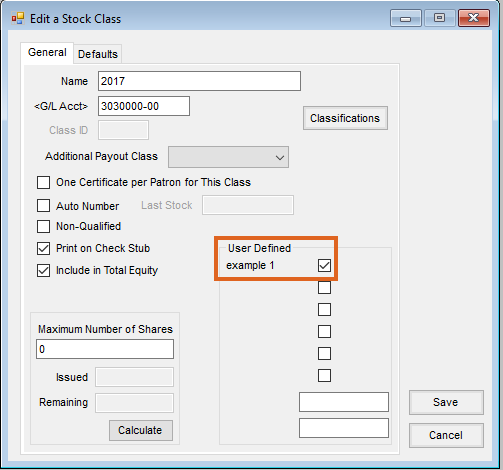
- User Defined #1 - User Defined #6 – These 10-character limit alpha/numeric text boxes define the labels for Stock Class filtering options. To activate this option, select a User Defined checkbox on the Edit a Stock Class window at Patronage / Setup/ Stock Classes.
- Stock Class Classifications – This opens the Stock Class Classification Setup window where Classifications can be added, edited, or deleted.
- Patron Cross Reference – Used to establish Patron filtering options.
Note: Cross Reference 1 and Cross Reference 2 are no longer used.- User Defined #1, User Defined #2, User Defined #3 – These 10-character limit alpha/numeric text boxes define the labels for Patron filtering options. To activate this option, select a User Defined checkbox on the Edit a Patron window at Patronage / File Folder / Patrons.
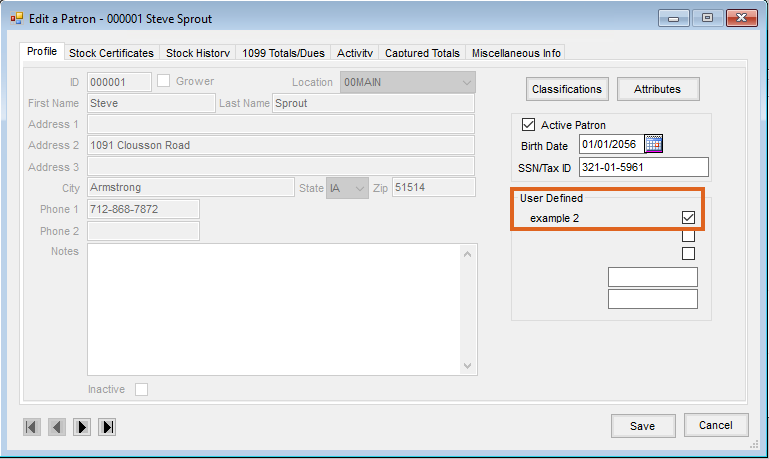
- User Defined #1, User Defined #2, User Defined #3 – These 10-character limit alpha/numeric text boxes define the labels for Patron filtering options. To activate this option, select a User Defined checkbox on the Edit a Patron window at Patronage / File Folder / Patrons.


