Setup
General Information
The General Info area is used to define several fields used throughout the program based on the state in which the reports are filed. This area is used to set up the list of Schedules, Fuel Types, Origins, and Modes of Transportation. This configuration screen is the key to generating the schedules for the Motor Fuel reports. The setup is located at Motor Fuel / Setup / General Info. To add an entry, double-click in an open field and begin typing. Once all of the entries have been made, select Save.

- Product Types – The Product Types area is used for the 3-digit Uniformity Code that was predefined above.
Note: The Product Type is not used in the State of Minnesota. - Origin Cities – Origin Cities are the cities or terminals where the fuel originates. These cities will be used during the purchasing process in Agvance Accounting.
Note: If an Origin City is used on a purchase but is not included in this list, it may cause issues in reporting. - Schedules List – The Schedules List area is where all Schedules for every type of transaction are added. The type of Schedule that the Product should be included on is selected while creating an Invoice. If reporting to multiple states, set up the appropriate combinations (i.e., ND7/MT3).
- Modes of Transportation – The following Modes of Transportation are used by Uniformity:
- J – Truck
- R – Rail
- B – Barge
- S – Ship
- GS – Gas Station
- PL – Pipeline
- BA – Book adjustment
- RT – Removal from Terminal (other than by truck or rail) for sale or consumption
- ST – Stationary transfer
Setup Motor Fuel Products
Configuring Motor Fuel Products
The Setup Motor Fuel Products screen is used to classify each Motor Fuel Product. The screen is located at Motor Fuel / Setup / Motor Fuel Products. The Products in the Product Codes drop-down list are the Products that were set up in the General Info setup area.
For Uniformity States, specify the Product Type the Product is grouped with on the Tax Return (ex. several types of diesel), each with their own Product Code, are reported together as Diesel (Type 160) on the return even though on the supporting Schedules of Disbursement and Receipt, they are reported separately by their Product Code.
Note: When setting up Motor Fuel Products, the Product Type column is not used in Montana.
Add-on Codes are set up at Hub / Setup / Item Group. Use the Add Item Group window to set up Item Groups for additional fuel taxes.

- Double-click an empty field in the <Product Name> field.
- The Select Products window opens to select the Motor Fuel Products to add. Once the Products are selected, choose Done. The Product Name, Dept ID, and Prod ID are filled in the grid.
Note: Multiple Products can be selected from this window, but remember to add a code to every Product that is chosen. - Once the Product has been entered, select the Product Code and the Add-on Code (if necessary). Continue these steps until all of the Motor Fuel Products the company reports have been set up.
- Select Save to save the list. Optionally Print the list for future reference.
Creating a Sales Invoice
Use the Sales Invoice when billing a Customer for a Motor Fuel Product.
Note: Other Products can be invoiced along with a fuel Invoice.
This removes the Product from inventory, updates the Customer's A/R, captures the cost of Products for margin computation, posts a Journal Entry, and specifies on which Schedule the Motor Fuel Products are to be included if applicable, the taxes paid on an Invoice, the destination of the fuel Products, and the Mode of Transportation.
- Follow the normal process for adding an Invoice.
Note: The Invoice Date must be in the correct liability period being billed. If outside the liability period, it will be excluded on Motor Fuel reports. - Set prices for the Motor Fuel Products by double-clicking in the Unit $ column for each Product.
- Go to the MFT Details tab to choose the Motor Fuel information to be applied to the Motor Fuel Products on the Invoice.
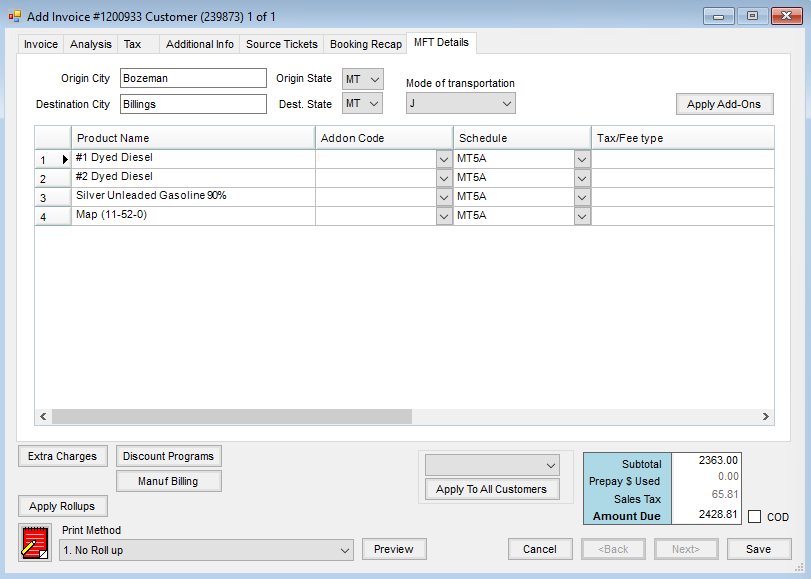
- On this tab, choose the Addon Code, Schedule, Mode of Transportation, and Tax/Fee Type. The Add-On Code will set the Schedule, if applicable, and the Motor Fuel taxes that are to be paid with the sale. If the taxes are not charged as a separate line item on the Invoice, the Schedule, Origin/Destination City, Mode of Transportation, and Tax/Fee Type will need to be selected. Optionally use an Addon Code or just enter the necessary information when invoicing.
Kansas, Missouri, Montana, Oklahoma, Wisconsin: The Tax/Fee Type is not used.
Minnesota: For Minnesota, fuel sales used in the PDA-49E calculations require the Tax/Fee Type to be utilized. The Undyed Fuel sales which are non-taxable will require the Tax/Fee Type to be set to the option of Both Free. For the Undyed Fuel sales which are taxable, the Tax/Fee Type is to be left blank. - The Origin and Destination City/State can be changed if different from what defaults in from the Customer information.
- Back on the Invoice tab, set the taxable or nontaxable reasons for Products if necessary. To set the Product to taxable, check the Tax column for that Product. To set the Product to tax-exempt, right-click the Tax box and choose the reason for exemption.
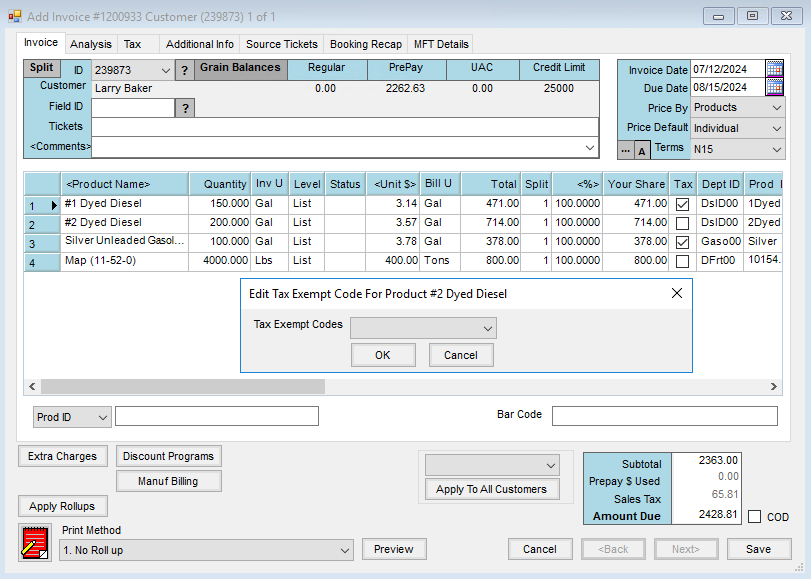
- Set the Sales Tax to the correct percentage if applicable.
- Choose Save when finished.


Creating a Purchase Invoice
Add a Purchase Invoice when an invoice has been received for a Motor Fuel Product that has already been delivered.
This creates an unpaid AP Bill for the Vendor, updates the Product cost, makes a Journal Entry, and records the Origin/Destination of the fuel, Schedule, Mode of Transportation, and Net/Gross Gallons if necessary.
-
Follow the normal process for adding a Purchase Invoice.
Note: The Invoice Date must be in the same liability period in which the fuel was received. If the receipt was entered on 4/30, the Invoice Date must be in the same liability period. If not entering the receipt in the April liability period, enter the date on the Purchase Invoice from the Vendor. If a Purchase Receipt was entered in the current reporting month and it does not include the Purchase Invoice in the same liability period, there will be issues with inventory numbers. The report will include the Receipt in inventory numbers and will include the Receipt in inventory counts but there will be a Purchase Invoice to support it. - The $ Total should reflect the cost of the fuel and Federal Excise Tax for the load of fuel.
- Make sure the fuel carrier is selected as the Estimated Freight Vendor. The freight can be entered as $/Unit or Total $. The $/Unit option only allows three-decimal accuracy. The Total $ option allows a more accurate number to be posted to the Estimated Freight Liability Account.
- Columns related to MFT may be hidden. Right-click the header column of the Product grid and select Choose Columns or Choose Columns Alphabetically then check the columns related to Motor Fuel.
- Choose the Origin City/State, Destination City/State, Mode of Transportation, Bill of Lading Date, Net Gallons, Gross Gallons, Seller License, Tax/Fee Type, and Receipts Schedule.
Missouri, Montana, & Oklahoma: The Seller License and Tax/Fee Type are not used in Montana or Oklahoma.
Kansas: The Tax/Fee Type is not used in Kansas.
Minnesota: Minnesota reports are not based on the Motor Fuel Schedules but are based on the Origin and Destination States. If the purchase needs to be reported to another state, the Schedule will need to be selected for the export/import state and the Mode of Transportation.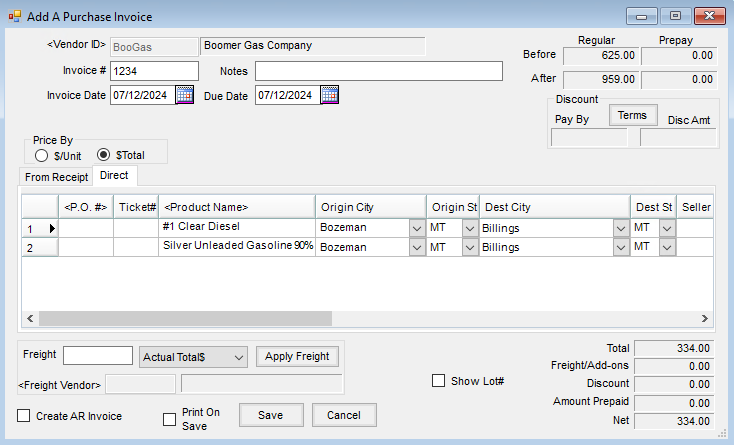
- Select Save to save the document and create an unpaid Bill for the Vendor.
- If valuing the State Motor Fuel Tax into the cost of the Product, after entering the Purchase Invoice for the fuel, a purchase needs entered for the dollar amount of the State MFT. Enter the $/Unit charged for the State MFT.

The purchase should be made to the State with the Product just purchased at a zero quantity. Enter the $/Unit charged for the State MFT. Since this will be an overestimate of the amount being paid to the State because of the credit that can be received, at the end of the month, enter a credit Bill for the difference.
Preview Purchases
Preview Purchases are used to review purchases for the liability period being reported.
The utility loads the selected date range of Purchase Invoices containing a Motor Fuel Product. It brings in the information Agvance uses to create the Schedules and the information which can be edited.
- Navigate to Motor Fuel / Reports / Preview Purchases.
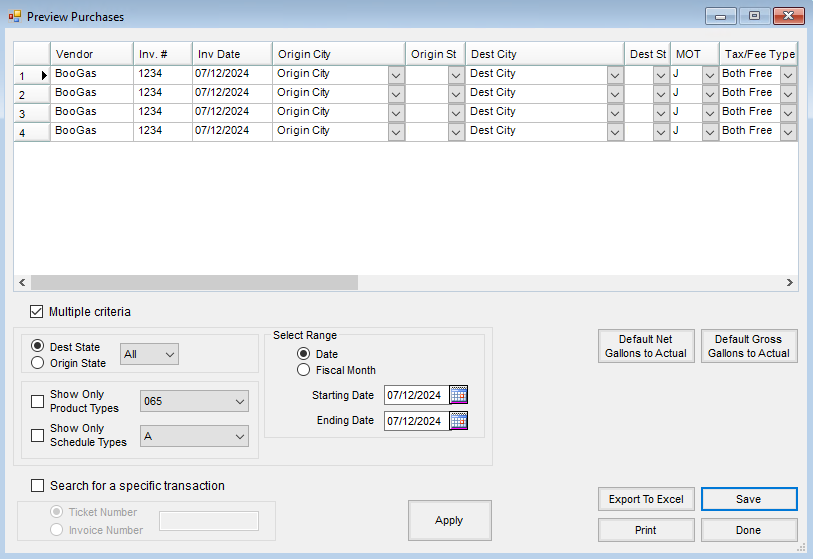
- Select a liability period by changing the date range and choose Apply.
- Review purchases to make sure the correct taxes paid, Origin/Destination City, MOT, Schedule, and Gross/Net Gallons were selected. If any are incorrect, they can be edited here. Upon making changes, select Save. When finished with this screen, choose Done.
Note: The Carrier's license number comes from the FEIN on the Vendor's 1099/Payment Info tab. If reports are showing a blank FEIN, check the Vendor's information in Agvance Accounting.

Preview Sales
This is used to review A/R Invoices for the liability period being reported and to check the selected Schedule, Destination Cities, or taxes paid.
The utility is used to review and correct information that will be used to create the Schedule of Disbursements and Receipts for the liability period indicated. It will load Invoices that contain a Motor Fuel Product for the selected date range and will bring in the information Agvance uses to create the Motor Fuel Schedules. It also gives the ability to edit some pieces of information.
- Navigate to Motor Fuel / Reports / Preview Sales.
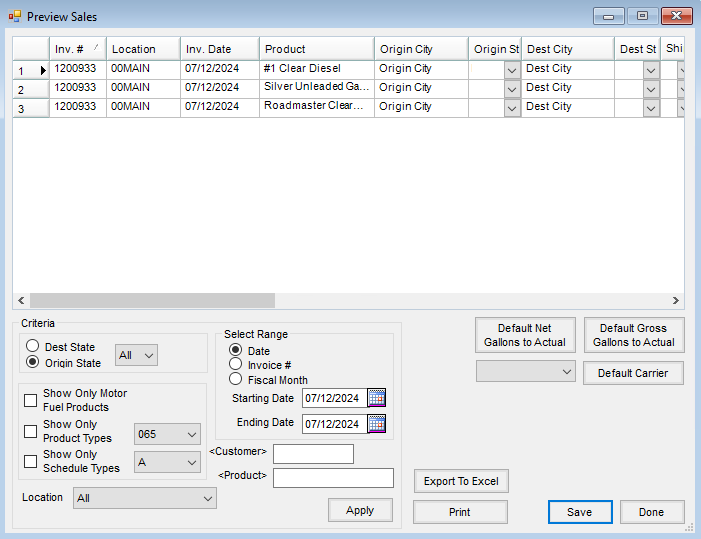
- Select a liability period or date range of Invoices to review. Optionally filter by Product or Customer and choose Apply.
- Review the sales to make sure the correct taxes paid, Schedule, Origin, or Destination City were selected.
- Optionally set the Carrier or Net/Gross Gallons if there are any Invoices that will appear on an out-of-state Schedule.
- If any items are incorrect, the information can be edited here. Upon making any changes, select Save.
- When finished with this screen, choose Done.

