For information regarding Blends in Agvance SKY, see Blends - SKY Customer, Blends - SKY Order, and Blend Jobs - SKY Dispatch.
Overview
Blend Tickets are generated for a Customer’s Field. A Field must exist for the Customer before a Blend Ticket may be created. Fields can be added one at a time at Hub / File / Open / Fields or a generic Field can be added for each Customer at Hub / Utilities / Add Fields.
Only Customers who have existing Fields set up display in the Select a Blend Ticket window. Existing tickets for a Field are shown in the grid. The grid displays relevant information about those tickets including Ticket #, Location, Dates, Status, Added by User, Last Edited User ID, etc.
Using the Add a Blend Ticket shortcut icon at the Select a Field window, select the Customer/Field for the Blend Ticket being added. Alternatively, tickets may be added from File / Open / Blend Ticket. The Select a Blend Ticket window appears to select a Field and then Add can be chosen. Select Favorite Customers to view only Customers set up as favorites.
When everything is completed on the Blend Ticket, choosing Save records the ticket and, if the Print on Save option is selected, opens the Print Blend Documents window.
If Save is unavailable, it is possible the Blend Ticket has been loaded and invoiced; therefore, no changes to the ticket can be made. Use the Cancel button to exit. Another possibility is that the Blend Ticket has been loaded and transferred to Field history.
The EPA Registration # heading on the Custom App Sheet and Consolidated Blend Ticket document read EPA / PCP Reg. Num. to include the EPA and/or PCP Registration # for Canadian chemical products. If a Product contains both an EPA and PCP Registration #, both numbers print on the Custom App Sheet and Consolidated Blend Ticket document.
When printing the Worker Protection Sheet, the PCP number is included along with the EPA number.

The ability to filter with the Current Region & Sub-Region checkbox is available when loading the Customer list.
Note: This is only available if the setup at Hub / Setup / Recent Customers by Region has been saved.
After selecting a Field, the split arrangement and Field list for the Customer display. A checkmark indicates the Field will be included on the ticket. The Field list may be sorted by selecting a column heading. Select other Fields to include on the Blend Ticket by checking the box for the Field. The total acres for the Blend Ticket are the sum of the acres of the selected Fields. The Field’s acres default from the Field profile.
Optionally Use Field GIS Acres by selecting the checkbox. If unchecked, the Reported acres of Fields will be used. Any Fields with no GIS acres available will continue to default as the Reported acres. This preference is remembered per user and application.

General
This screen holds the variables necessary to formulate product using one of the pre-defined inventory Product Sets.

- Customer ID / Field ID – This defaults from the Field selection screen. Choosing the Question Mark icons provides additional details about the Customer or Field shown. To view file attachments added to the Field in the Hub, access the View Field Information window by selecting the Question Mark icon by the Field ID and choose Attachments.
- Blend Type – Choose Calculated Analysis, Custom Mix Fertilizer, or Registered. These options determine what prints on the Oregon State Fertilizer Tag.
- Calculated Analysis – This automatically prints the calculated analysis at the top of the Oregon State Fertilizer Tag.
- Custom Mix Fertilizer – This prints Custom Mix Fertilizer at the top o the tag and prints the calculated analysis below that label.
- Registered – This enables the Registered Blend Name field. With Registered selected, the name entered here prints at the top of the tag.
- View Maps – This allows viewing, customizing the view, and printing full page maps created from the Agvance Mapping module. Zone defaults to All. If the Field is set up with management zones in the Agvance Planning module, a Blend Ticket for a specific zone may be generated.
- Plan – If a Field Plan has been created in Agvance Planning, it may be imported into the ticket only while in the add mode of the ticket by selecting the appropriate Plan letter from the drop-down. If a Plan exists for the Field, the drop-down menu displays in red to alert that a Plan exists. To assist in the selection of a Plan, specific information is provided in the drop-down including Plan letter, Ordered Date of the Plan, Location, and Billing Notes. Plans may also be imported by clicking the Import Blend button.
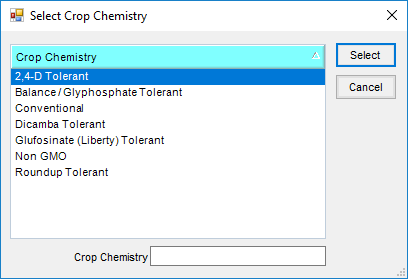
- Crop Chemistry – If applicable, select a Crop Chemistry for this Blend Ticket by choosing from the drop-down or double-clicking the label to search/sort. Crop Chemistries can be set up at Setup / Crop Chemistry. Due to Roundup resistance issues, chemistry applied on the Field may be recorded for future reference.
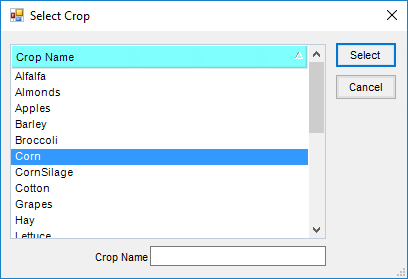
- Crop – Select from the list or manually enter the crop. The list of available crops is maintained at Hub / Setup / Crop Maintenance or in the Planning module at Planning / Setup / Crop Maintenance. The selected crop is associated with each Product on the final Blend Ticket and displays on a fertilizer tag crop warning if one is required for the state. If a crop is selected from the drop-down on the General tab after the Products are entered on the Products tab, the crop code is changed on each product line to the newly selected crop. If the crop is manually entered in this area, the crop code on each Product line is not automatically updated, but may be manually changed.
Note: The ability to filter for a crop on reports is limited to only those crops that are set up, not the ones typed in. - Placement – The method in which the product is applied (broadcast, sprayed, knifed, etc.). Several Placement methods come loaded with the program, but items may be added or deleted from the list. More information on Placement setup can be found here.
- Ordered Date – This defaults to the system date but may be edited.
- Loaded Date – Enter the date the ticket was loaded. If a ticket is marked Loaded and the loaded date is blank, the date is set to the system date. When a ticket is imported into Accounting, the import date is controlled by the Import from Tickets Date preference set at Accounting / Setup / Location Preferences.
- Time – This defaults to the system time when the ticket is added but may be edited.
- Billing Notes – These comments print on the Consolidated Blend Ticket and follow through to the Invoice in Agvance Accounting. To add comments to the list in the drop-down for future use, double-click on Billing Notes and select Add. One-time comments for the Blend Ticket may be manually entered as well. Comments may be up to 80 characters.
- Quantity – Indicate the number of acres, tons, hectares, tonnes, or 1000 SqFt for the blend formulation. The quantity defaults from the Field file. Double-clicking on the Quantity label allows selecting the crop zone for a particular year, which sets the crop and acres on the Blend Ticket, and sets the crop zone boundary for the Custom App Sheet.
- Apply New Acres – If the number of acres are edited, this must be selected to apply the new acres to the Blend Ticket.
- Import Blend – This provides access to existing Agvance Blends and Plans. When using the Junge® Blender System which is set up in the current Product Set, those blends are also available at this window. The Import Blend window displays those transactions available to be imported into this Blend Ticket as a starting point. The original document remains unchanged and may be imported repeatedly. This makes it possible to store the most common blend scenarios as templates.
- When importing a blend, the Select a Ticket screen defaults to the Field of the current Blend Ticket but a Blend or Plan from another Grower/Field may optionally be imported. Right-clicking the existing Blend or Plan displays the transaction details. Products, rate/acre, requested analysis, Crop, Placement, Billing Notes, Product Set, Optimize By, and Price By settings are brought in from the imported Plan or Blend. Pricing and acres are not.
- Important: Pricing from the imported transaction is not retained. If pricing from the imported Plan is needed, select the Plan from the drop-down on the General tab.
- New pricing is calculated just as it would be if the Products were formulated or selected without the Import function.
- Product Set – Indicate which of the pre-defined sets of inventory Products to use to formulate the blend. Product Sets are defined at Blend / Setup / Product Sets. Only Product Sets for the default Location are available. If a Product Set is selected that includes active Products with limits set, a red background appears for the Product Set label. The Question Mark icon associated with the Product Set on the General tab allows viewing and editing the selected set of inventory Products. For more on this, see Product Sets. For setup in SKY Order, see Product Sets - SKY Order.
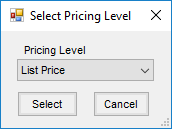
Note: A Product Set must be defined, even if the Blend is a direct request. This is how the program knows the type of Blend (dry, liquid, suspension, or feed). Depending on the type, some printout changes and warnings take place. - Optimize By – This is the pricing level the formulation uses to find the most economical blend for the company for the current formulation request. This option defaults from the user’s last saved Blend Ticket.
- Price By – Used for billing, this indicates how to invoice the Products. It also determines how the information is printed on the Consolidated and Custom Application documents. This option defaults from the user’s last saved Blend Ticket. There are four choices:
- Products – This displays and prices by individual inventory item on the Invoice. If a manufactured formula is used, only the finished Product amount and price is displayed on the Invoice. The raw materials may optionally be displayed on the Blend Ticket if Split Out when Printing is indicated in the Product file when Manufactured Formula is selected.
- Blended Analysis – This displays only the pounds/acre analysis, not the individual Products on the Invoice. The prices of the Products are combined into a single line item.
- Guaranteed Analysis – This displays only the percentage analysis per 100 pounds on the Invoice and combines the Products used to formulate the blend.
- Elements – Invoicing by element requires each element (N, P, K, and S) to be set up as an inventory item with individual prices and identified at Hub / Setup on the Location Preferences tab. Both liquid and dry elemental-pricing Products may optionally be set up. The Product Set determines which of these pricing items are used. When the Invoice is generated, the guaranteed analysis is displayed along with the correct price per unit of the entire analysis. The individual prices set up for the elemental Products are combined to calculate the analysis unit price.
- Loaded – A loaded ticket affects inventory on the save of the blend. Formulating the same ticket without this option checked has no effect on inventory. Change the status of the ticket to Loaded later by using the Record as Loaded, Edit to Actual Scale, or one of the Edit to Blender Scale options. Another option is to Edit the ticket, select the Loaded option, and Save. Editing a loaded Blend Ticket adjusts inventory accordingly. It also leaves an inventory trail to indicate the ticket was edited after it was loaded.
- When a Blend Ticket is loaded, it affects inventory. If a Blend Ticket is edited and the quantities are adjusted, inventory is adjusted as well. When the Blend Ticket is invoiced, the Invoice affects Accounts Receivable but inventory is only affected if there is a change in quantity when invoicing. After a Blend Ticket is loaded, it can be invoiced at any time.
- Mini Bulk – This indicates if this is a mini bulk load.
- Custom Applied – This indicates if this load was custom applied. This status defaults from the last used setting. Selecting this option negates all federal and state checking for restricted use Products and prints Custom Applied on the Blend Ticket, Custom Application Sheet, and Consolidated Blend Sheet.
- Repacked – This indicates if the load is repackaged from another source. A Repackaged Report is available in Accounting / Accounting Reports / Inventory / Inventory Status.
- Respray – This indicates if the load is a respray of a Field.
- VRT – This indicates if the ticket is to be variable rate applied. This flags certain blender interface files as VRT so the blend equipment knows the Products are not to be blended but loaded into separate bins/tanks. When a VRT Blend Ticket is printed, one page prints for each Product that has weight as calculated from the Unit Weight of the Product. Exceptions to this printing style are blends from Feed Product Sets and blends printed from the Resize form. Products set up as a Manufactured Formula that are set to split out on the blend all print on the same batch ticket which allows creating the finished good used in VRT.
- Nutrient Requests – When formulating the blend to a requested analysis, type in the goal for each nutrient - N, P, and K. These are rounded with accuracy of two decimals. The User Defined nutrient is rounded to four decimals and the remaining nutrients are rounded to three decimals.
- Set Nutrient Constraints – This formulation tool allows defining what percent of a particular nutrient is satisfied by a particular type of Product. This advanced feature is found by double-clicking on any of the nutrient headings (<N>) except the User Defined heading.
- For example, if requesting a 150-0-0 blend and no more than 75 pounds of N is to come from a Nitrate source of N, the Nitrate N should be set to <= 50 (75 is 50% of 150).
Note: Analysis items in the Product Set must have their chemical composition defined before the Set Nutrient Constraints function will work. The chemical composition of a Product is set by selecting Details at Hub / File / Open / Products on the Blend Setup tab.
- For example, if requesting a 150-0-0 blend and no more than 75 pounds of N is to come from a Nitrate source of N, the Nitrate N should be set to <= 50 (75 is 50% of 150).
- Formulate By – This controls how the program interprets the nutrient requests entered. This option defaults from the user’s last saved Blend Ticket.
- Lbs of Plant Food – This is pounds of nutrient per acre. Additional water is added to suspension blends if the Maximum Salt Out Temperature has been exceeded, if the total of the Guaranteed Analysis of all nutrients exceeds the Suspension Blend Target % defined in the Product Set, or if the Maximum P% on the Guaranteed Analysis has been exceeded.
- Guaranteed Analysis – This is pounds of nutrient requested per 100 pounds of product. When an analysis is entered, it is multiplied by the rate per acre then divided by 100 to arrive at the pounds of plant food required for the blend. Once the blend is formulated, either water or dry filler is added, depending on the Product Set, to meet the correct rate per acre (or hectare, ton, tonne, 1000 sq ft) requested. This locks in the guaranteed analysis. This is also why the analysis entered may need to be adjusted to meet a requested rate/acre when not using filler in a dry Product Set.
Note: If either Tons or Tonnes is selected for the Quantity Label, then the Formulate By will be locked into Guaranteed Analysis and the Lbs of Analysis will set to 2000 for Ton units and 2205 for Tonne units. - Start With Products – This function starts with specified Products, locks in the rate per acre or total amount in the blend in English units or in Kilograms, and has the program formulate the remaining nutrient values needed from other Products used in the Product Set. For this reason, the Products selected should not be in the Product Set (or at least should be marked as Inactive in the Product Set).
Note: Nutrient information may be edited for any of the selected Products, but edited information is used only if Save Product Info is selected before Done.- When selecting a Product in the lower grid, information about the Product displays in the top portion of the screen. Optionally, information may be changed related to the Product’s nutrient value or to its setup. For this edited information to be used when formulating, Save Product Info must be chosen before Done.
- To input the total units of nitrogen needed from a Product containing nitrogen, right-click in the Rate/Acre or Total Quantity column in the Product’s row in the lower grid. This brings up a screen requesting the Nitrogen Amount in Pounds. Choose OK to calculate back to the Rate/Acre or Total Quantity.
- The following is an example of the Start With Product Information screen.
- Load Nut Recs – If a nutrient recommendation was generated for this Field (and zone), selecting Load Nut Recs brings in the nutrients requested in pounds of plant food. If the Planning module is used, selecting the Question Mark icon displays the scenario used in generating these recommendations. Below, the type of recommendations pulled in (Field average or zone average) displays. If the recommendations were generated on a sample-by-sample basis and Load Nut Recs is used, the recommendations used are based on the Field average.
Note: Once a recommendation is loaded, it can be cleared by selecting Clear Nut Recs. - Formulate – Using the Product Set, requested analysis, and other settings on the General tab, the program calculates the Products and rate needed for this acreage. The system uses a Least Cost method for this calculation. When the formulating is complete, the Products tab displays.
- Load Nut Recs – If a nutrient recommendation was generated for this Field (and zone), selecting Load Nut Recs brings in the nutrients requested in pounds of plant food. If the Planning module is used, selecting the Question Mark icon displays the scenario used in generating these recommendations. Below, the type of recommendations pulled in (Field average or zone average) displays. If the recommendations were generated on a sample-by-sample basis and Load Nut Recs is used, the recommendations used are based on the Field average.
- If all the nutrient requests cannot be met, a message displays listing those requirements not filled. It is possible a different Product Set would work better for the request or the Allow Nutrient to Run Over or Set Limits options on Products at the Product Set level have constraints that cause the formulated products to fall short of the analysis requested.
- View Analysis – This displays the Ordered analysis, the Blended analysis in Lbs/Acre, and the Guaranteed analysis. Everything is displayed at the maximum decimal accuracy stored in the database. The settings in Blending or Planning at Setup / Location Preferences on the Print Prefs tab control the Guaranteed Analysis Decimal Accuracy on the printout. The different forms of Nitrogen used may be viewed by selecting the <N> in the heading. This information is only valid if the Chemical Composition area of all Nitrogen contributing products has been entered, which is found by selecting Details at Hub / File / Open / Products on the Blend Setup tab.
- Show Splits – This displays the Customers on the ticket, along with the billing splits, Bill To information, and Pesticide Expiration Date. The grid at the bottom of the window displays a list of the Customer’s Fields and acres. Fields involved in this blend are indicated by a checkmark.
- Additional Info – Optionally add information on this window which may later be used for tracking and reporting. See the Additional Info tab of this article.
- Print on Save – When this option is selected, saving the Blend Ticket displays the Print Blend Documents window. It defaults to the settings used on the previous ticket.
- Print Aerial Imagery – Select Print Aerial Image from a Custom Application document or a Field Plan document to include a static image that cannot pan or zoom. The scale of the image is determined by the Zoom Level. A box will print around the latitude/longitude that is saved with the Field that is being printed. For the combined format in the Custom App only, all Fields will have the boxes drawn around them.

Products
This screen automatically displays the formulated Product after selecting Formulate on the General tab. If requesting Lbs of product per acre directly, choose the Products tab. A blank screen appears where Products may be added. When making a direct Product request, be sure to first select the acres and a valid Product Set on the General tab.

- Acres, Set and Target Lbs of Analysis – This displays information from the General tab.
- Reorder Products – This is used in conjunction with the Order column in the grid. In the Order column, enter the new row number for each Product and then select Reorder Products.
Note: To get to the Order column, select the Product grid, then use the arrow keys on the keyboard to move to the right. - If Products with mixed Inventory and Billing Units are used for analysis blends, the analysis displays in the unit of measure of the first analysis Product.
- Product Grid – Add to existing Products or select all the Products for the blend in this grid.
- Product Name – Double-click this column heading to display the Select Products window. Select the Inventory Department and the Product from the department.
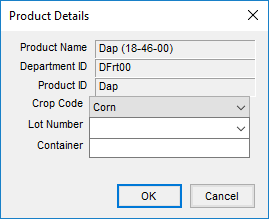
- Product Details – For additional information on a Product that has been added, right-click the Product’s name in the grid to display the Product Details window. The Crop Code, Lot Number, and Container may be edited as needed.
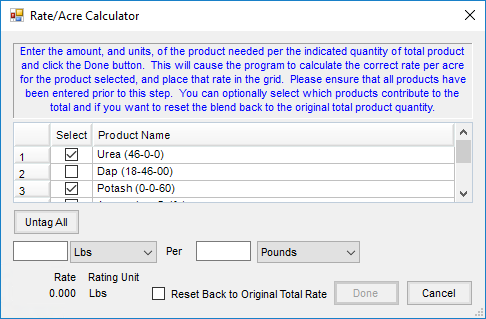
- Rate/Acre – Enter the quantity to use in rating units. Right-click in this column to display a Rate/Acre Calculator. All Products and rates should be filled out in the product grid before using this function. In the Select column of the grid, check only the boxes on the Products to be used in the calculation. Some specialty Products are to be added at a rate of 2 quarts per ton of DAP, for example. This could also be used for certain seed treatment products where the application rate is Ozs per 100 lbs, etc.
- In the image below, the surfactant is set at 32 Ozs per 100 Gallons of mixture. The available units display in the drop-down for selection of Ozs, Pts, Qts, Gal, Lbs, or Tons. In the Per units drop-down menu, select Gallons, Pounds, Nutrient Pounds, or Count. The calculator displays the rate and rating units calculated in the lower left corner of the window.
- The Reset back to original total rate checkbox defaults as selected when using the Rate/Acre Calculator for chemical mixes. Agvance assumes the total rate per acre for the mix is set with water and chemical prior to adding the rate of surfactant. For example, once the chemical’s and water’s totals are calculated, the surfactant is ready to be calculated using the Rate/Acre Calculator. When surfactant is added with the default of the Reset back to original total rate, the water Product is reduced by the amount of the surfactant to be added to the mix. Select Done when finished or Cancel to exit.
- Total Product – This extends the rating units based on the number of acres (hectares, tons, tonnes or 1000 SqFt). If the ticket is being used as a Product pickup or delivery document, enter the total amount picked up or delivered in the Total Product column and the Rate/Acre is calculated after selecting Recalc Using Total Product.
- Blended – The Product total is converted to blending units and rounded to scale accuracy. Like the Total Product, quantities can be entered in the Blended column as well.
Note: When numbers are entered directly into the Blended column and Recalc using Blended is selected, the Blended number will not be rounded to scale. - Scale – This is the scale setting assigned to the Inventory Department where this Product resides. This number relates to the scale option number at Setup / Location Preferences on the Blend Setup tab.
- Container ID – Double-click and select the Product’s Container ID if the Refillable Container Management area is used.
- Ship From Location – This option, when enabled, allows Ship From locations to be selected on the line items of Blend Tickets. If a different Ship From location is specified on any line item of the ticket, an Inter-Company Transfer (ICT) is created automatically at the save of the ticket to move the inventory from the specified location to the location of the selected Products on the ticket. This Create ICT Based on Ship from Locations preference is found at Accounting / Setup / Location Preferences on the Delivery Ticket tab. Additionally, if all Products on a Blend Ticket have the same Ship from Location selected, the specified location’s address prints as the FROM address on the HazMat Shipping Order document.
- Mix Group – If the VRT indicator is unchecked, this defaults to 1 and blends the products together. If the VRT indicator is checked, then it numbers each line. The numbers may be edited to indicate the Products to be blended at the same time. The Blend Ticket prints per Mix Group.
- Carrier – Selecting this option indicates the Product is a carrier. This is typically used when chemical blends use fertilizer Products or water as carrier of the chemicals. By selecting the carriers and using the Adjust Carrier to Gal/Acre adjustment option, the rate per acre remains accurate. A Product with a zero-unit weight may not be marked as a carrier.
- Ship From DeptId – Specify the Department ID when the Product exists in more than one department, such as a regular fertilizer department and a bulk fertilizer department, in the Ship from Location and the Create ICT Based on Ship From Location preference is selected on the Setup / Location Preferences / Delivery Ticket tab.
- Recalc Options – Located below the Product grid, the options affect all Products in the grid if no lines are highlighted. If a specific Product needs to be recalculated, highlight the line by selecting the row number (hold the Shift key down to select several adjacent Products or the Ctrl key to multi-select Products), then choose the appropriate recalculate option.
- Adjustment Options – This adjusts filler, water, or Products marked as carriers to the ratio or total manually entered. The choices available in the drop-down list, located below Recalc Using Rate/Acre, vary based on the blend type – dry/feed or liquid/suspension. Select Apply to make the change.
- Dry Feed Options:
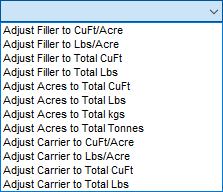
- Liquid Suspension Options:
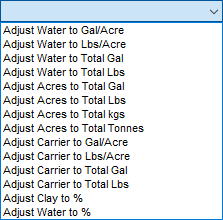
- Dry Feed Options:
- Ratios and Calculations Displayed at the Bottom – Based on the current formulation, there are several non-editable figures displayed at the bottom of the screen. Some may be zero if the current blend does not relate to them (% Water will be zero when working with a dry blend). The figures recalculate each time any of the Recalc options are selected or if the blend is re-formulated.
Note: The Estimated Salt Out Temp is affected by settings found by choosing Advanced on the Product Set associated with this blend.


Prices
Prices may be viewed and edited at this screen.
The prices default in using the following hierarchy:
- First, the program searches for Quoted Prices (if the blend originated from a Field Plan and was imported through the drop-down menu instead of selecting Import Blends).
- If no quoted prices exist, the price defaults from the Customer Price Level set on the Customer profile.
- If there is no Price Level set on the Customer file, the List price defaults. No prepay dollars or Bookings are considered at this point.

- Quoting Options – Three pricing options are available:
- Not Quoted – This option defaults to the Customer level pricing or the List price, whichever one is in effect.
- Quoted – This option locks in the line item prices on the Blend Ticket and retains them when the ticket is imported into invoicing.
- Analysis Quoted – This option locks in the price of the analysis on the Blend Ticket and retains it when the ticket is imported into an Invoice.
- Apply Prices to All – After choosing the desired Quoting option, select this if all Customers on the Blend Ticket should have the same pricing arrangement.
- Terms – Double-click in the Terms field to display the Select a Discount window. This is optional input. Terms or discounts may also be set or overridden at the invoicing stage. Terms default first from the Field Plan imported into the Blend, then from the grower on the Blend Ticket, and lastly from the location preferences setting for default term.
- Cust ID – The Customer ID is displayed. When a Blend involves a split billing, select any of the Customers from the drop-down menu to view their portion of the blend. To lock in a price for a Customer where the price is different than the defaulted price level, use the Quote Status drop-down.
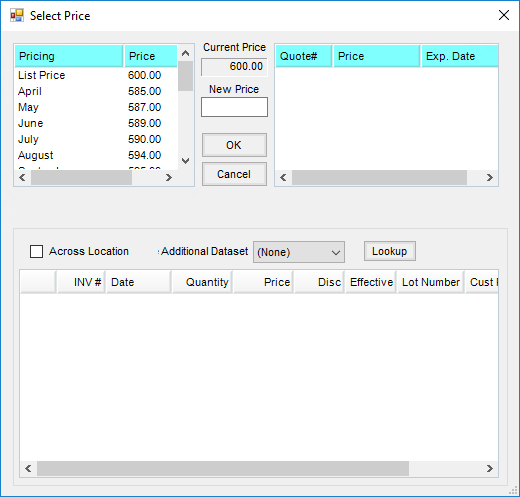
- Pricing Grid – Only the Unit $ and the % columns may be edited in this grid. To edit, double-click in the cell and the options display in a pop-up window. Optionally, double-click on the Unit $ heading to display pricing levels. Selecting a new price level here changes every Product in the Pricing grid to the pricing level specified. To only change an individual product’s unit price, type directly in that Unit $ cell in the grid or double-click in that cell to open the Select Price window. Any pricing previously set on the Product may be selected at that screen. The Price Look-Up feature may be used to find what the Customer was previously charged.
- Recalc using Unit Price – Select this option after editing any price to recalculate the extensions of all Products.
- Recalculate – The price of the analysis may be edited by changing the price that defaulted in then selecting Recalculate. Each analysis Product line item is adjusted to reflect the new analysis price. A message displays as a reminder to set the Quote Status to an Analysis option to retain the changes.
- Pricing Options – This allows viewing and manipulating the profitability of a blend. The Customer displayed on the Prices tab also displays in the Pricing Options window. When quoted and approved Field Plans are imported into a Blend Ticket, additional cost and margin comparisons are available on this window.
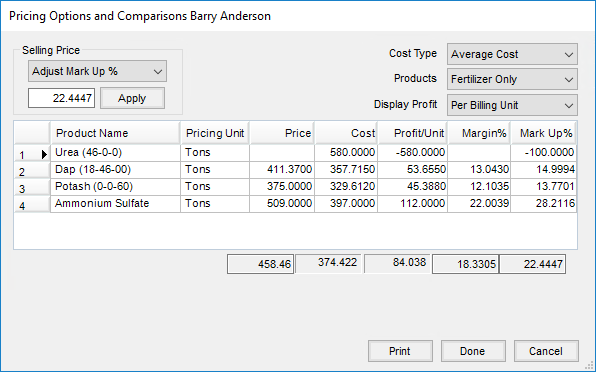
- Selling Price – Adjust the selling price to either target dollars per selling unit or a target Markup % or Margin %. Select Apply to make the change.
- Cost Type – This is the cost figure used as a basis if the Selling Price is adjusted by Markup % or Margin %. This option defaults to the Quoting Basis at Setup / Location Preferences on the Blend Setup tab.
- Products – Load either all the Products from the Products tab or just the fertilizer Products (with or without Hidden Blend Fees) into the Pricing Options grid. The totals include only the Products shown in the grid at that time. Changes made at this screen affect the Product prices on the Prices tab except for Hidden Fees.
- Display Profit – This controls how the numbers in the Product grid are displayed as the selling price is manipulated. Options include: Per Total Dollars, Per Billing Unit, Per Ton, Per Tonne, or Per Acre (or Hect or 1000 SqFt depending on the quantity label set at the General tab).
- Product Quote Icon – Saved quotes for the Customer may be viewed for reference. Product prices do not default based on these Customer quotes. However, if a quote exists for one of the selected Products on the ticket, the option displays red. If quotes exists but not for the Product on the Blend Ticket, the option displays white. By selecting the Quote icon, all quoted prices display. Optionally double-click the row under the Unit $ column in the grid to select a quoted price, if available.
Note: Quotes may be added, edited, and saved by selecting the Notepad shortcut on the Blend Ticket Prices tab, the Field Plan Prices tab, the Sales Order, Invoice, Delivery Ticket, and Booking windows, or at File / Open / Customers.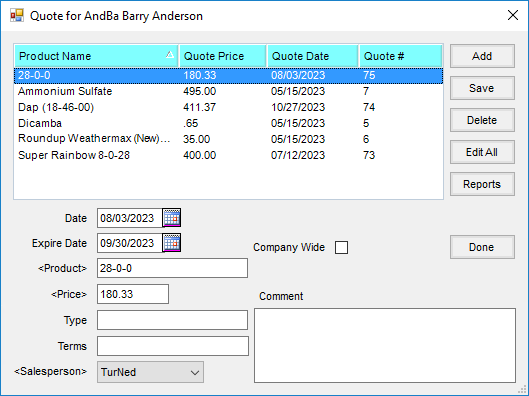 Note: This Quote function should not be confused with quoted prices set in either Planning or Blending.


 Note: This Quote function should not be confused with quoted prices set in either Planning or Blending.
Blend
This screen holds the batch breakdown based on blender capacities as well as optional notes and instructions about the job.

- Application / Blend Comments – Optional notes may be added before or after the job is completed. Double-click in the white areas below the words Application Comments and Blend Comments to manually add or select from a list of saved comments. The Application Comments print on the Custom Application Sheet and the Blend Comments print on the Blend Ticket.
- Target Pests – Double-clicking in the white area below the words Target Pests displays the previously entered pests to be selected or information may be manually entered. The Target Pests print on the Custom Application Sheet. More on Target Pest setup can be found here.
- Batch Breakdown:
- Equal or Partial – Indicate if the batches are to be calculated in equally sized loads or all full loads except the last one, which might be smaller. This setting defaults from the Product Set.
- Lbs, CuFt, or KGs – This indicates the blender capacity unit. It does NOT change the blending units in which the materials are mixed. It only applies to the capacity of the blender and determines the number of batches needed to mix the job. This defaults from the Product Set used to make the blend. If gallons are chosen, the batch breakdown is done in gallons. Likewise, if the capacity is entered in pounds or kilograms, the batch breakdown is in pounds or kilograms respectively.
- Capacity – This number defaults from the blender capacity entered at Setup / Product Sets. It has a direct effect on the number of batches calculated. Either of these numbers may be changed and the other recalculated by choosing the appropriate option. The effect displays in the batch breakdown box to the right.
- # of batches – This number is calculated by dividing the total product on this ticket by the blender capacity. Either of these numbers may be changed and the other recalculated by selecting the appropriate option. The effect is displayed in the batch breakdown box to the right.
Note: Only those items with a unit weight greater than zero affect the batching of tickets. - File Names – This is used in conjunction with the Dispatch module and allows the blending operator to associate VRT spread files from the network to a Blend Ticket.
- Dispatch Info – This area allows entering information to be used in the Dispatch module in Agvance. This includes Date Requested, Time Requested, Date Scheduled, Time Scheduled, Priority, Comments, and Status.
- # of batches – This number is calculated by dividing the total product on this ticket by the blender capacity. Either of these numbers may be changed and the other recalculated by selecting the appropriate option. The effect is displayed in the batch breakdown box to the right.
Additional Info
Optionally add information on this window which may later be used for tracking and reporting.

- Ship Via – Enter method of shipment. The methods are defined at Hub / Setup / Ship Via. If a Ship Via is selected and the Blend Ticket is imported into an Invoice in the Agvance Accounting module, the information displays on the Invoice’s Additional Info tab.
- Control Number – This is an optional number used to reference an internal control number (such as hand ticket numbers) associated with the sale.
- Ship To – Select from the Customer's Ship To addresses. This address prints along with a Bill To address on the Consolidated Blend Ticket.
- Salesperson ID – This defaults from the Ship To address. If there is no Ship To address, the Salesperson ID defaults from the Customer's setup. If there is more than one Customer on the ticket, it defaults to the settings for the first Customer listed. A salesperson may optionally be selected from the drop-down which is maintained at Hub / Setup / Sales Staff.
- Authorized Agent – This person is associated with the Customer who is authorized to make decisions. Agents are set up in the Customer file under Contacts.
- County – This defaults from the Ship To address. If none are set up, it defaults from the Field, and then from the Customer's setup. If there is more than one Customer on the ticket, it defaults to the settings for the first person listed. Optionally, double-click to select the county from a list of all counties in the state.
- Territory – This defaults from the Customer setup and is optional information to be used as needed.
- Customer PO # – This optional information may be entered if the Customer provides a Purchase Order number for the order.
- Invoiced Units – If filled out, this is the number of units (generally acres) that prints in the upper right portion of the Invoice document. It defaults to the selected Field’s number of acres and cannot be edited on the Additional Info window.
- Crop – This displays the crop selected on the General tab. This cannot be edited from the Additional Info window. Select from the drop-down or double-click the label to search.
- Freight Vendor/Freight Calc/Estimated Amt – Indicate the Freight Vendor, then choose Estimated $/Unit or Estimated Total$ from the Freight Calc drop-down. Enter the appropriate Estimated Amt based on the Freight Calc selected. When creating an Inter-Company Transfer (ICT), the freight will default from imported transactions when the per unit is the same for all source transactions, or the total dollar amount is added together when the same Freight Vendor exists.
- Federal Permit – The non-expired federal permits of all Customers associated with this Blend Ticket are available in the drop-down. If only one Customer has only one non-expired federal permit, it defaults into this area. When a Ship To address is selected, the default federal permit from that Ship To is selected if it has a valid date.
Note: The Applicator's number only prints if it is custom applied. - Custom Applied – This defaults from the General tab. This cannot be edited from the Additional Info window.
- Additional Comments – Optionally enter more notes which transfer to the Invoice if the ticket is imported. The comments do not print on any blend documents, but do print on the Invoice.
- Applicator ID – Optionally double-click to select applicators from those entered at Hub / Setup / Applicators. This also imports into the Invoice if using the Agvance Accounting module. The Vehicle/Applicator report, found either at Blending / Reports / Blend Ticket Reports or at Accounting / Accounting Reports / Accounts Receivable / Sales, summarizes acres by Applicator or Vehicle.
- Vehicle ID – Optionally double-click and select a vehicle from those entered at Hub / Setup / Vehicles. These also import into the Invoice if using the Agvance Accounting module.
- Acres – Enter the number of acres for each Applicator involved. The acres on the General tab of the Blend Ticket default into the first row of the grid but may be edited.
- Permit # – This is used for states where every sale of restricted use Product must have a state/local permit associated with it. This permit prints in addition to the federal permit on the Invoice. If the Products are set up as federal or state restricted, the program checks and either warns or disallows the sale if the appropriate valid (unexpired) federal and/or state/local permits do not exist. The degree to which this state/local permit is checked (Warn Only, Disallow, or Don’t Check) is set at Hub / Setup / Company Preferences on the Customer tab.
- Record Field Conditions – Right-clicking Additional Info brings up the Record Conditions window where field and weather conditions at the time of application may be recorded. For more information, see Record Conditions.

