Bookings are found in Agvance SKY Order under Accounting and display in an interactive grid. This grid operates much like an Excel spreadsheet. For more information on how the grid functions, see Using Grids in Agvance SKY.
Additional filtering options (Salesperson, Booking Date Range, Ticket Number Range) are available under the Filters button.
Selecting a Ticket Number opens the Booking as view-only with a button to Edit Order in the lower right if edits need made.
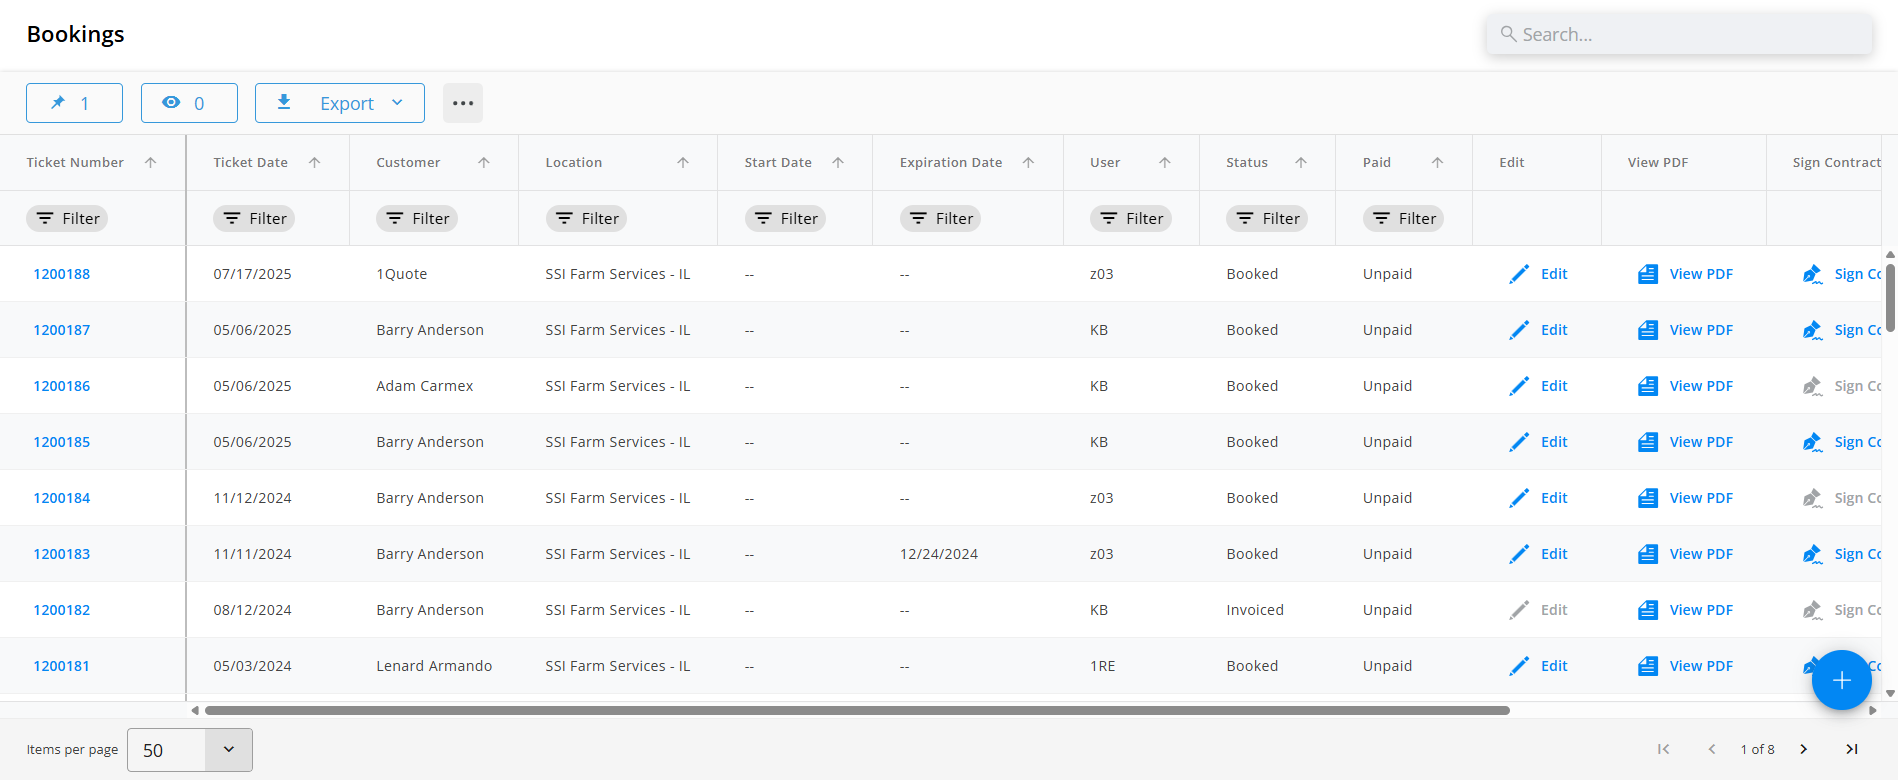
Grid Action Buttons
- Edit – This opens the Booking to make any needed changes.
Note: If editing an existing Booking, the Location and Customer or Field information cannot be modified. - Pay Booking – This action is available for those with permission to add Payments in Agvance SKY Customer on eligible Bookings.
Note: If a Booking or a Customer on a Booking is invoiced, fully prepaid, down paid, or voided, it is not eligible for payment.- If there is one Customer on the Booking, Agvance SKY Customer will open in the current tab to make the Payment and will then return to the Bookings page in Agvance SKY Order. For multiple Customers, a drop-down displays with Customers eligible for payment on the Booking. Choose the appropriate Customer then Continue to make the Payment.

- If there is one Customer on the Booking, Agvance SKY Customer will open in the current tab to make the Payment and will then return to the Bookings page in Agvance SKY Order. For multiple Customers, a drop-down displays with Customers eligible for payment on the Booking. Choose the appropriate Customer then Continue to make the Payment.
- Export Documents – This provides the option to export the Booking and/or Booking Contract as a PDF in a new tab. Ensure any pop-up blockers are disabled before exporting.
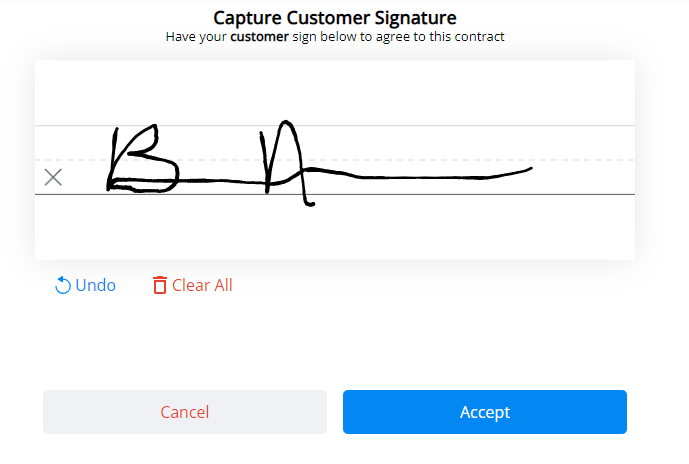
- Sign Contract – A Contract Format must be selected on the Booking before saving for this option to be available. Selecting Sign Contract opens the contract to review. Choose Sign Contract again to have the Customer sign the contract, then Accept.
- Void – Bookings that have not been voided or partially/fully invoiced can be voided.


Add/Edit a Booking
Bookings can be added by selecting the + Add Order icon at the bottom right corner of the page then choosing + New as Booking. To edit an existing Booking, choose the Ellipsis then select Edit Booking.
Note: If editing an existing Booking, the Location and Customer or Field information cannot be modified.
Location/Customer or Field
Location
Select the Location for the Booking.

Customer or Field
Under Customer or Field, choose + Add Customer or + Add Field. A grid of Customers (or Fields) displays.
By Customer
- Use the Search field to find the specific Customer or scroll through the list. A maximum of eight Customers may be added to a Booking. The Filters button to the far right of the Search bar can be used to narrow down the list of Customers.
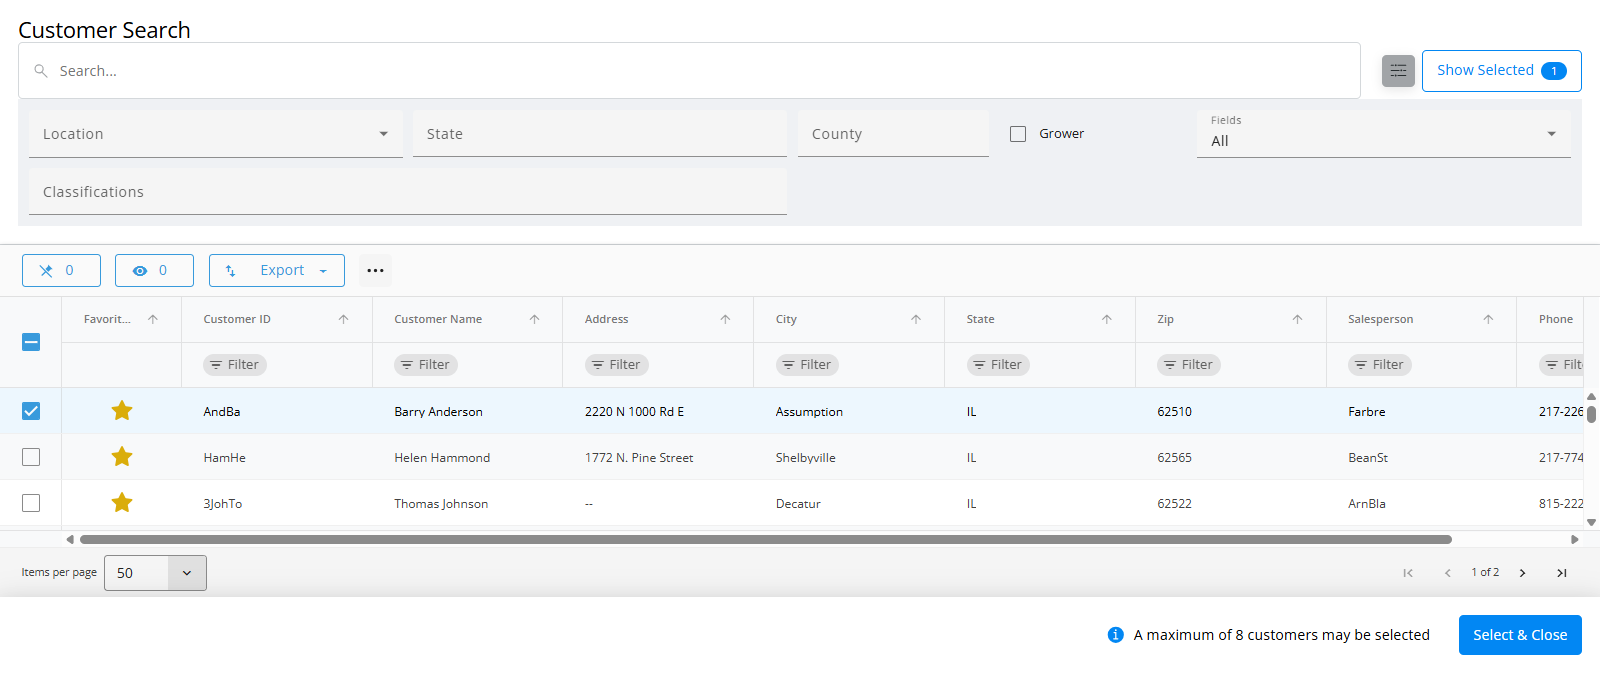
- The Show Selected button next to the Search bar is enabled after choosing the Customer(s). The number indicates how many Customers are currently checked. Selecting the button filters the grid to show only the selected Customers.
- Once the Customers are selected, choose Select & Close.
- Optionally update the Split %. The Delete icon removes the Customer(s). Choosing Add/Manage Customer gives the ability to add or remove Customers from the Booking.


By Field
- Use the Search field to find the specific Field or scroll through the list. One Field can be added to a Booking. The Filters button to the far right of the Search bar can be used to narrow down the list of Fields.

- The Show Selected button next to the Search bar is enabled after choosing the Field. The number indicates how many Customers are currently checked. Selecting the button filters the grid to show only the selected Field.
- Once the Field is selected, choose Select & Close.
Note: Choose Remove Field to remove the currently selected Field and choose another. - Optionally update the Split %. The Delete icon removes the Customer(s).
Note: The primary Customer cannot be removed.
- Even though by Field, additional Customers can be added by choosing + Add Split Customer.
Note: A maximum of eight Customers can be added to a Booking.


Order Details
Import Plan
- Plans can optionally be imported into the Booking. Choose Import Plan, then search for Plans or scroll through the table to find and check the appropriate Plan(s). Splits, Payment Terms, Products, and Pricing will automatically be populated. Once Plans are checked, choose Select & Close.
Note: Searching for Plans will reset selected Plans.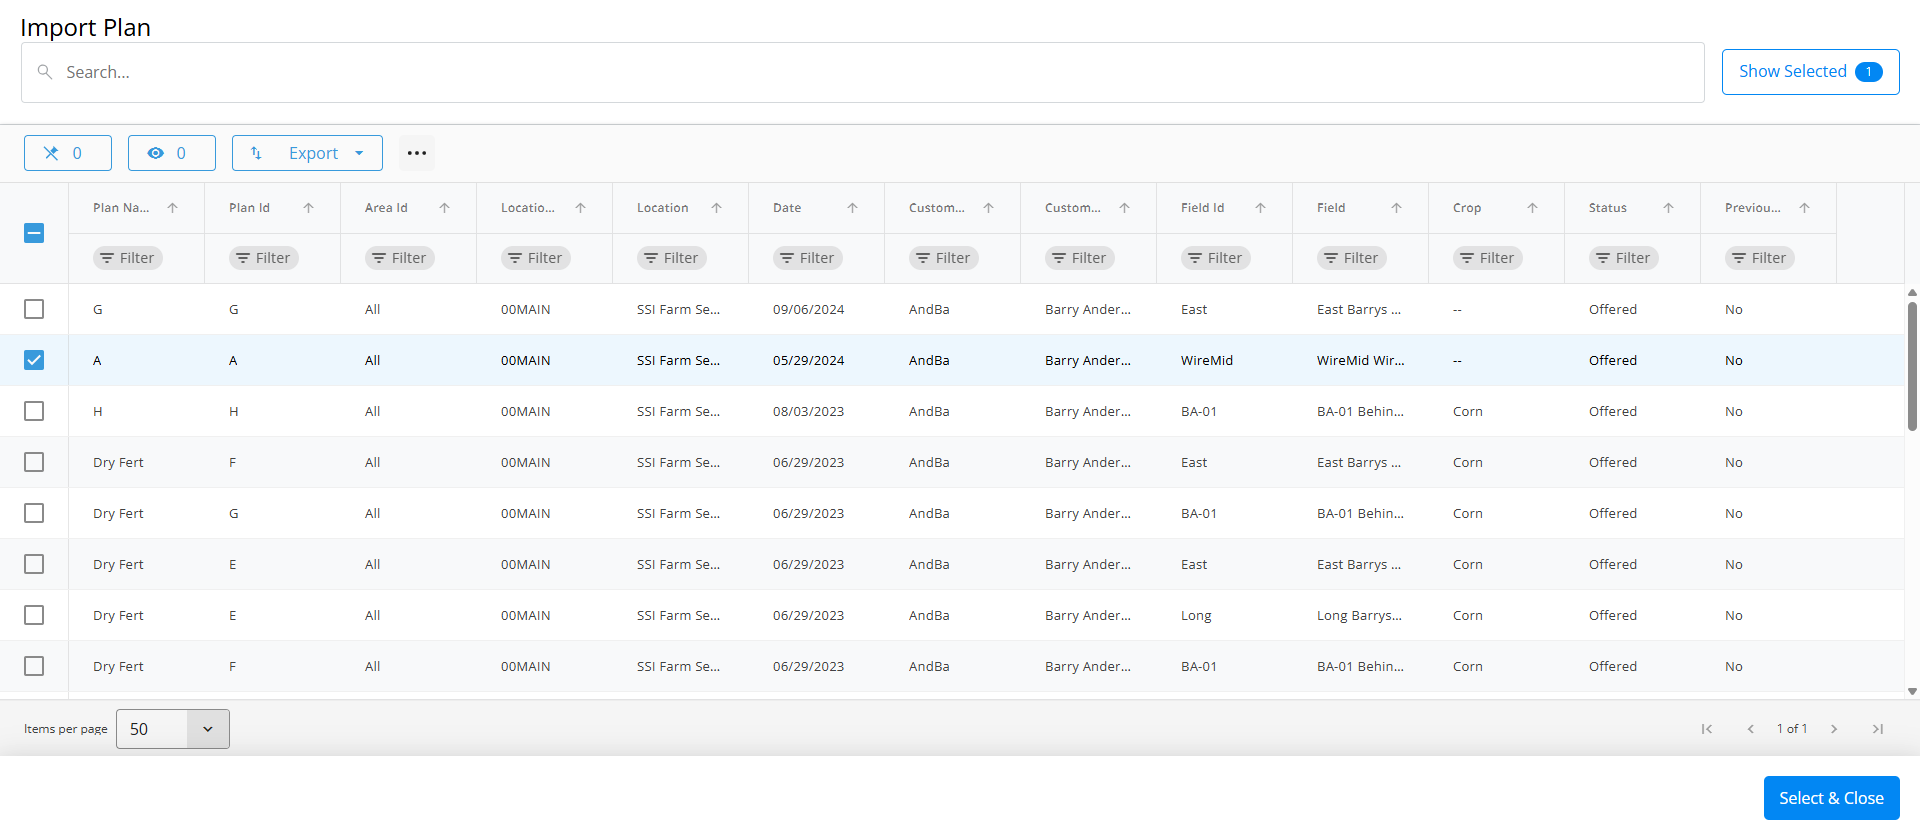
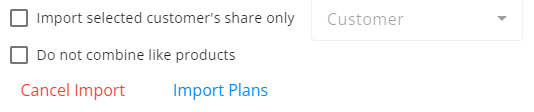
- Under Import Options, one Customer's share of a Plan can be imported by selecting Import selected customer's share only and indicating the Customer from the drop-down. Optionally choose Do not combine like products. Select Import Plans.
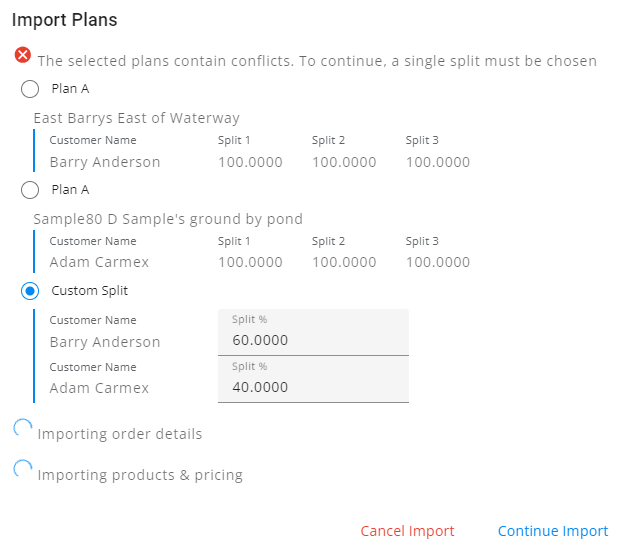
- Upon choosing Import Plans, a progress window displays. Once the Plans are imported successfully, the message changes to indicate selected plans have been imported. If there is a split conflict, choose the appropriate split. Select Continue Import.
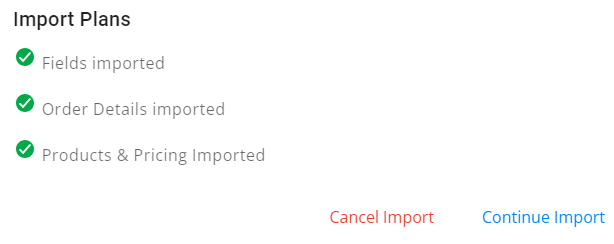
- A confirmation will display to indicate the Plan was imported successfully. Choose Continue Import again.


- The Order Number will default once the Location has been selected.
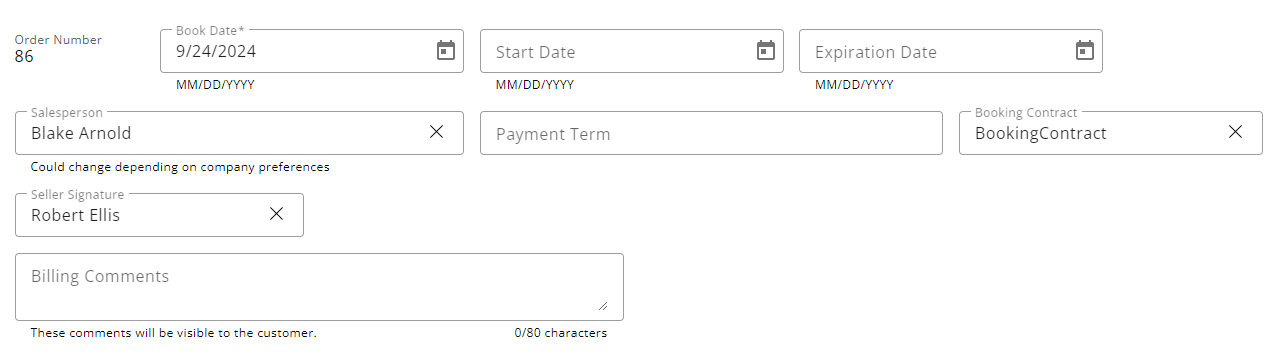
- The Ticket Date defaults with today's date but can be modified if needed.
- Optionally enter a Start and Expiration Date for this Booking.
- The Salesperson defaults based on the setting selected in Agvance SKY Admin.
- A Payment Term can optionally be applied to the Booking by selecting the appropriate Term from the drop-down.
Note: Payment Terms must first be set up at Hub / Setup / Payment Terms. - A Booking Contract can also optionally be selected from the drop-down.
Note: Booking Contracts must first be set up in Agvance Windows by selecting Design Booking Contracts at Accounting / Setup / Preferences on the A/R tab. - If the Seller Signature Only From Logged In User option is checked at Accounting / Setup / Preferences on the A/R tab, the Seller Signature will populate automatically with the name of the User currently logged in to Agvance SKY. If this preference is not enabled, a Seller Signature can be selected.
- If applicable, Billing Comments can be entered and will be visible to the Customer.

Products
If a Plan was imported in the Location section, Products and their quantities will default from the Plan(s) selected. If this is the case, review the Products and amounts.
To make changes, follow the steps below. If no changes are needed, move on to the Pricing section.
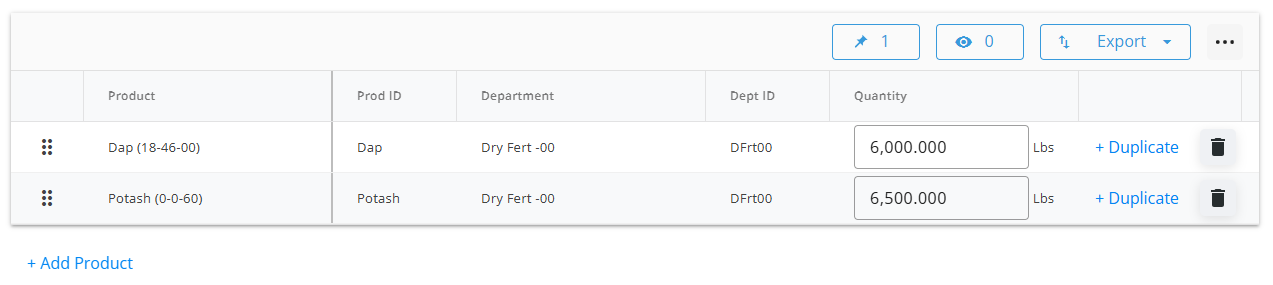
- Select + Add Product.
- A grid of Products displays. Use the Search field to find the appropriate Product(s) or scroll through the list. The Filters button to the far right of the Search bar can be used to narrow down the list of Products.
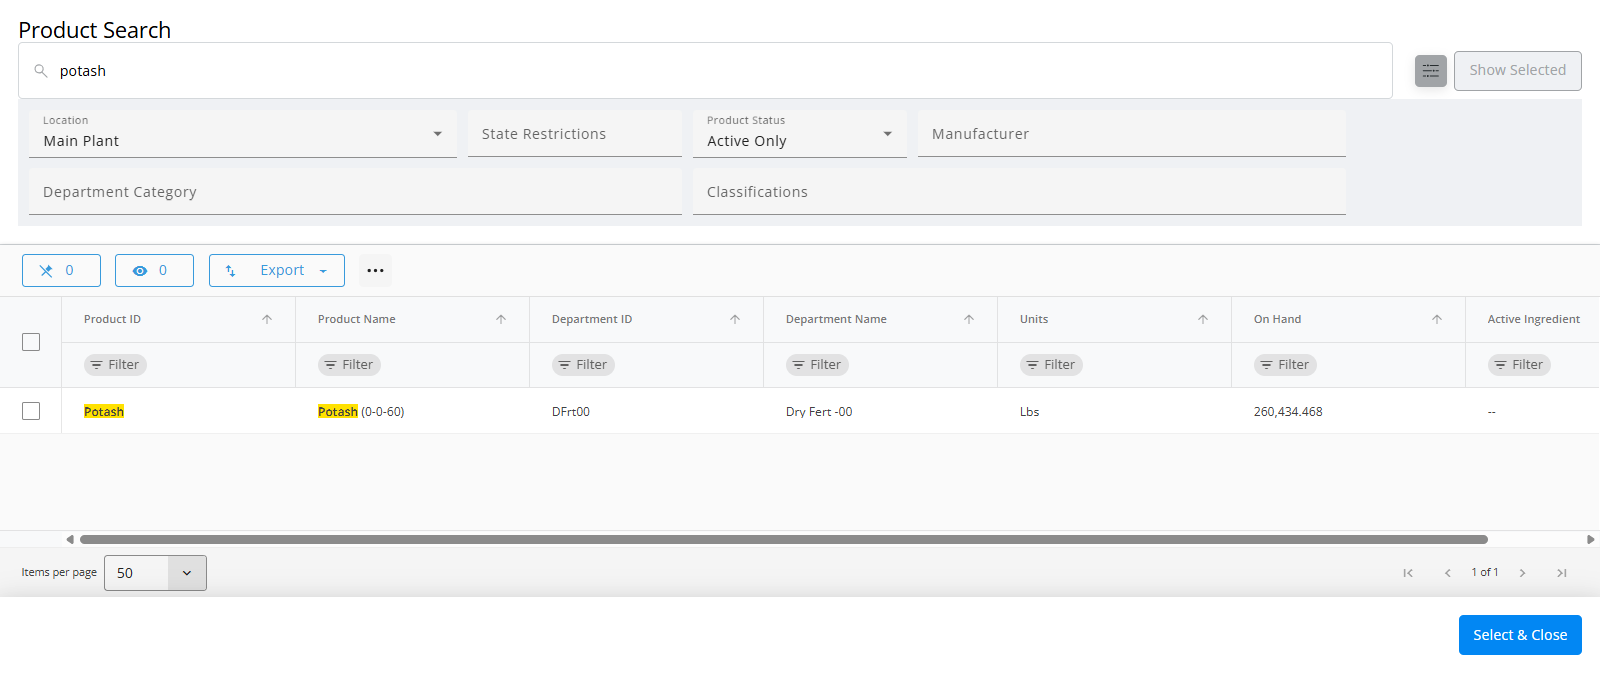
- The Show Selected button next to the Search bar is enabled after selecting the Product(s). The number indicates how many Products are currently checked. Selecting the button filters the grid to show only the selected Products.
- Once the Products are selected, choose Select & Close.
- In the Products section, indicate the Quantity for each Product.

- Products can be reordered by selecting the grid of dots on the left and dragging to the appropriate position.
- Choose + Duplicate to add another line of that Product.
- The Delete icon can be selected to remove a Product line.

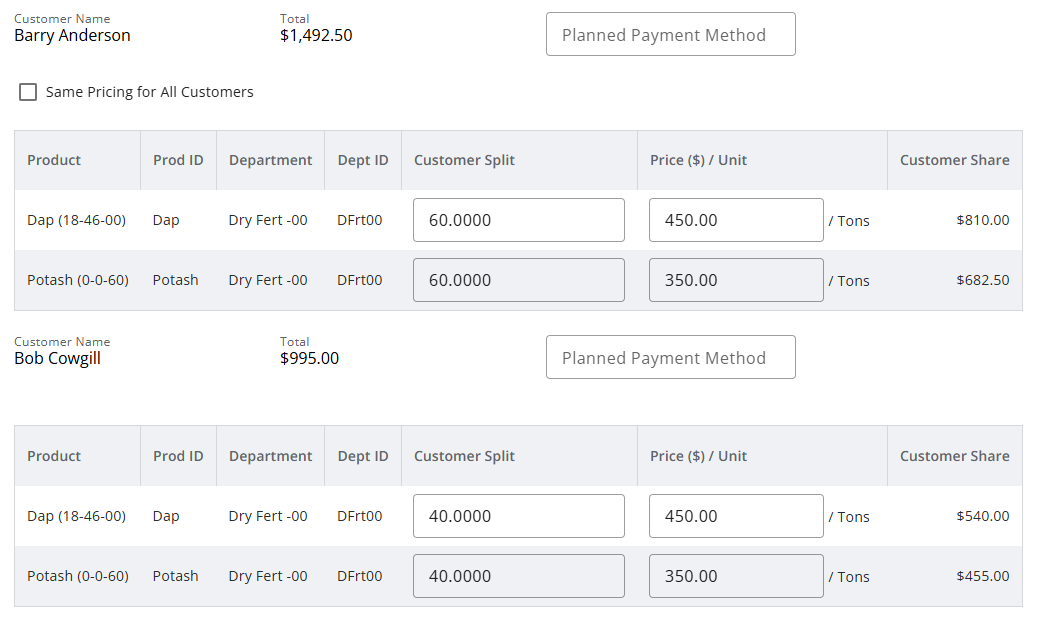
Pricing
If a Plan was imported under the Location section, pricing information will default from the Plan(s) selected. If this is the case, review the Price ($) / Unit per Product/Customer.
If this is the case, review the Products and amounts. To make changes, follow the steps below. If no changes are needed, move on to the Notes section.
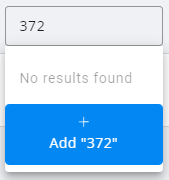
- The Price ($) / Unit column can be changed as needed. A price can be entered or a Price Level can be chosen from the drop-down.
 Note: If keying in a price, choose Add "$" from the drop-down.
- Checking the Same Pricing for All Customers option applies the pricing for the first Customer to all other Customers in the split.
- The Planned Payment Method can be selected from the drop-down if these are set up at Accounting / Setup / A/R / Booking Payment Methods.
 Note: If keying in a price, choose Add "$" from the drop-down.

Notes

- Additional Comments can be entered in the Notes section.
Note: A maximum of 240 characters are allowed in this field. - After Notes are entered, Create Order can be selected but Tech License information is available on the Additional Info tab.
- Checking Take Payment upon Creation of this Booking navigates to Agvance SKY Customer to complete the Payment there. If there is one Customer on the Booking, Agvance SKY Customer will open in the current tab to make the Payment and will then return to the Bookings page in Agvance SKY Order. For multiple Customers, a drop-down displays with Customers eligible for payment on the Booking. Choose the appropriate Customer then Continue to make the Payment. For more information on paying Bookings, see the Grid Action Buttons section at the top of the article.
Additional Info
Tech Licenses
For Products that are a part of a Technology Group, the appropriate Tech License can be selected from the drop-down. If only one tech license is available, it will automatically be applied and the drop-down will be disabled.

