Import information from loaded Delivery or Blend Tickets into an Invoice.
The quantity for the Product can be changed when invoicing Blend or Delivery Tickets. However, if the quantity is changed, the analysis and Field history could be incorrect. The recommended procedure would be to change the quantity on the Blend or Delivery Ticket to keep the Field history and analysis correct.
Note: Only Products with on the Product Set with a checkmark in the Invoice column will be displayed on the Invoice. For more information, see Product Sets Setup.
Single Invoice
When a Return Delivery Ticket is imported into an Invoice, the Return Reason selected on the Delivery Ticket is included on the Invoice's Source Tickets tab. If more than one Return Delivery Ticket is imported, the Return Reason from the last Delivery Ticket with a Return Reason populated is used. The Return Reason can also be seen on the Delivery Product Analysis report at Accounting Reports / Inventory / Inventory Status by checking the Returns Only option.
- Navigate to Accounting / A/R / Invoice and select Add or choose the Add an Invoice icon at the top of the Accounting module.
- On the Select Customer(s) or Field for Invoice window, choose Import Tickets.

- Highlight the tickets to be included on the Invoice and choose OK. The Customer/Field ID filter in the upper left corner can be used to display a selected subset of the unprocessed tickets. Double-click in the Customer and/or Field ID fields to select the Customer and/or Field. Crop, Location, and Farm may optionally be entered which filters all tickets accordingly. Multiple tickets may be selected by holding Ctrl on the keyboard and choosing the tickets to be included.
Note: Right-click a ticket to display additional information.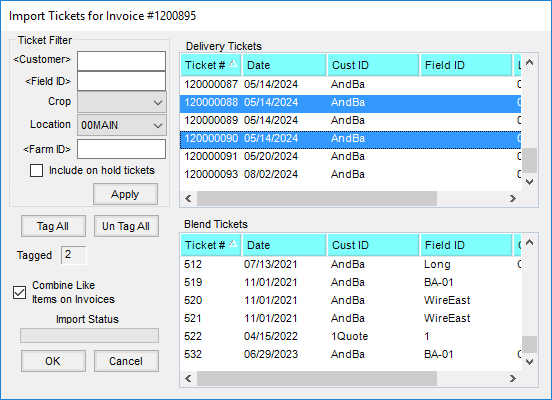
- Select the Combine Like Items on Invoices option to combine the same Product with like crop codes from different tickets into one line item on the Invoice. Leaving this unchecked lists each entry as a separate line item. If there are any tickets selected that have conflicting bill splits, a Split Conflict window displays which allows the split arrangement to be selected.
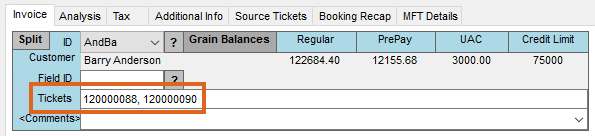
- The Source Ticket numbers show in the Tickets area on the Invoice. The Source Tickets tab provides more detail of the imported tickets.
- Complete the Invoice.
- When all information is entered, select Save. This does not affect inventory unless quantities are changed or additional Products are added to the Invoice.


Note: After invoicing from Delivery and/or Blend Tickets, these tickets are marked as Processed and are no longer available at the Import Tickets screen for future billing. Voiding the Invoice makes the ticket(s) available for re-billing.
Multiple Invoices
Multiple Tickets, found at A/R / Invoice, is used to efficiently invoice a group of selected Delivery Tickets or Blend Tickets. Individual invoices are created for each ticket selected.

This option was created as way of automatically invoicing a batch of selected delivery and blend tickets. Tickets for multiple customers can be selected since it creates one invoice per ticket. The pricing follows the ticket price, the booked price, the price level entered on the customer file, or list price. If there are any pricing differences between a ticket and a booking, or if there are issues with the invoice checking, such as credit checking, permit checking, or grain bank pools, messages will appear awaiting a user response of how to continue. If a message appears, the user has the option to skip the invoicing for that ticket. Skipping that ticket allows the process to continue for the remaining tickets.
During the busy season, it can sometimes be difficult to get the task of invoicing all those tickets completed.
At the Import Multiple Tickets window, tickets may optionally be filtered by Customer, Field ID, Crop, Location, and Farm ID.

Select tickets. Multiple tickets may be chosen by holding the Ctrl key while selecting the tickets.
If the Preview Invoice(s) option is selected, each Invoice is displayed and may be adjusted as needed. At the bottom of the window, the following options are available:
- Skip – The Invoice for the current ticket is not saved. Selecting this advances to the next selected ticket for review.
- Back – For a split Invoice, this navigates to the previous customer in the split.
- Next – For a split Invoice, this navigates to the next customer in the split.
- Save – This will save the Invoice.
If the Preview Invoice(s) option is not selected, the Invoices are created automatically.
Note: If any required information is missing or if there are credit warnings for the selected customers, messages display.
