Viewing Payments
A listing of all payments made toward the customer's account can be viewed from the Payments menu. This includes both Regular Invoice payments and Prepay applied towards the account.
Use the Search field to search by Payment #, Reference #, or payment Type (Regular, Prepay, or Budget). Using the Search field filters the data down by matching results.

Filter the data further by using the Date Range filters to display results for payments with a payment date within the selected date range. The Date Range filter can be utilized in conjunction with the Search feature.
Select the Calendar icon on the filter and choose a date from the calendar that displays. Or, select in the Date Range fields and key in the desired start and end dates. Choose Apply Filters when finished.

The filters selected display below the Filters button.

Make an Outstanding Balance Payment
- Select Make a Payment at the top of the screen, choose Outstanding Balance, and select Continue.

- Invoices Due on or Before a selected date display with the option to view or download a PDF. Invoices Due After today's date display in the middle of the page.

- Balances Due By Month can reviewed as a bar graph or pie chart for the last six months.
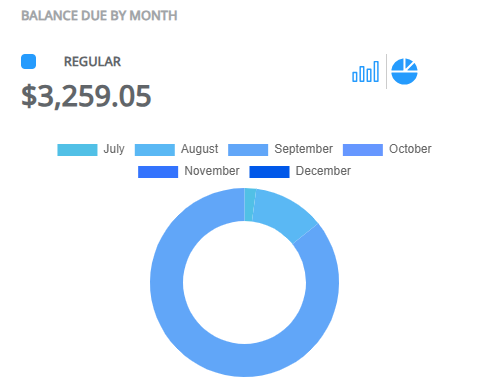
- Review the Regular Balance, Unapplied Credit, Net Due, and Scheduled Payments amounts on the right. Choose Pay Statement Balance, Pay Off Balance, Select Invoices, or Enter Amount to determine the amount of the payment then choose Make Payment.

- Pay Statement Balance – The amount due and the due date are displayed. Selecting Make Payment navigates to the Review Payment page to finalize.
- Pay Off Balance – The full balance amount is displayed. Selecting Make Payment navigates to the Review Payment page to finalize.
- Select Invoices – Specific Invoices can be chosen to pay the full amount of the Invoice. Selecting Make Payment navigates to the Select Invoices page to indicate which invoices will be paid.
Note: Discount amounts will display when applicable.
- Enter Amount – Selecting Make Payment gives the opportunity to enter a dollar amount that will automatically apply to Invoices. A breakdown of the Regular Balance and Unapplied Credit is available to review the Net Due before entering an amount.
- On the Payment Information page, review/edit or add payment information. Select Review Payment.
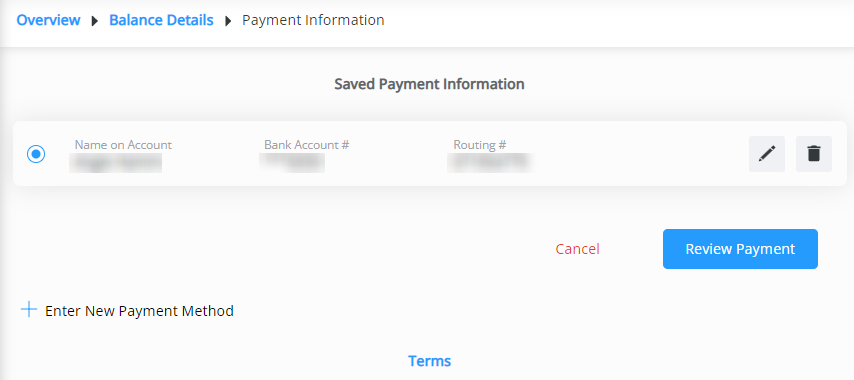 Note: The Edit icon can be selected to make any necessary changes to the saved payment method. To remove a saved payment method, the Delete icon can be selected. However, if there are recurring payments set to use that method, they will be removed and message will display to Cancel or Acknowledge and Delete.

- Review Selected Invoices (if applicable) and Account Information.
- Optionally select the day for the payment to be made.
Note: Same-day payments cannot be cancelled after submitting.
- Verify the Email Address is correct and optionally add any Comments.
- Review the Payment Total and, if paying via ACH, review the Terms and check the box agreeing to allow the ACH transaction to be processed.

- Once all information has been reviewed and is accurate, select Submit Payment. Avoid selecting the Back button or refreshing the browser while the payment is processed.

- After 10 minutes of inactivity on the page, a dialog box displays indicating that after 15 minutes of inactivity, the payment will be canceled and the page will be redirected to the Overview page. Choose Go To Overview to cancel out of the payment or Extend to continue with the payment.

- After 15 or more minutes of inactivity, a dialog box will display and the option to leave the payment and go back to the Overview page to start over.

Make a Budget Due Balance Payment
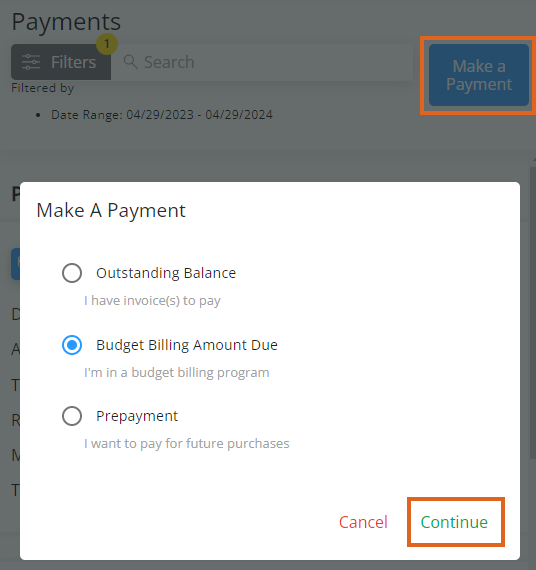
- Select Make a Payment at the top of the screen, choose Budget Due Balance, then select Continue.
- Invoices Due on or Before a selected date display with the option to view or download a PDF. Invoices Due After today's date display in the middle of the page.

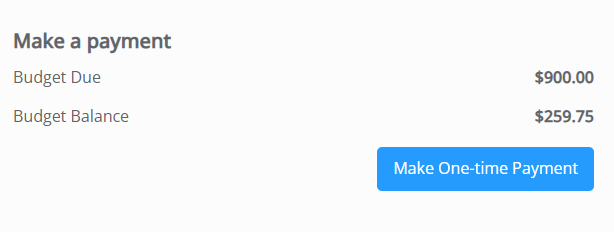
- The Budget Due and Budget Balance amounts display at the top of the page for review. To make a one-time payment, select Make One-time Payment. To set up recurring payments, go to Step 11.
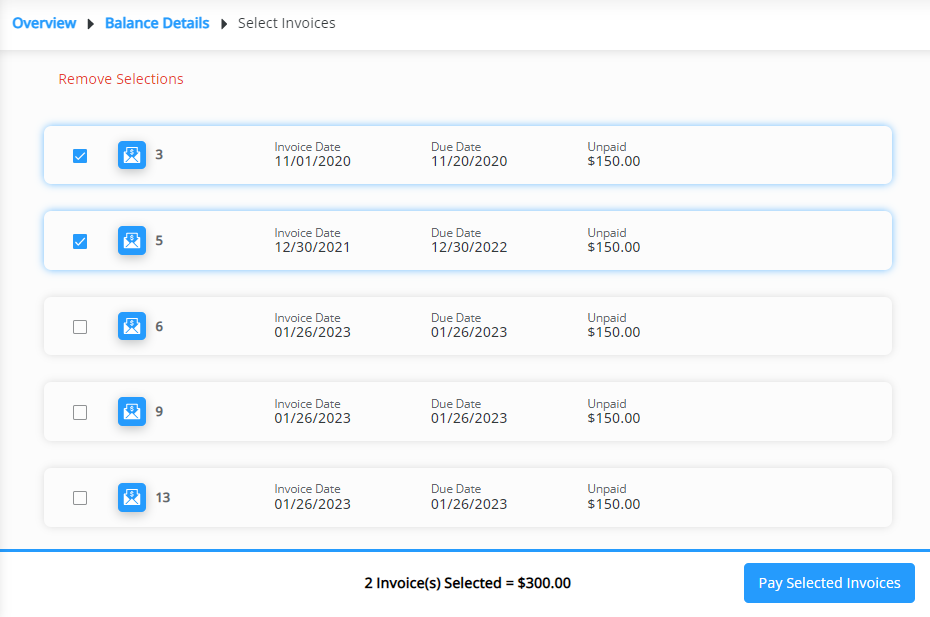
- Select the checkbox for each Invoice to pay then choose Pay Selected Invoices.
- On the Payment Information page, review/edit or add payment information. Select Review Payment.
 Note: The Edit icon can be selected to make any necessary changes to the saved payment method. To remove a saved payment method, the Delete icon can be selected. However, if there are recurring payments set to use that method, they will be removed and message will display to Cancel or Acknowledge and Delete.

- Review Selected Invoices and Account Information.
- Verify Contact Information and optionally add any Comments.
- Optionally select the day for the payment to be made.
Note: Same-day payments cannot be cancelled after submitting.
- If paying via ACH, review the Terms and check the box agreeing to allow the ACH transaction to be processed.
- Once all information has been reviewed and is accurate, select Submit Payment. Avoid selecting the Back button or refreshing the browser while the payment is processed.

- To set up Recurring Payments, select Setup Recurring Payment on the right. Delays may occur if recurring payments are scheduled outside of business hours. Schedule in advance to ensure timely payment.
Note: Recurring payments will fail if there are no open Budget Memo Invoices for payment on the day of payment.
- Enter a brief Description for this recurring payment. The Payment Amount defaults to the Invoice Due and cannot be modified.
- Choose a Start Date by selecting the Calendar icon, then choose the Date of Each Month the payment should be made. The Payment Date defaults once this is selected.
- Choose the Number of Payments to be made (1 Time - 12 Times). The Last Payment Date will display beneath this drop-down.

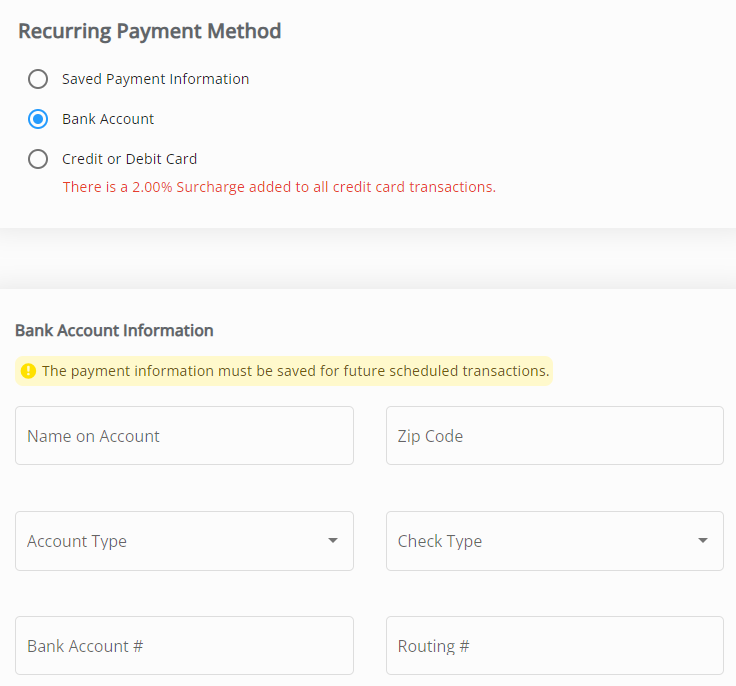
- For the Recurring Payment Method, choose to use Saved Payment Information or optionally choose Bank Account or Credit or Debit Card to enter new information. If entering new payment information, it will have to be saved for future scheduled transactions.
- Select Review Recurring Payment and make sure everything is correct. Choose the Pencil to make any adjustments. Verify the Email Address is accurate and optionally enter any Comments. Be sure to check both boxes and review the Recurring Payment Terms then select Submit.
Note: The second checkbox is only for ACH payments.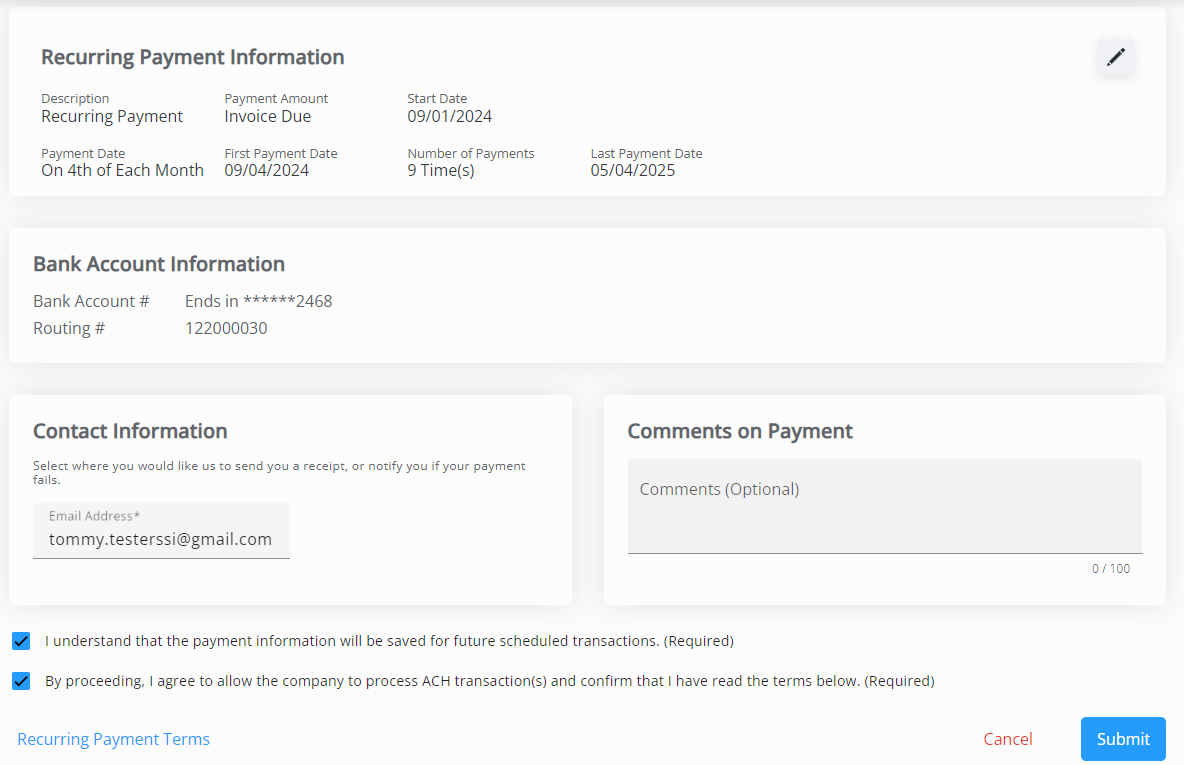
- Once submitted, the payment will display on the Recurring Payment card on the Budget Due Details page. This payment can be canceled by selecting the Delete icon and choosing Remove on the confirmation window.

- After 10 minutes of inactivity on the page, a dialog box displays indicating that after 15 minutes of inactivity, the payment will be canceled and the page will be redirected to the Overview page. Choose Go To Overview to cancel out of the payment or Extend for an additional 15 minutes to complete the payment.

- After 15 or more minutes of inactivity, a dialog box will display and the option to leave the payment and go back to the Overview page to start over.

Make a Prepayment
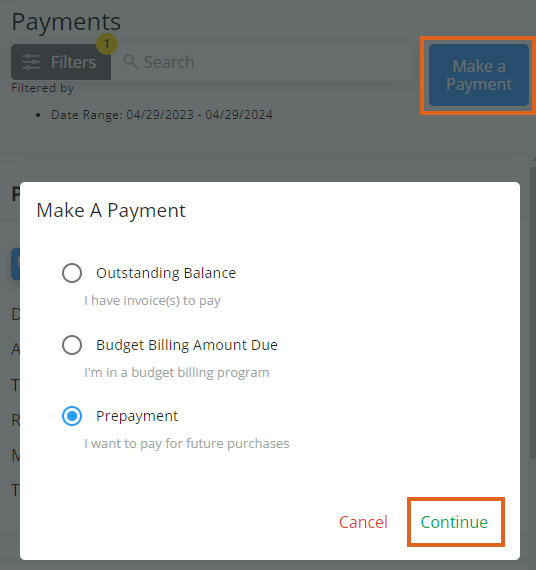
- Select Make a Payment at the top of the screen, choose Prepayment, then select Continue.
- The Prepay Balance displays in the top left and Paid Bookings display in the bottom half of the screen. Select the Expand icon on a Booking line item to view additional details or the Ellipsis to view or download a PDF of the Booking.

- In the top right, choose Select Bookings to Pay or Enter Amount to Prepay and select Make Payment.
- Select Bookings to Pay – Specify which Bookings are to be included in the payment. Select Bookings using the checkbox then choose Pay Selected Bookings. Discount amounts will display when applicable.
Note: Bookings created from Grower Orders will not be available for selection in the list that displays.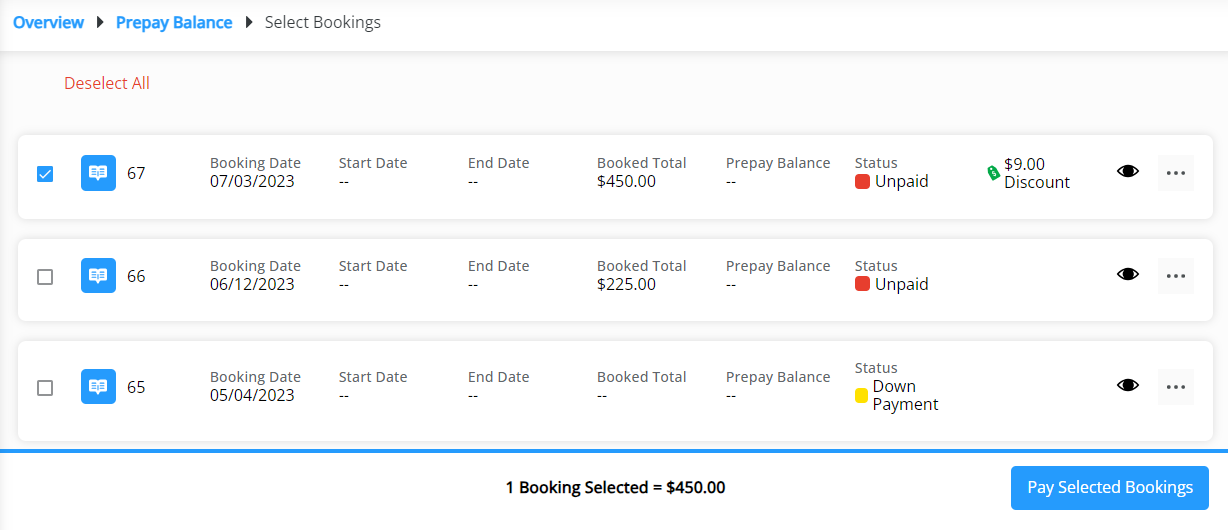
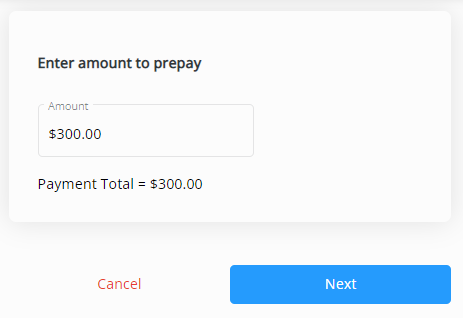
- Enter Amount to Prepay – Enter an amount to be automatically applied to Unapplied Cash and select Next.
- Select Bookings to Pay – Specify which Bookings are to be included in the payment. Select Bookings using the checkbox then choose Pay Selected Bookings. Discount amounts will display when applicable.
- On the Payment Information page, review/edit or add payment information. Select Review Payment.
 Note: The Edit icon can be selected to make any necessary changes to the saved payment method. To remove a saved payment method, the Delete icon can be selected. However, if there are recurring payments set to use that method, they will be removed and message will display to Cancel or Acknowledge and Delete.

- Review information here including Selected Bookings/Prepay Amount, Account Information, and Contact Information. Optionally add any Comments. If paying via ACH, review the Terms and check the box agreeing to allow the ACH transaction to be processed.
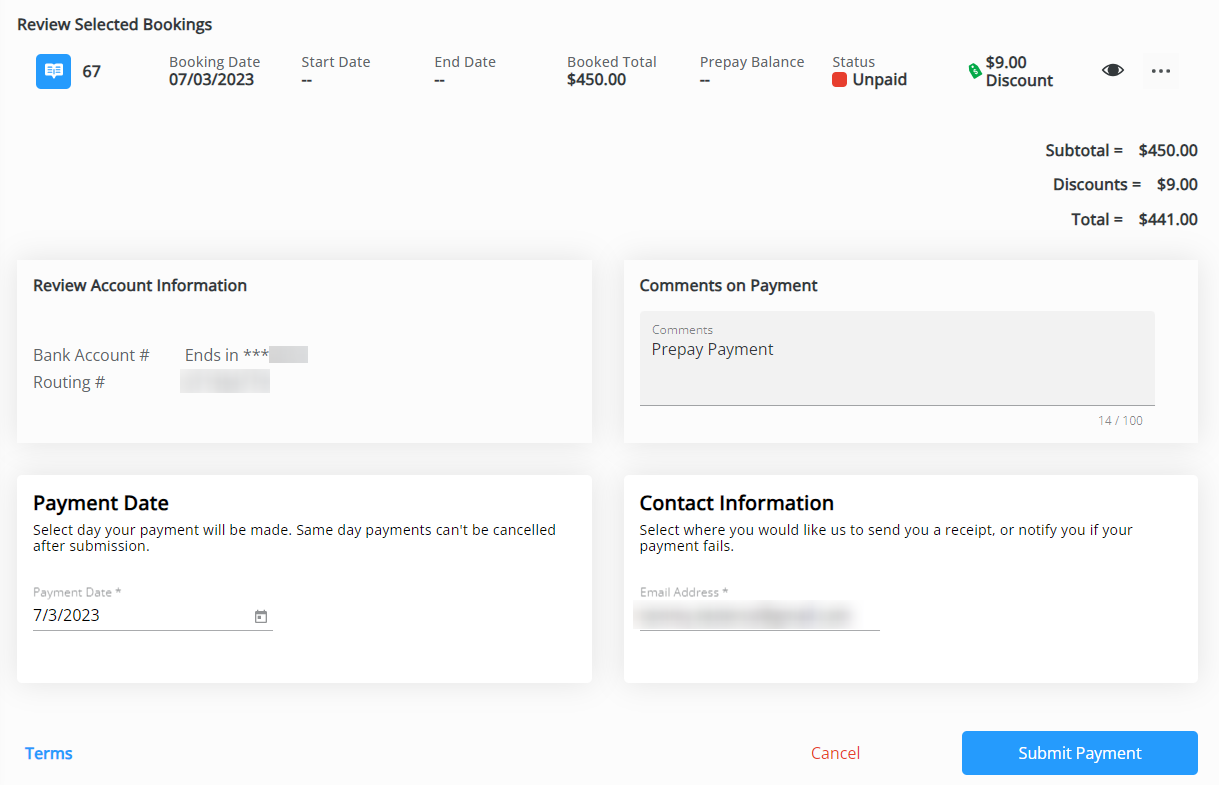
- Optionally select the day for the payment to be made. Scheduled Payments will show as Pending in the Payments list. If needed, it can be cancelled by selecting the Delete icon.
Note: Same-day payments cannot be cancelled after submitting.
- Once all information has been reviewed and is accurate, select Submit Payment. Avoid selecting the Back button or refreshing the browser while the payment is processed.

- An email will be sent confirming a payment has been scheduled, one when the payment posts, and one if the payment fails for some reason.
- After 10 minutes of inactivity on the page, a dialog box displays indicating that after 15 minutes of inactivity, the payment will be canceled and the page will be redirected to the Overview page. Choose Go To Overview to cancel out of the payment or Extend for an additional 15 minutes to complete the payment.

- After 15 or more minutes of inactivity, a dialog box will display and the option to leave the payment and go back to the Overview page to start over.


 Note: The Edit icon can be selected to make any necessary changes to the saved payment method. To remove a saved payment method, the Delete icon can be selected. However, if there are recurring payments set to use that method, they will be removed and message will display to Cancel or Acknowledge and Delete.


