Add Users and assign a Role at Hub / Setup / Users. In addition to the Role restrictions, several security-related restrictions may be added at the User level. These include restrictions to certain General Ledger Account Categories, Product costs, Location login as well as Customers, Products, and/or Vendors from particular Locations. Optionally filter for Inactive, Active, and All Users. The default is set to Active.

- Add/Edit/Delete – Users can be added, edited, or deleted. Adding/editing a User can be seen in more detail below.
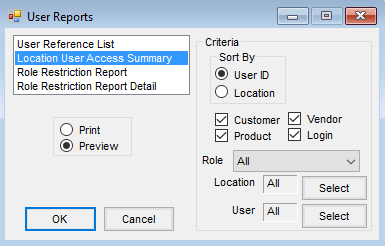
- Reports – From here, run the User Reference List, Location User Access Summary, Role Restriction Report, and Role Restriction Report Detail reports.
- Roles – Role setup can be found here. See Establishing Roles for more information.
- Options/Location Restrictions – Additional security options are available here. See User Login Setup for more details.
- Batch Add Users – Add multiple Users at once by entering the Network ID and choosing Apply. From there, the User information can be entered and saved.
- Batch Assign Roles – This area allows for temporarily changing Users' Roles to one that is restricted, allowing the End of Month process to proceed. Once the month is closed, use this same tool to change the Users back to their original Roles. A specific list of Users can also be locked out so their Roles do not change. See Batch Assign Roles for additional details.

Profile
The User Profile allows for the most basic security control.

- ID – Enter an ID for the User. This ID can be alpha/numeric and is up to three characters.
- Inactive – Marking this option inactivates the User. The User remains in the database but is not allowed to log in to Agvance.
- Windows Login ID – Enter the Windows Login ID for this User. Entering the Windows Login ID allows using the Windows Network Login for Agvance.
- First Name – Enter the first name for the User. This is a required entry.
- Last Name – Optionally enter a last name for the User.
- Password – This is optional but recommended to protect the sensitive data from unauthorized access.
- Email Address – Optionally enter the email address for the User. For emailing reports or AP Vendor ACH payment notifications directly from Agvance, the email address must be completed.
- Role – Double-click to select the role for this User.
- Last Password Change Date – This displays the date the User’s password was last changed.
- Set Password to expire now – This option sets the User’s current password as expired and prompts to enter a new password the next time the User logs into Agvance.
- Use Windows Login ID when Emailing – This uses the Windows Network Login information when emails are generated from Agvance.
- Auto Geocode Address on Save of Customer – Selecting this option automatically geocodes the address entered on the Profile tab of the Customer file.
- Auto Geocode Address on Save of Ship To – Selecting this option automatically geocodes the addresses entered from the Addresses on the Customer file.
- Auto Geocode Address on Save of Field – Selecting this option automatically geocodes the address entered on the Profile tab of the Field.
- Auto Geocode Address on Save of Tank – Selecting this option automatically geocodes the address entered on the Profile tab of the Tank information in Energy.
- Allow Checking for Updates – If this User is responsible for Agvance updates, select this option.
- Automatically check for updates every X days – For Users responsible for Agvance updates, this option allows setting the number of days for automatically checking for program updates. If an update is available, this User is notified when logging into the program.
- Notes – Optionally enter notes for this User.
- Notify me every X minutes of all In-Transit purchase receipts bound for my location – For Users responsible for in-transit Purchase Receipts, select the number of minutes to use when checking for new in-transit Purchase Receipts.
- Notify me every X minutes of all open purchase order requests I can approve – For PO Request Approvers, select the number of minutes to use when polling for new open Purchase Order Requests.
General Restrictions
These User-specific settings allow customization for a User’s access to a Location's and/or Profit Center's sensitive data. If there are several Users within the same Role with similar General Restrictions, select Start with User to replicate those settings.

- Restricted G/L Categories – Control access to G/L accounts associated with any of these P&L Categories. The restricted G/L Accounts do not display on the Select a G/L Account screen for this particular User.
- Restricted Profit Centers – Control access to G/L accounts associated with any particular Profit Center. The restricted G/L Accounts do not display on the Select a G/L Account screen for this particular User.
- Allow CRM Category/SubCategory edits – This controls the ability to edit CRM Categories and Subcategories.
- Allow Access to Custom Reports Export – This controls access to the Custom Export option when previewing reports. This Custom Export option allows information from the previewed report to be exported by right-clicking on the Custom Export grid to export as a PDF, Excel, or Text format file.
- Allow Changing Printout Weight (Ranco) – This allows printing a shipping document reflecting the total weight on a delivery vehicle where multiple batches were used to load the delivery vehicle.
- Ignore NIST Handbook 44 Standards – Agvance Scale Interface behaves in accordance with standards outlined in the NIST Handbook 44. It is possible that some states have not adopted these regulations or allow exceptions to them. For those companies, this option provides a way of relaxing several regulatory programming restrictions.
- Restricted Locations – Control access to Products, Customers, and Vendors of other Locations. The Login restriction blocks the ability to select or switch to the restricted Locations as the global (default) Location. Selecting these options causes the restricted Location’s Customers, Products, and Vendors from displaying in the selection windows. If a User’s security is restricted from any Location’s Products, when running reports where the Product Selection is ALL, the Product Select form displays forcing selection from accessible Products. For multi-Location Customers, the option to restrict access to their own Customers may be a matter of convenience (the Customer windows only display Customers associated with the allowable Locations), or the intent may be to strictly limit access to a particular Location. For this reason, there are two levels of control.
Note: A message stating You may only select 0 rows displays when selecting G/L Accounts if the Profit Center Location Default is set to Current in the User's setup at Hub / Setup / Users and the Location is not set on the Profit Center at Accounting / Setup / Profit Centers. Either set the Location on the Profit Center or change the Profit Center Location Default to All. - Default Options – The Login, Customer, Applicator, Employee Department, Profit Center, Product, Vendor, Vehicle, and Dispatch Work Order defaulting options are a softer restriction. Use these settings instead of the restricted options when the intent is to default the selection windows to the current Location setting but still allow the option to select from the other Locations. This streamlines the records displayed in the selection windows without limiting access to the data.
- Mobile Job Manager – This allows Mobile Job Manager Users access to edit tickets and/or record conditions.
- Mobile Inventory - Disallow Quantity Entry – This feature forces Mobile Inventory Users to scan the quantities in instead of manually typing in the quantity. For example, a quantity of 4 requires the User to scan the product four times instead of typing 4.
Note: This is not related to the Warehouse app. - Require Apbills to be on Hold – This option automatically puts A/P Bills in an on-hold status as they are entered.
- Allow access to user setup without a password – This powerful setting allows the administrator to gain access to the User Setup area without the SSI-supplied password.
- Restrict from Settlement Paynames with Mortgagor – This security setting prevents editing the payee names on a Settlement check when there is a lien on that Customer’s account.
- Check Database Image while Logging in – The User(s) responsible for the system backup should have this option selected. As they log into Agvance, a warning displays if there is no image in the \avdata\lastimage folder that is less than 24 hours old (indicating a potential concern with the backup process).
- Allow Access to Administrative Passwords – This allows adding, editing, or viewing the optional transaction-specific Manager Passwords stored at Hub / Setup / Location Preferences.
- Disallow Invoice Column Edits on Product Sets – This disables the Invoice selection column on the Edit A Product Blend Set screen.
- Default to Edit button at File/Open/Product Select – When selected, at File / Open / Products, the focus is on Edit instead of View.
- Display all Send Data to SSI Errors – When errors occur in Agvance, this User is notified.
- View Cost Information – Selectively restrict Users from viewing any of the cost information.
Note: This also impacts a printed Purchase Order.
Agvance Apps

- Restrict from Physical Inventory Count – To restrict this User from entering a physical inventory count, select this option.
- Suppress frozen balance – When entering an Inventory Adjustment, the frozen inventory quantities do not display for this User if this option is selected.
- Restrict from Inventory Adjustments – This option controls the visibility of the Inventory Adjustments option in the Warehouse app. When selected, the Inventory Adjustments option is not visible.
- Require Scan to Confirm Picked Products – This option requires the User to scan to confirm the correct Product has been selected when doing an outbound edit of an existing ticket and completing the pick process.
A grid of Locations is available. This provides the ability to restrict a User from ALL costs at the given Location in Warehouse. If a Location is not selected, the standard setup of what costs are restricted will still be in place. This allows viewing the cost of the Products from the Location where they work but not other Locations in the database (retail or wholesale).
