Use Agvance Report Agent to run or email multiple reports/tasks at a scheduled time or on-demand with the click of a button. This Agvance Agent is helpful for large reports that run on a regular basis and some Accounting and Grain reports can be run in a batch. The Agvance Agent utilizes the Save Sets/Load Sets function found on several of the Agvance reports (but not all reports or functions with the Save Set/Load Set feature are schedulable).
Setup
The Agvance Agent is run from a separate shortcut/icon on the desktop that points to the Agvance dataset. The Agent must be logged into and open for a scheduled batch of reports to run automatically.
Creating the Agvance Agent Shortcut
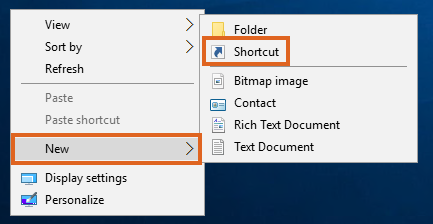
- To set up a shortcut, right-click on the Desktop or another folder where you would like to run the Agvance Agent from. Go to New / Shortcut.
- On the Create Shortcut window, select Browse…
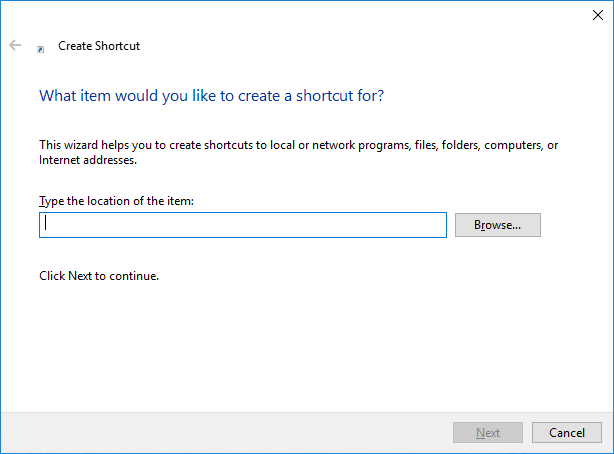
- The Browse for Files or Folders window opens. Select the Agvance Agent executable file.
Note: The Agvance Agent executable file (AgvAgent.exe) can be found in the Agvance folder within the Program Files folder on the hard drive.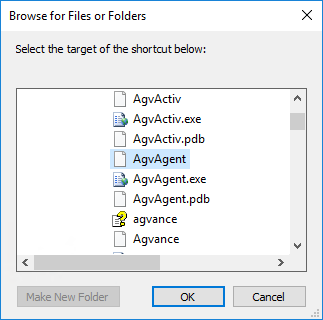
- Select Next on the Create Shortcut window. On the final step, name the shortcut and choose Finish. The shortcut is now available.
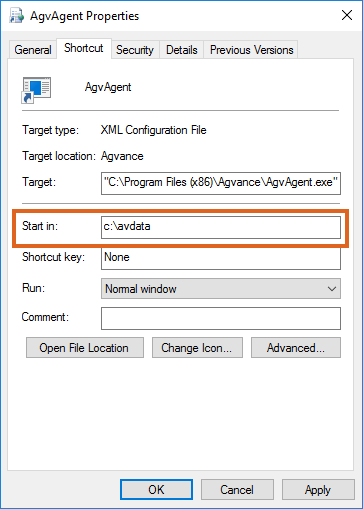
- Before running the Agvance Agent, the shortcut must start in the Agvance dataset. Right-click the Agvance Agent shortcut and select Properties. In the Start In field, type the path to the Agvance dataset. Select OK. Double-clicking the shortcut opens the Agvance Agent.


Using Save Sets on Agvance Reports
As mentioned before, the Agvance Agent utilizes the Save/Load Sets feature for Agvance reports. The Save Set feature allows establishing and saving set criteria for a report. The User can then load the set at a later time and the report criteria will match what was saved in the set. The Load Set and Save Set buttons are found on several Accounting and Grain reports.
How to Save a Set
An example of a report where a Save Set may be beneficial is the Sales Analysis found at Accounting / Reports / Accounts Receivable / Sales.
- On the A/R Sales Reports window, select the criteria to use when running the report.
Note: Specific Customers and Products selected using the Select button are not included as part of the saved information with a Save Set. However, specific Customer Classifications and Product Classifications are saved with the Save Set. This is by design as it is a way to automatically tag a new Customer or Product to belong to specific Classifications which will cause that new Customer or Product to show up on reports without reselecting them on each report. - Once the Report Criteria is complete, the set can be saved by choosing Save Set.
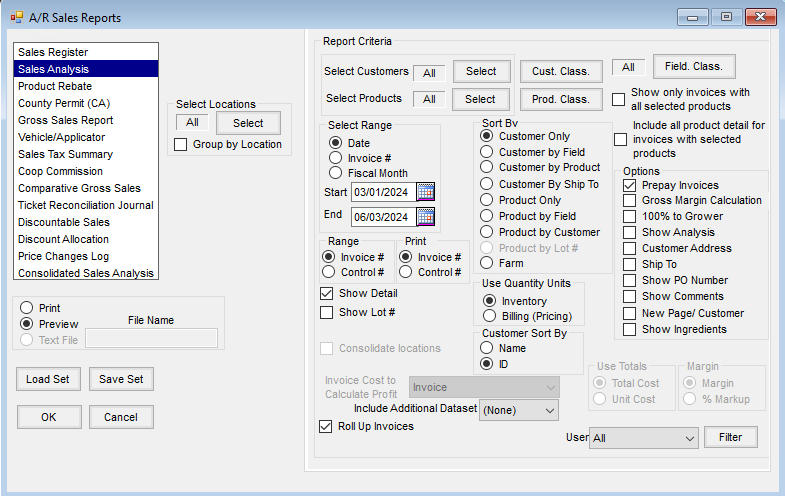
- When selecting the Save Set button, the Save Report Set window will open. Use this window to name the set and select whether this set will be saved for the User logged in or for every User set up. These two labels are found on the Report Set tab. The Ranges tab on the Save Report Set window gives the ability to set dynamic ranges for dates, document numbers (Invoice, etc.), fiscal month ranges, etc. if those ranges are an option in the Report Criteria.

Note: Multiple sets can be set up for the same report. However, if an unassigned set is saved (a set that is available to all Users) for the same report, it is recommended to use the name of the who created the set in the name of the set. For example, if Jane Smith and John Doe both create an unassigned set for the Sales Analysis report, use something similar to Jane Sales Analysis and John Sales Analysis as the names of the sets.
To load a set, choose Load Set and select the set to be loaded. The Report Criteria should then be loaded according to what was saved in the set.
Using the Agvance Agent
The Agvance Agent gives the ability to run Agvance reports either on-demand from a batch or at a scheduled time.
Note: The Agvance program cannot be open while running report batches from the Agvance Agent. If reports are set up to run during the night, make sure Agvance is closed before leaving. The modules for the reports that are scheduled to run must be activated on the desktop that is running the Agvance Agent.
Example: If an Accounting report is scheduled to run, then Accounting must be activated on that desktop.
Only batches set up and saved by the User logged into Agvance Agent will be available to run.
Polling
When the agent is polling, the batches that are scheduled to run at a specific time will run. However, when polling is turned off, the scheduled batches will not run. Polling can be turned off and on by selecting File / Toggle Polling. The polling status is displayed on the title bar of the Agvance Agent window.

View Queued Batches
View the queued batches by navigating to View / Queued Batches. The grid will list the batches set up to run at a scheduled time, but the Agent was not polling at that time. Check the Delete box in the grid to delete the reports batch from the queue.

Adding a Batch – Batch Tab
To add a batch, go to Setup / Batch and select Add. Enter a Description to name the batch of reports that will be set up to run. For example, if running Sales Register, Sales Analysis, and Gross Sales Report, the batch might be named Sales Reports.
If the group of reports/tasks is one that runs on a regular basis, it can be set up to run on a schedule. Check the Create a schedule for this batch option to set the reports to run on a schedule. When the checkbox is selected, the parameters for setting the schedule become enabled. Selecting the frequency (Daily, Monthly, or Weekly) for the batch changes the parameters in the Schedule Task frame. Once the parameters have been set for the schedule, select Save to save the settings. The batch will now run according to the schedule.

Adding a Batch – Tasks Tab
From the Tasks tab, add saved or unassigned reports. To add a Saved Set, double-click on in the grid and choose the Saved Set from the Select Tasks window. Use the filtering options to filter the list of Saved Sets. After choosing a task or several tasks, select the printer where the reports should print. The default printer is the User’s default Agvance printer.
Note: Multiple reports can be set up to run from a batch. The report may also be saved to a file by selecting (Save To File) in the printer selection and entering the File Type, File Path, and the File Base Name. Another option is to email the reports. After selecting a task for the batch and setting the Printer to Email, the following information will be required before the task setup can be saved.
- Specify the File Type.
- Enter the File Path (the file to be emailed will first be saved to the designated File Path).
- Enter the File Base Name.
- Enter an Email Subject.
- Enter an Email Message.
- Select at least one Email Group (in at least one of 10 available email groups.
When the batch runs, the task/report to be emailed will first be saved to the File Path designated. It will then be attached to an email sent from the User running the Agvance Agent to recipients included in the Email Group(s) set up for that task/report.

Editing a Batch
To edit a batch, select the batch from the list and choose Edit. Add or remove any tasks or change the description of the batch. Changes to the schedule information for a batch can also be made. After making the changes, select Save.
Deleting a Batch
To delete a batch, choose the batch to remove and select Delete. If the batch is set up to run on a schedule, the scheduled job will also be deleted.
Manually Running a Batch
To manually run a batch, select the batch to run and choose Run. Any batch, including those set up to run on a schedule, may be run manually.
Emailing a Batch
- To email reports from AgvAgent, the User running the Agent must have an email address set up at Hub / Setup / Users. Additionally the Mail Host must be specified at Hub / Setup / Company Preferences on the General tab (an email administrator can supply this information).
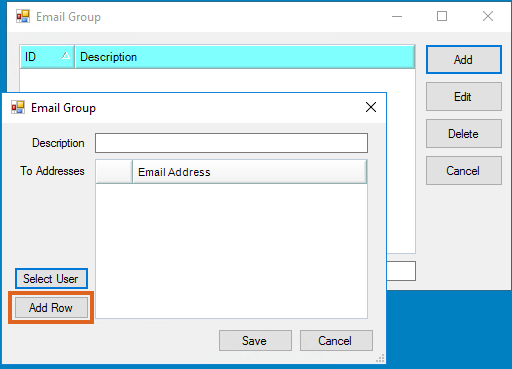
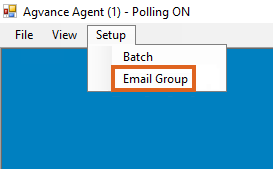
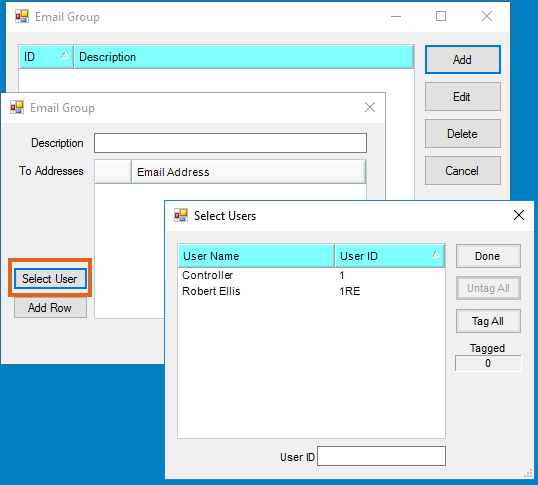
- Agvance Agent now provides a setup area to establish Email Groups. Before Users can email various tasks/reports in Agvance Agent, Email Group(s) will need to be set up. In AgvAgent, navigate to Setup / Email Group.
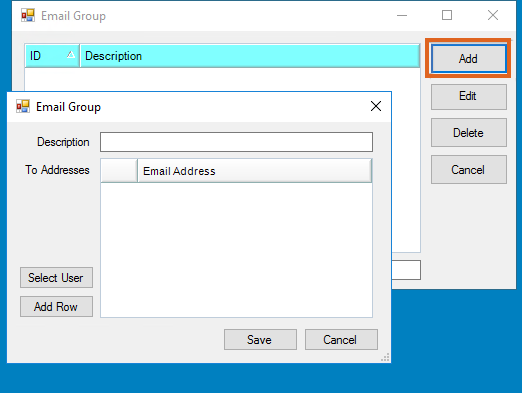
- Choose Add to open the Email Group setup window. Email Groups can also be edited and deleted here as needed.


Adding Individuals to Email Groups
- To add other Agvance Users within the company, choose Select User to choose one or more Users from a list.
- To add other individuals, choose Add Row and manually type in the email address of intended recipients.