Overview
Before ending the fiscal year, it is best to deposit as many of the outstanding entries in the Make a Deposit screen as possible. Ideally, the window would be empty for the start of the new year. If outstanding items remain, Agvance brings entries from the prior year into the Make a Deposit screen for the current year. For more information, see Bank Deposit at End of Fiscal Year.
Version 6.0.15390 or Higher
- End of Fiscal Year Processing – It is important to install build 6.0.15590 or higher prior to performing the Fiscal End of Year process to ensure all steps in the archive process are successfully completed.
Ending the fiscal year of a business is an important step. Several data files are archived, purged, and reset for the new year.
Operationally, ending a year is just like ending any month but, when the 12th month is selected, significantly more posting tasks occur than during a typical month-end. In addition, the previous year's data is archived (just as it is before ending the period) in another directory so that it can be accessed later. That directory name is \FYAVyyyy where yyyy is the year selected as the 12th month is ended.
Fiscal Month
Agvance Accounting provides for twelve fiscal periods (or months) in a fiscal year. The first calendar month of the fiscal year must be set at Setup / Preferences on the General tab. With that set, the computer knows what calendar month is the end of the fiscal year. This is important because, in addition to end of month tasks, it automatically performs these two functions:
- Ends the fiscal year when the 12th month is ended.
- Clears the Vendor 1099 Paid YTD and the Customer 1099 Amt Paid To Date at the end of December.
Note: If 1099 forms are required, run them prior to ending the fiscal month of December. However, if December is also the end of fiscal year, then the month/year may be ended and the 1099s printed later from the archived data set.

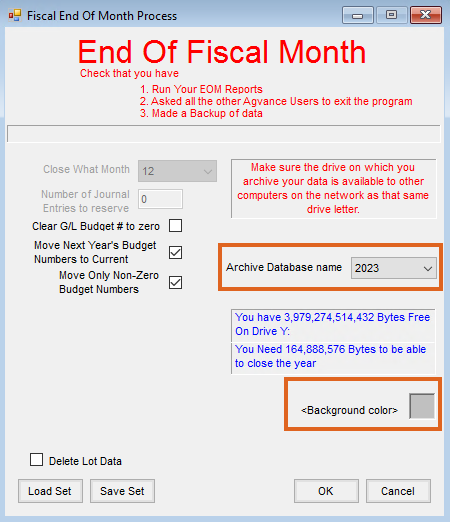
- Close What Month – The fiscal period being closed is indicated.
- Number of Journal Entries to Reserve – As any month is ended (except the 12th), the computer reserves at least 5000 blank Journal Entries prior to closing the month. The number of Journal Entries to reserve is remembered from one end of month to the next. This allows A/P Bills to be posted to the prior month and Adjusting Entries to be made in previous months. To post a Journal Entry into a previous month, the Period selection at the bottom of the Add a Journal Entry screen must be changed to the desired month.
- Load Set/Save Set – This automates the end of month process through a scheduling agent.
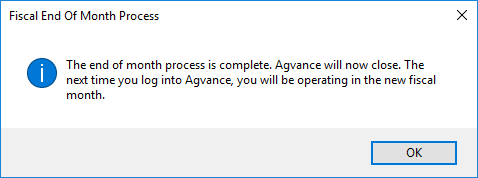
Once the month has been closed, the following message appears as a confirmation that the fiscal month has been closed.
If This is Also End of Fiscal Year (When Ending Month 12)
Version 6.0.15390 or Higher
- End of Fiscal Year Processing – It is important to install build 6.0.15590 or higher prior to performing the Fiscal End of Year process to ensure all steps in the archive process are successfully completed.
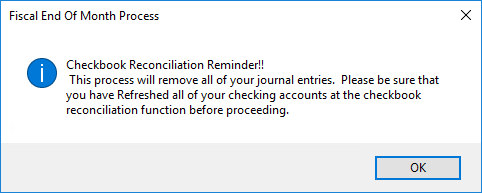
A Checkbook Reconciliation reminder appears first. If the Checkbook Reconciliation utility is used, open the Checkbook Reconciliation area for each account to be reconciled and choose Refresh.
Once the accounts to be reconciled later have been refreshed, continue with the end of year process.

- Clear G/L Budget # to zero – If checked, this option changes the G/L current budget numbers to zero.
- Move Next Year’s Budget Numbers to Current – If the budget numbers should be moved to the new dataset, select this option. This moves the new year budget amounts into the current budget area in the new year.
- Move only Non-Zero Budget Numbers – Active only if the Move Next Year’s Budget Numbers to Current option is selected, this only moves the non-zero budget numbers.
- Archive Database Name – Indicate the year of the data being ended. This number will be incorporated into the archived dataset name – FYxxyyyy where xx are the first two characters of the data directory.
- Example: FYAV2021 would be the directory name of the archived data for \avdata in 2021.
- Delete Lot Data – Check this if any lot numbers with zero quantity should be deleted.
- Background color – Optionally set the archive background color to something other than the standard background. This is suggested as the different color serves as a visual reminder when an archived dataset is open.
- Space Available – The free space available on the data drive and the space required to archive the data display. If not enough space is available to archive, cancel the process and make room on the data drive.
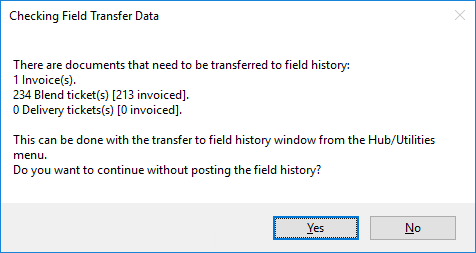
- Field History – The system checks for loaded Blends, (by Field) Delivery Tickets, as well as direct (not originating from a Blend or Delivery Ticket) by Field Invoices that have not yet been posted to Field History. There is an option to continue or stop and post the Field History. If the End of Fiscal Year is continued (without posting the Field History), the source documents will likely be gone. It is recommended if this warning appears that the End of Year process be discontinued and the Field History be posted before ending the year. This is done in the Hub at Utilities / Transfer to Field History.
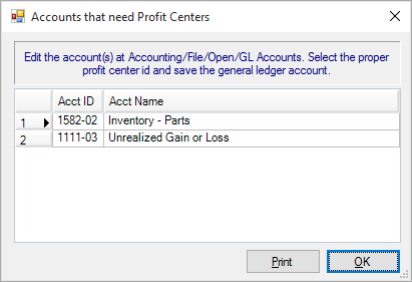
- Accounts that need Profit Centers – If Profit Centers are used on general ledger accounts, then every account must have a Profit Center selected. If any account is missing the Profit Center, a notice appears listing the accounts with no Profit Center. Enter the Profit Center on those accounts before attempting to end the fiscal year.
- Unposted Interest Deduction – Grain customers with unposted interest deductions get a warning. This allows the End of Year process to be stopped and the posting to be done prior to ending the year. To post the interest deductions, use the utility found at Grain / Utilities / Update 1099 Interest Paid Values.
- Document Renumbering – The numbering scheme for a variety of documents may optionally be restarted.
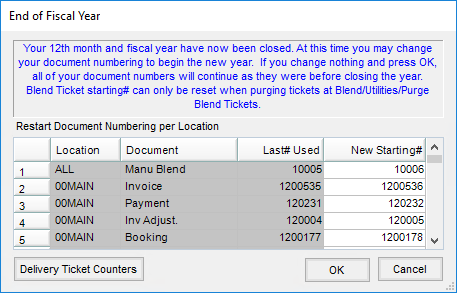
- New Starting # – The numbers in the New Starting # column may be changed. The next documents generated will have this document number – any number greater than zero may be entered.

End of Fiscal Year Process
- To end the fiscal year, go to Accounting / End of Periods / Fiscal Month.
- If the Checkbook Reconciliation area is used, before closing month 12, refresh all activity in accounts to be reconciled. Below is the reminder that displays before the Fiscal End of Month Process screen for month 12. To refresh, select OK at the reminder message, exit the Fiscal End of Month Process screen, and go to Accounting / G/L / Checkbook Reconciliation. Select the proper account choose Reconcile. Select Refresh. If multiple accounts are reconciled, repeat the refresh process for each account.
 If the accounts to be reconciled have been refreshed, select OK to bypass this message and continue with the year-end process.
 - Select the Background color for the prior year dataset. This gives a visual indicator to more easily identify when archived data is being used.
- Select the Archive Database name. This should be the year of the data being ended. If the correct year does not default, select the drop-down arrow and choose the correct year.
- If fields are entered on transactions (Blend Tickets, Delivery Tickets, or Invoices), the following message may appear:
Choosing Yes proceeds with the end of year. No cancels the end of year process, giving the opportunity to transfer the field history by going to Hub / Utilities / Transfer to Field History.
- A scan of the General Ledger Accounts is done. If a Profit Center is used on any General Ledger Account, then every General Ledger Account must have a Profit Center. Any account missing a Profit Center displays in a grid. A Print button is available to print a report of the accounts. Selecting OK closes the screen. A Profit Center ID must be selected on each of these accounts before the fiscal year end process may be completed.
- The data is archived (copied) as month 12 is ended.
Note: This process may be lengthy depending on the size of the database. Even if the program says it is not responding, do not end (Ctrl-Alt-Delete) the process.- Agvance makes a new directory called \FYAVXXXX where AV is the first two letters of the data directory and XXXX is the selected Archive Database name.
- After the data is copied, the program begins the end of year process in the current year dataset. Following are a few of the details:
- Deletes
- Processed Quick Tickets
- All inventory detail records
- All Purchase Invoices
- Processed and voided Purchase Receipts
- All General Journal Entries
- Zeroes all income and expense accounts and posts the difference into the Retained Earnings account set on the G/L tab at Accounting / Setup / Preferences or, if Profit Centers are used, the Retained Earnings account set for each Profit Center found at Accounting / Setup / Profit Centers.
- Clears month end archived numbers for Customers, Vendors, inventory, and General Ledger Accounts and captures beginning year balances.
- Deletes
- Numbering for some key documents may optionally be reset.
- The following message appears:
 After this step, data entry may begin in the new fiscal year.
 - Logging back into Agvance opens the current year. This is a good time to perform some data clean up. Some items (general ledger accounts, employees, and vendors) that are no longer used may be deleted. Agvance verifies the item being deleted does not have any balance or activity. If a balance or activity exists, the delete is not allowed. Customers and products are not often allowed to be deleted due to existing transactions. Set these items to Inactive if they will no longer be used.


Blending
For companies using Blend Tickets, after the fiscal year is ended, it is recommended to use the Purge Blend Tickets utility in the current year. By using this utility in the current year, an archive of the purged tickets exists in the prior year dataset.
Adjusting Entries
- Review the Journal Entries from the accountant. Verify all General Ledger Accounts used in the entries exist in the current year dataset.
- Log into the prior year dataset. Verify all General Ledger Accounts exist in this dataset.
- While logged into the prior year dataset, enter each Journal Entry dated the last day of the fiscal year, entering the accountant’s Adjusting Entry number in the Ref/Check#. At the bottom of the screen, verify the correct Current Year is displayed. If the correct Current Year is not displayed, select it from the drop-down.
- As the Journal Entry is saved, a message asks if this Journal Entry should affect the current year data. Selecting Yes updates the beginning balances in the current year accordingly for each General Ledger Account affected. Entries to income/expense accounts affect the beginning balance of the appropriate Retained Earnings account in the new year.
- Reprint any financial reports in that dataset to reflect the true end of year position.
- Make an image of the archived dataset and store this image in a secure location.
Warning: The accountant or auditor may give adjusting entries that affect the Accounts Receivable or Accounts Payable account. If Journal Entries are posted to these key accounts, the Accounting check-ups show out of balance. Instead of using the Accounts Receivable or Accounts Payable accounts on the Journal Entries, it is suggested to post the entry to an A/R Adjustment account or an A/P Adjustment account. These accounts can be added to the General Ledger (in both years affected) if they do not already exist. In the current year, a Customer or Vendor transaction must be entered on the specific Customer or Vendor account, posting to the A/R Adjustment or A/P Adjustment account accordingly.
Enter General Journal Entries as opposed to Vendor Journal Entries for changes to inventory asset accounts. An adjustment to the product may be necessary in the current year database as well.
Please call SSI Support with any questions about this procedure.
