The Alt3 style is most like the Standard Combo Statement with Condensed Headers but includes a Cover Page. This style was designed to meet specific company needs and federal guidelines for Consumer Statements.
Setup
Combo Statement Style Alternate 3 is available in the Statement Defaults section found on the A/R tab at Accounting / Setup / Preferences.
- Select Alternate 3 in the Combo Statement drop-down.
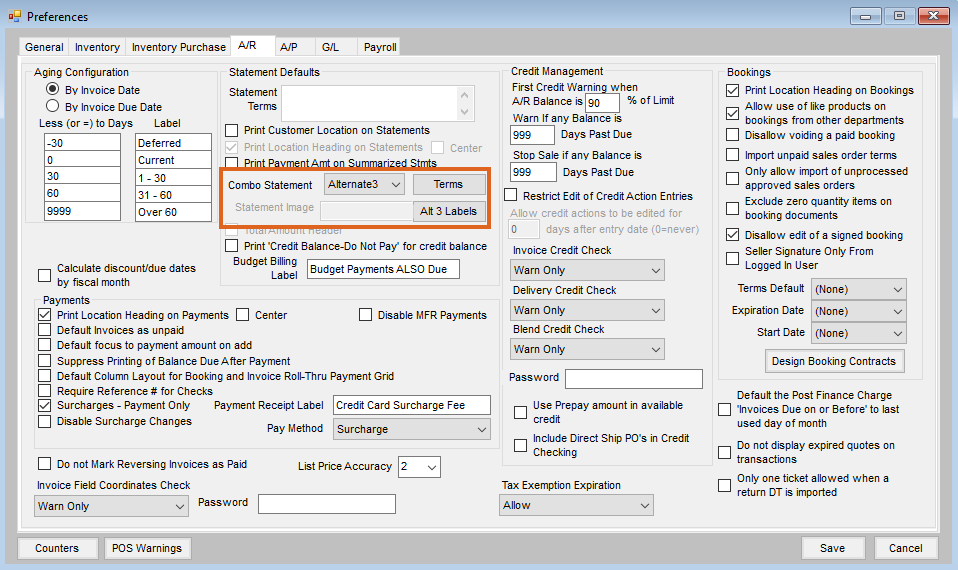
- Select Alt 3 Labels to edit the wording for the labels numbered 1 - 5, as shown below.


After the Alternate 3 style has been selected, navigate to Accounting Reports / Accounts Receivable / A/R Status / Combo Statement. In the middle section towards the bottom of the window, select Setup.

- In the Setup Combo Statement window, set the Start Date for the Statement. The Start Date is displayed as the beginning date for the Account Activity Summary on the cover page. The Statement includes only current fiscal month activity regardless of this date.
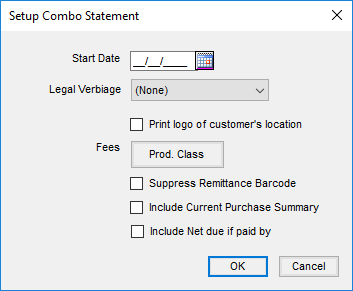
- Select the Legal Verbiage from the drop-down.
Note: Legal Verbiage will print at the end of the Statement and is set up at Accounting / Setup / A/R / Legal Verbiage for Statements by selecting Add. Key in a Name and, in the area below the Name field, type the legal verbiage. Optionally highlight text and select Font to choose the Font, Font Style, Size, Effects, and Script.
Alternatively, text can be copied and pasted into the field. If opting to copy and paste, formatting from the copied source will carry over. When finished, select Save.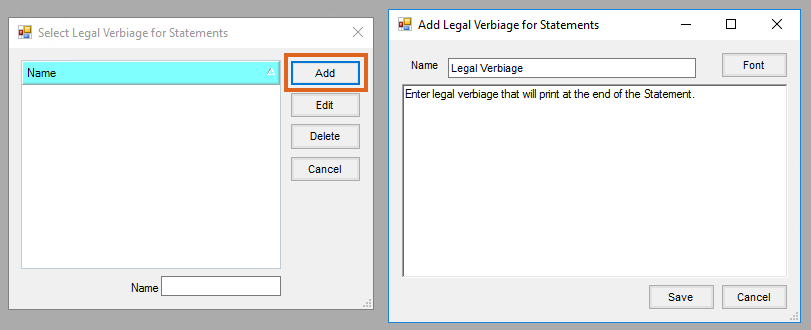
- In the Setup Combo Statement window, optionally mark Print logo of customer’s location to print the logo from the Customer’s Location rather than the Location logged into when creating the Statement.
- Optionally select Prod. Class to open the Classifications window. Double-click the <Classifications> heading to open the Select Product Classification Window and choose any applicable Classification(s) and select Done. These Classifications will appear in the Classifications window.
Note: Classifications could include Products like NSF charges, Late Fees, Warehouse Storage, etc. depending on the company’s definition of Fees.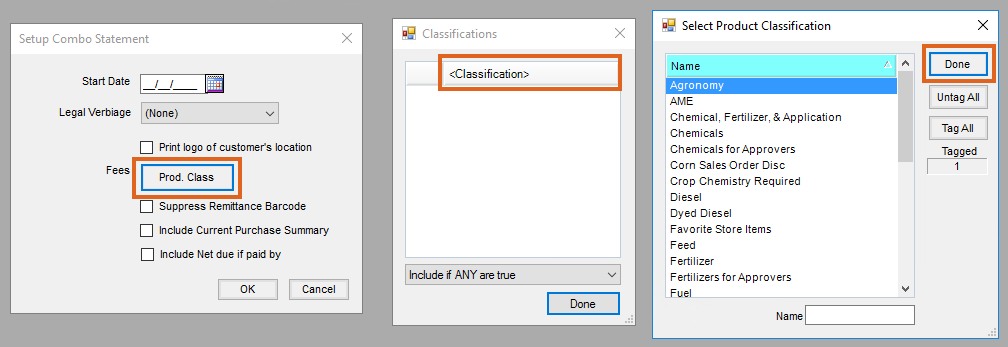
- From the drop-down menu, choose Include if ANY are true, Include if ALL are true, Include if ANY are false, and Include if ALL are false, then choose Done.
- Prod. Class will display in red if Classifications have been chosen.
- Optionally select any combination of the checkboxes to Suppress Remittance Barcode, Include Current Purchase Summary, and/or Include Net due if paid by.
- If Suppress Remittance Barcode is selected, the remittance barcode will not print on the Statement.
Note: This bar code is the Customer ID and can be scanned when adding a Payment on Account in Agvance to select that Customer. The Select Customer window must be sorted by Cust ID and the cursor needs to be in the Cust ID field at the bottom. On the Filter tab, the Location needs to be set to All. If it is not and the Customer is from a Location other than the one selected on the Filter tab, a different Customer may be selected with a similar ID. - If Include Current Purchase Summary is selected, the purchase summary will display on the cover page of the statement. This includes a Sales Group recap of the Invoices for the Customer for the current fiscal month. The Department Sales Class is used to group dollar amounts.
- The Include Net due if paid by option will print the net due in the Statement header return label as well as on the cover page.
- If Suppress Remittance Barcode is selected, the remittance barcode will not print on the Statement.
- Select Terms to open the Terms for Alternate 3 Format window. Optionally, enter Terms to print on the Statement and select Save.
- Choose OK.
- Select any other applicable criteria on the A/R Status Reports window and select OK.


Note: If using the Save Set feature, an Alt 3 Save Set should not overwrite a non-Alt 3 Save Set and vice versa.
Report Printout
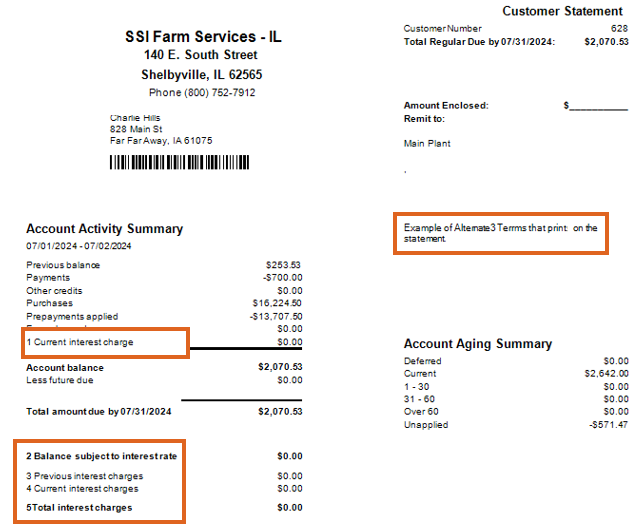
The Alt3 style is most like the Standard Combo Statement with condensed headers but includes a cover page.

- Remittance Stub – The top section of the cover page can be used as a remittance stub.
- Top Left Side
- The logo prints in the top left if Print logo of customer’s location is selected in the Combo Statement report criteria under Setup rather than the global location.
- If no logo exists at Setup / Location Preferences on the Logo tab, the Location address of the logged in Location or the Statement preference to print a Location address rather than the Customer’s Location.
- The Customer name and address are printed below the logo in Arial with a font size of 9 pt.
- The Customer bar code prints below the Customer name and address.
Note: This bar code is the Customer ID and can be scanned when adding a Payment on Account in Agvance to select that Customer. The Select Customer window must be sorted by Cust ID and the cursor needs to be in the Cust ID field at the bottom. On the Filter tab, the Location needs to be set to All. If it is not and the Customer is from a Location other than the one selected on the Filter tab, a different Customer may be selected with a similar ID.
- Top Right Side
- The page number, Customer Statement label, and Customer ID display.
- Total Regular Due – The total Regular balance due by that date excluding Deferred and Budget balances.
- Budget Amount Due by – This uses the Budget Billing label from Accounting / Setup / Preferences / A/R. No label is printed if the customer has no Budget Balance due.
- Total Due by – The total of Regular and Budget balances. This line will not print if there is no Budget amount due (if the label from Budget Amount Due did not print).
- An area to indicate the Amount Enclosed and the Remit To information is displayed. The Location name and address are printed below the Remit To label. This follows the Statement preference to print the logo of the Customer’s Location rather than Location logged into when Statements are generated. Location information is printed based on that setting. The Location’s Remit To address is used if populated. If not, the Location address from the Location Profile tab is used.
- Account Activity Summary
- Dates – The first date comes from Combo Statement report criteria by entering a Start Date after selecting Setup. The second date comes from the Statement/Aging date in the Combo Statement report criteria.
- Previous Balance – The Customer’s prior month ending Regular balance.
- Payments – The total of payments made on the Regular balance for the current fiscal month.
- Other Credit – The total current fiscal month Invoices where the overall total is a credit amount.
- Purchases – This includes current fiscal month Invoices excluding the most recent Finance Charge Invoice and Fee Charges.
- Prepayments Applied – Prepay amount used on Invoices in the current fiscal month.
- Fees Charged – The total of Products purchased in the current fiscal month based on Fees and Product Classification on the Combo Statement report criteria under Setup.
Note: The Classification is optional and could include Products like NSF charges, Late Fees, Warehouse Storage, etc. This depends on the company’s definition of Fees. - Current Interest Charge – The most recent Finance Charge Invoice in the current month.
Note: If Finance Charges are posted more than one time during the month, only the most recent based on transaction date and time is included here. The first Finance Charge Invoice would be included in Purchases. - Account Balance – The sum of Previous Balance, Payments, Other Credit, Purchases, Prepayments Applied, Fees Charged, and Current Interest Charge.
- Less Future Due – The sum of Invoices due after the Due Date from the Combo Statement report criteria.
- Level Pay Due – The sum of all unpaid Budget Memo Invoices. The Budget Billing Label is printed from Accounting / Setup / Preferences / A/R. The label does not print if the customer has no Budget billing.
- Total Amount due by XXXX – The sum of the Account Balance, Less Future Due, and Level Pay Due fields.
- Balance subject to Interest charges – The amount that is displayed is the balance when the current month Finance Charge Invoice was posted.
- Previous Interest Charges – Sum of unpaid Finance Charge Invoices from prior months.
- Current Interest Charge – The unpaid Finance Charge Invoice from the current fiscal month.
Note: If Finance Charges are posted more than once during the month, only the newest Invoice’s unpaid amount is displayed here. This is based on the transaction date and time of the Invoice. - Total Interest Charges – Sum of the Previous Interest Charges and Current Interest Charges.
- Prepay Summary
- Previous Prepay Balance – The Prepay Balance from the end of the prior fiscal month.
- Prepay Received – The total of new Prepay received in the current fiscal month.
- Prepay Applied – The total of Prepay money applied to current month Invoices.
- Prepay Balance – Sum of Previous Prepay Balance and Prepay Received minus Prepay Applied.
- Budget Billing Summary
- Budget Balance – The current Budget Balance. This section does not print if there is no Budget Balance.
- If the current balance displays in Agvance as a negative, Budget Billing payments have not kept up with Budget Invoices. The balance on the Statement should be a positive amount.
- If the current balance displays as a positive in Agvance, Budget Billing payments have exceeded Budget Invoices. The balance on the Statement should be a negative amount.
- Statement Terms – Prints across the right side of the Cover Page directly below the Remittance Stub and are set up in the Statement Defaults section on the A/R tab at Accounting / Setup / Preferences. A Terms selection is enabled to enter terms. Old Statement Terms are not used.
- Account Aging Summary – Prints the aging buckets and corresponding balance in each bucket.
- Future Due Summary – This label follows the company setting in the Aging Configuration section on the A/R tab at Accounting / Setup / Preferences. If this setting is blank, Future Due Summary is printed. A list of future due dates will print, based on Invoice due date, and the unpaid portion of those future due Invoices. This section does not print if there are no future due Invoices.
- Seven lines with dates and unpaid portion totals of the Invoices due on those dates are printed.
- If not all dates fit in the seven lines, an 8th Additional Dates line is printed and the total unpaid portion of Invoices due on the rest of the future dates.
- Future Due Summary – This label follows the company setting in the Aging Configuration section on the A/R tab at Accounting / Setup / Preferences. If this setting is blank, Future Due Summary is printed. A list of future due dates will print, based on Invoice due date, and the unpaid portion of those future due Invoices. This section does not print if there are no future due Invoices.
- Terms and Conditions – These optionally print at the end of the statement and are set up at Accounting / Setup / A/R / Legal Verbiage for Statements.
