Setup
The use of the Product Master Replication process in Agvance requires a Product Master location be specified in the database. This is done at Hub / Setup / Locations or Accounting / Setup / Locations on the Profile tab. Select the Location that will act as the Product Master location, check the Product Master checkbox and select Save.
A common practice, especially with diverse or large companies, is to set up a dedicated master location for this process. This allows for a few things. User security can be implemented to allow only certain people access to that location. It also allows for setting up a location that would have all product lines the company might handle, where there is no particular location that handles all of them.

The next step is to make sure that the Category in the Inventory Departments is set appropriately and consistently. This is done at Hub / Setup / Inventory Departments or Accounting / Setup / Inventory Departments on the Profile tab. Whatever is entered here and saved becomes available in the drop-down when adding or editing the next Inventory Department.
 |
 |
The next step is to set up the Product Synchronization rules.
Synchronization Rules
Navigate to Hub / Setup / Product Synchronization Rules.
When adding a Product, the program will add this new Product to all related departments and update/populate all information checked in the Sync on Add column. When editing a Product, Agvance will not only update all existing Products in related departments with the information checked in the Sync on Edit column; it will also add to any new related departments that do not have the Product set up at this time.

Synchronization Grid
- Data Element Name – This shows the Agvance table.column where the data element exists in the database.
- Editable Description – This gives the administrative user a place to type in a user-friendly description of what this element represents.
- Sync on Add – Selecting this option causes the data element to be synchronized when the product is added to other locations/departments. Notice product.PRODNAME, product.INVUNITS, product.UNITWGHT, and product.PACKSIZE, prodprce.BILLUNITS, and prodprce.BILLDIV are grayed out. These are required data elements so this forces synchronization of these data elements upon adding a new product.
- Tag All – Selecting this will check everything in the Sync on Add column. It is typical to check everything in this column.
- Untag All – All lines will be unchecked in the Sync on Add column upon selecting Untag All.
- Sync on Edit – A checkmark in this column causes the data element to be synchronized/updated when the product is edited at the master location and then synced up to the other Locations/Departments.
- Tag All – Selecting this will check everything in the Sync on Edit column. It is typical to check everything in this column then go back and uncheck those elements that should remain unique to the Location or should not be overwritten by the Product Master.
- Untag All – All lines will be unchecked in the Sync on Add column upon selecting Untag All.
- Other Considerations
- Definitely Uncheck – prodprce.AVGCOST, prodprce.LASTPURCST, and prodprce.EstAvgCst.
- Common to Uncheck – product.InActive, product.InActiveDate, prodacct.SalesAccount, prodacct.PURCHASEACCOUNT, prodacct.FREIGHTACCOUNT, and prodacct.Purchasediscount.
Note: Leaving these checked may cause inventory and/or GL discrepancies. - Special to the Locations – Every case is different, but an example is pricing. If the company allows Locations to have different prices, then all data fields related to pricing could be potentially unchecked.
- Synchronize Adds only when needed for transactions – When this is checked, the Sync on Add rules that have been selected are only applied when adding an Inter-Company Transfer.
Note: This is typically unchecked. Some of the larger companies with hundreds of locations in different parts of the country use this to reduce the number of products managed at the individual locations. - Live Product Synchronization – When this is marked, the update or addition of a product at the master location syncs to the other locations/departments when the product is saved.
Note: This is typically checked to ensure automatic/real-time updates. With new implementations, it is typical to leave this unchecked in the early stages while building the data. Products are built in the Product Master Location over some time and when the implementation team/customer feels the setup is complete or close to complete, a Product Synchronization utility can be utilized to push the products out accordingly and then Live turned on (see the Product Synchronization Utility tab above).
When new Product Attributes or Classifications are added, both the Sync on Add and Sync on Edit will be defaulted to unchecked. The Attributes and Classifications are always at the bottom of the grid. When adding a new Attribute or Classifications, it is a good idea to come back to review and set appropriately.
Additional Datasets
This is an optional step and is used when a customer has multiple companies that handle the same products. This allows for maintaining in one dataset and updating the others.

- Add Dataset – Use this option to choose additional datasets to apply the product synchronization rules. Once an additional dataset is selected, it appears in the grid with the option to mark to include.
Product Synchronization Utility
This utility can be used to initiate a manual sync of all Products, edited Products, or a select few Products whenever the Live Product Synchronization option is unchecked.
- Go to Hub / Utilities / Admin Utilities and then Hub / Synchronize Products.
- Select the Products to be synchronized.
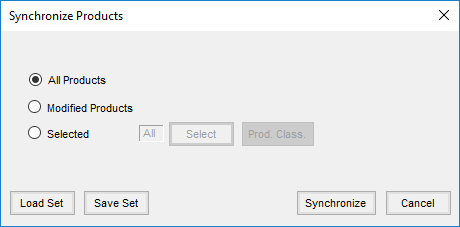
- All Products – This will go through all Products currently at the Product Master Location and initiate both the Add and Edit rules. This is typically used on new implementations after building the main Product list and when ready to push out to all the other Locations.
- Modified Products – This is typically used by companies that do not have Live Product Synchronization turned on.
- Selected – This allows for a combination of Products to target the synchronization whether by selecting them or selecting Product Classifications. This is usually used (but not limited to) when a new Product line is introduced, an import of new Products is done, batch editing of Products, etc.
- Select Synchronize and the synchronization occurs.

If editing Products from the Product Master Location with the Batch Edit Products utility (Admin Utilities / Hub / Batch Edit Products), an option is available to initiate the synchronization from there as well.

