View a listing of Purchase Receipts in Agvance SKY Product. In Agvance SKY Admin, the Product permission can be turned on or off for each Agvance SKY User to allow or deny access to the Agvance SKY Product app. Users can also be given the permission to Add Purchase Receipts.
The Purchase Receipts list displays Purchase Receipts with the option to search by Vendor, Vendor ID, PR #, Control #, Ship Date, Status, Type, or Fiscal Month. Choose the Expand icon to view up to three line item details for each Purchase Receipt.

Filters are available to filter the grid by Date Range, Status, Type, Location, and/or Fiscal Month. Select Apply Filters to update the grid with selections.
Select the Vendor name or icon to display more information for that Purchase Receipt.
In the grid, view and search for specific line items by Product Name, Product ID, PO #, PR #, Dept ID, Qty, Total, Prepaid, or Discount.

Add a Purchase Receipt
Those with the Add Purchase Receipts option enabled in Agvance SKY Admin have the + Add Purchase Receipt button enabled at the bottom of the window.
Use the navigation menu on the left to jump to different sections of the Purchase Receipt.
Purchase Receipt Info
- Select a Vendor from the Vendor drop-down.
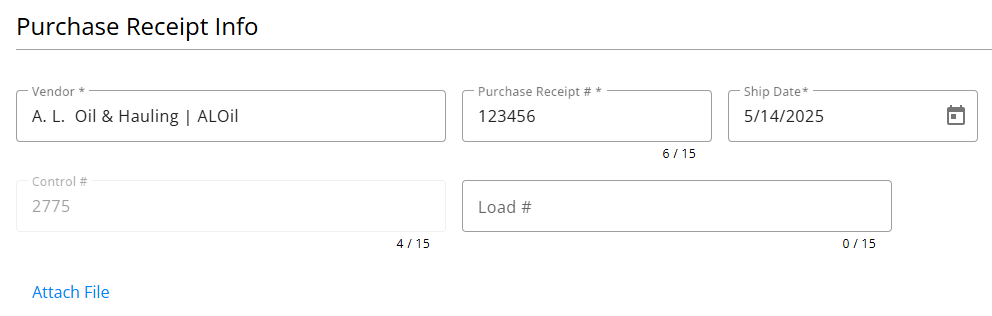
- Enter a Purchase Receipt #.
- Select the Ship Date.
- A Control # or Load # can optionally be entered.
Note: A Control number can be entered if Auto-number Document for Purchase Receipts is not checked in Agvance Windows Accounting Preferences. If this option is checked, this number cannot be edited and will be incremented automatically. - If applicable, select Attach File to browse for and select relevant documents.

Products
Products can be added individually or by importing an applicable Purchase Order, Warehouse Ticket, and/or EDN.
Note: If the Require PO On PR preference is enabled in Agvance Windows on the Inventory Purchase tab at Accounting / Setup / Preferences, the Search Products option will not be available.
Add Products
- Choose Search Products.
- A grid of Products displays. Use the Search field to find the appropriate Product(s) or scroll through the list. The Filters button to the far right of the Search bar can be used to narrow down the list of Products.
Note: The Show Selected button next to the Search bar is enabled after selecting the Product(s). The number indicates how many Products are currently checked. Selecting the button filters the grid to show only the selected Products.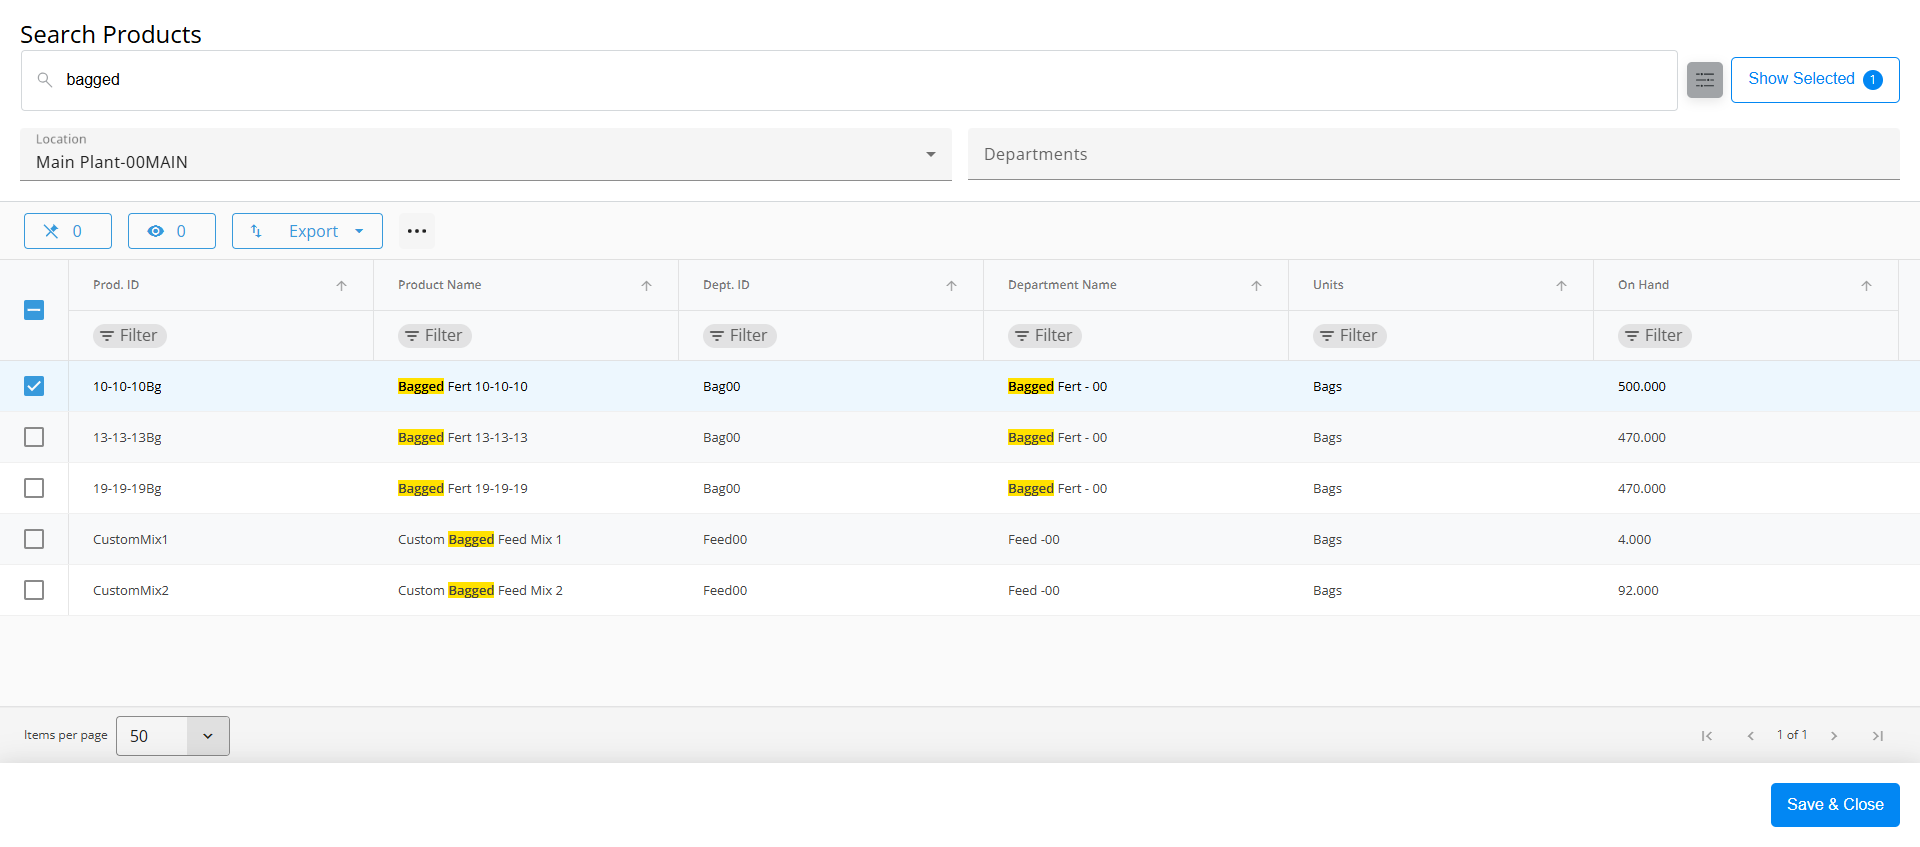
- Once the Products are selected, choose Select & Close. Those Products will then be displayed to optionally enter additional information. See the Additional Product Information section below.

Import Purchase Order
- Choose Import Purchase Order.
- Find and select the appropriate PO, then choose Select & Close.
Note: Only one Purchase Order can be imported into a Purchase Receipt.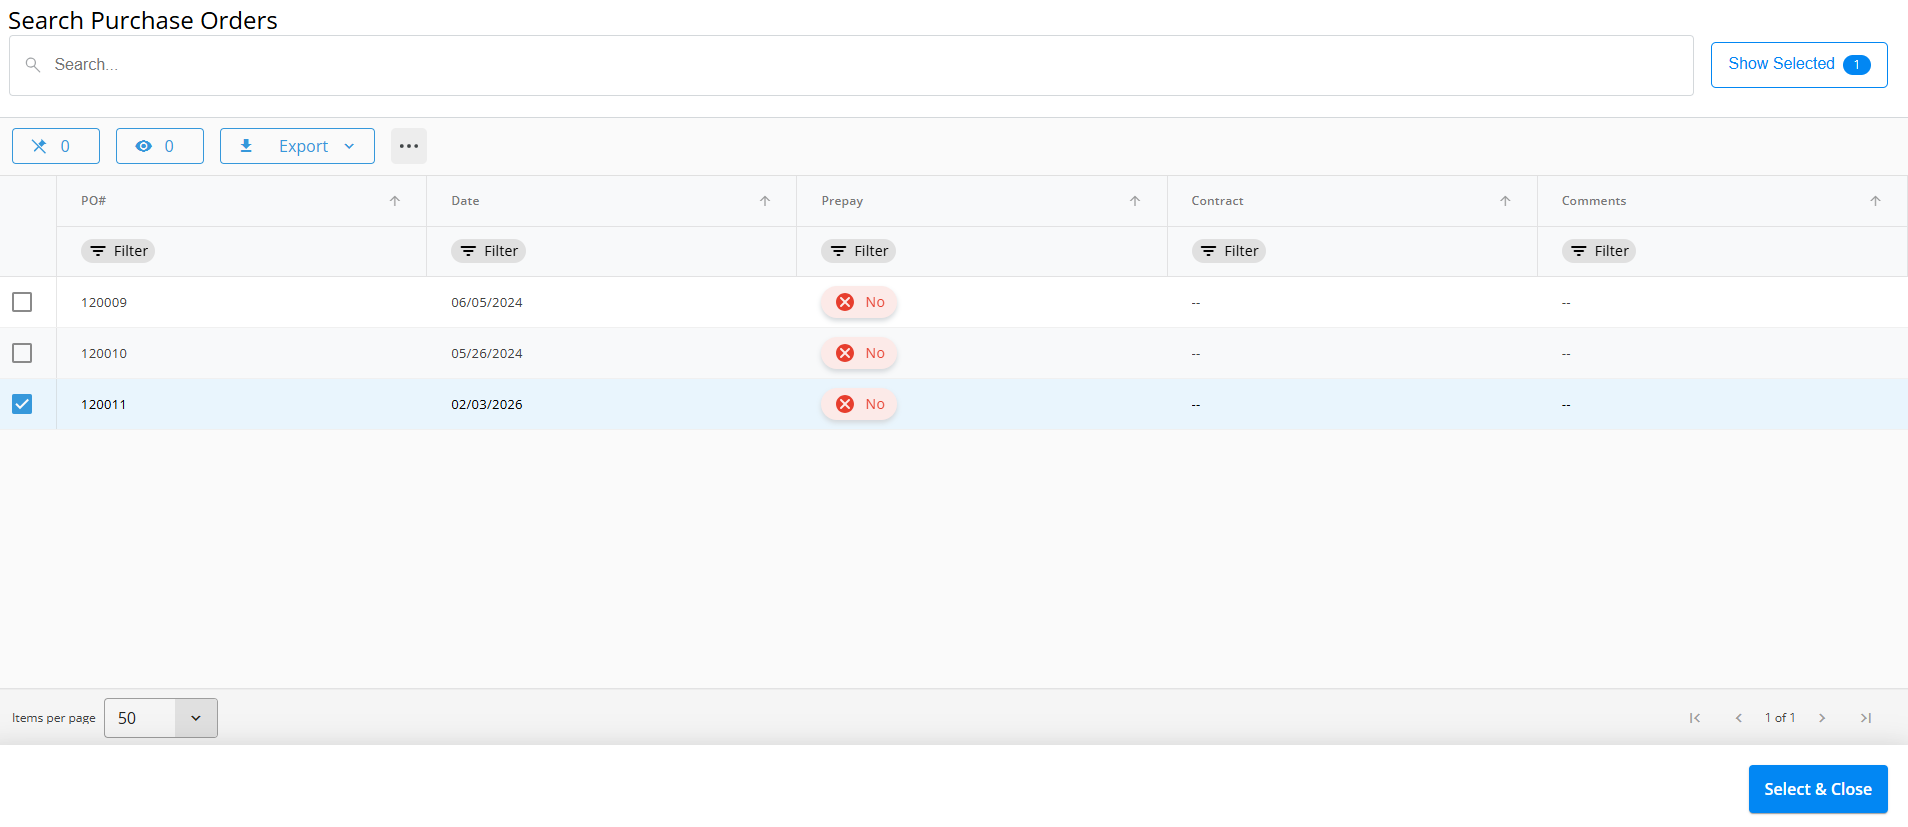
- Product information will then be displayed in the grid with information from the Purchase Order. Additional information can optionally be added if applicable. See the Additional Product Information section below.

Import Warehouse Ticket
- Choose Import Warehouse Ticket.
- Find and select the appropriate Warehouse Ticket, then choose Select & Close.
Note: Only one Warehouse Ticket can be imported into a Purchase Receipt.
- Product information from the ticket selected will then be displayed. Optionally include additional Products by selecting Search Products. Additional information can optionally be added if applicable. See the Additional Product Information section below.

Import EDN
- Choose Import EDN.
- With Filters expanded, indicate the Location. Choose Get New EDNs From Web to populate the grid, then check the appropriate EDN to be imported. Choose Select & Close.
Note: Only one EDN can be imported into a Purchase Receipt.
- Product information from the EDN selected will then be displayed. Optionally include additional Products by selecting Search Products. Additional information can optionally be added if applicable. See the Additional Product Information section below.

Additional Product Information

- If a Warehouse Ticket or EDN was imported and a Purchase Order exists for the Vendor and Product, choose Select PO in the Product grid to link that PO to this Purchase Receipt.
- The Lot Number drop-down gives the ability to choose from Lot Numbers already set up in Agvance.
- Enter the Received Quantity.
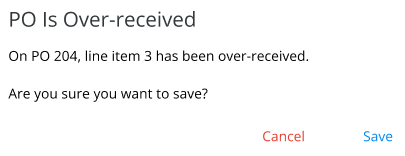
Note: If a prepaid PO was imported and the Restrict Over Receiving on Prepaid PO preference is selected in Agvance Windows on the Inventory Purchase tab at Accounting / Setup / Preferences, the following message will display: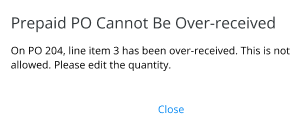
- Enter the Estimated Cost ($).
If no Estimated Cost is entered, the cost on the line item is set to the Product's Last Cost. If the Last Cost is zero and the Product is in an Estimated Average Cost Department, the Product's Estimated Average Cost will be used.
If the Product is in an Estimated Average Cost Department AND no cost is entered AND no Freight is applied, the cost on the line item will be set to the Product's Estimated Average Cost. - Add-On Charges can be included by selecting View on the appropriate Product lines. In the window that displays, choose Add New Charge to add a new line to the grid in the top section.
Note: Add-On Charges will default automatically based on the Products' Classifications. However, these can be added, edited, or removed as needed.- Choose the Charge ID from the drop-down. These must first be set up in Agvance Windows at Accounting / Setup / Inventory / Purchase Add-on Charges.
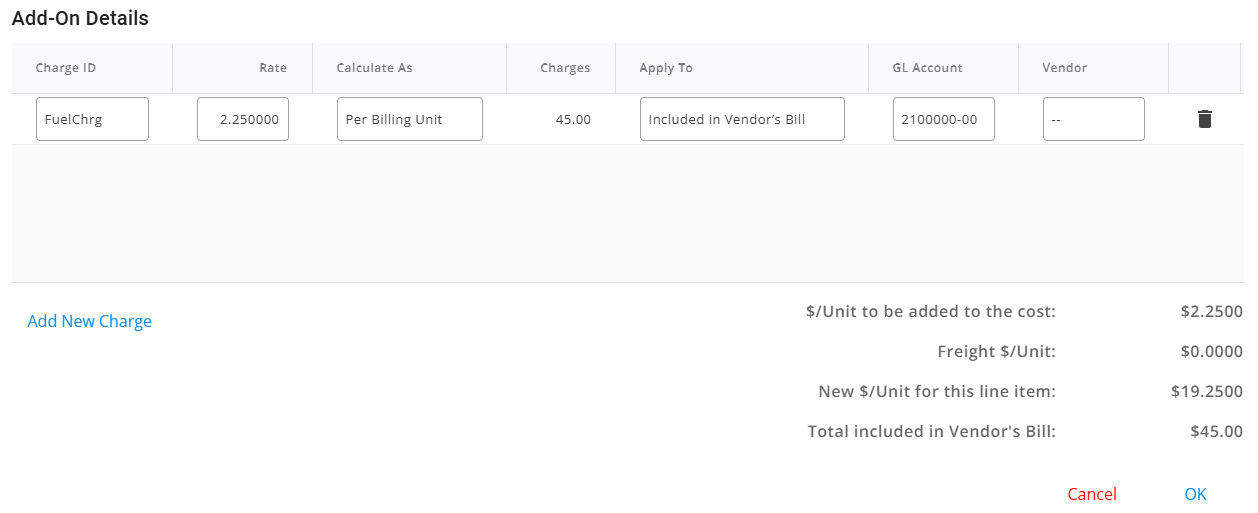
- Enter the appropriate Rate, and choose the Calculate As method. The Charges will be calculated automatically.
- The Add-On Charge can be Accrued or Included in Vendor's Bill.
- Include in Vendor's Bill – The GL Account will default from the Inventory Department. The Vendor will default as blank and will be disabled.
- Accrued – Select the GL Account. The Vendor will default based on setup but can be edited.
- Add-On Charges can be removed with the Delete icon.
- Review totals at the bottom, then choose OK.
- Choose the Charge ID from the drop-down. These must first be set up in Agvance Windows at Accounting / Setup / Inventory / Purchase Add-on Charges.
- The Freight will be populated once the Freight section is applied.
- If applicable, choose Select Container on the Product line item, select the appropriate Container, then choose Select & Close. Once the Purchase Receipt is saved, the Filled Status, Current Location, and Current Product will be updated on the Container.
 Note: With Containers, the following validations will take place:
- A Container is required and one is not selected (the PR cannot be saved until one is selected).
- The Container's Current Product does not match the Product on the Purchase Receipt (edits can be made to the PR, or the PR can be saved as-is).
- The Container is over capacity (edits can be made to the PR, or the PR can be saved as-is).
- Products can be removed by selecting the Delete icon.


 Note: With Containers, the following validations will take place:
Freight
- If applicable, enter the Freight Cost.

- Select from the Freight Options drop-down (Actual Total$, Estimated Total$).
- If the Freight is being estimated, a Freight Vendor can be selected from the drop-down.
- Once Freight information is entered, select Apply Freight. The amount will be prorated across all Products.

Notes
- Optionally enter any applicable Notes for the Purchase Invoice.
- After reviewing, select Post Purchase Receipt to post and return to the Purchase Receipts screen or Post & Start New to post the Purchase Receipt and start another.
Note: If a PO was imported and the quantity on the Purchase Receipt is over the amount from the Purchase Order, the following message will display to either Cancel and edit the quantity or Save the Purchase Receipt.