Nutrient Recommendations are generated for a Customer’s Field by selecting the Generate Nutrient Rec shortcut in the Planning module. A Field must exist for the Customer before a Recommendation or Field Plan is created. Fields may be added one at a time at Hub / File / Open / Fields or one generic Field for all Customers may be added at Hub / Utilities / Add Fields.
Highlight the desired Field from the Select a Field window and choose Select. If a Nutrient Recommendation already exists for the Field, the information displays and may be edited. If no Nutrient Recommendation currently exists, known information about the Field displays, and remaining information may be manually entered.

- Nutrec Style – Choose the style to be used when generating Recommendations for this Field. Use one of the customized styles previously created or choose Standard for the Recommendation style supplied with the Agvance program.
Note: The Standard style is based on University of Illinois data. - Soil Type – This defaults with the Soil Type set in the Field file. It is an optional field and not necessary for the calculation of the Recommendation. A Soil Type entry is limited to 30 characters.
- Soil Class – Used for Lime recommendations, this defaults from the Field file or can be manually entered. The definitions of the options are:
- A – Dark-colored silty clays and silty clay loams.
- B – Light and medium-colored silty clays and silty clay loams; dark-colored silt and clay loams.
- C – Light and medium-colored silt and clay loams; dark and medium-colored loams; and dark-colored sandy loams.
- D – Light-colored loams; light and medium-colored sandy loams; sands.
- E – Muck and Peat.
- Method – Indicate whether the Recommendation for the Field should be calculated based upon Field Average, Each Sample, or Zone Average.
Note: The Field Average method finds the average of the test results and creates a Recommendation from that average. If Zone Average is selected, the Zone Definition screen appears to define the zones.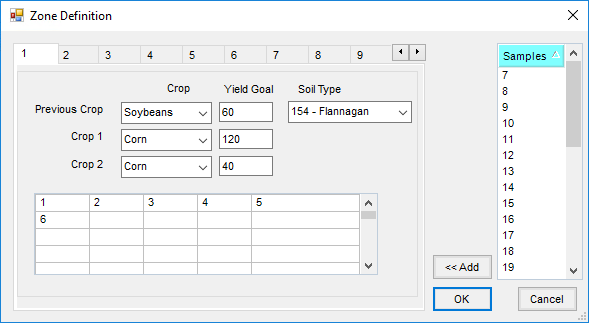 Zones are defined by grouping sample areas together. There may be up to 12 management zones per field. There is a separate tab for each zone defined. The following information must be set up for each zone:
- Crop/Yield Goal – Enter the crop and yield for Previous Crop and Crop 1. Optionally enter Crop 2, if applicable.
- Soil Type – Optionally enter the Soil Type.
- Selecting sample areas – All sample areas available are displayed to the right. Double-click each one or highlight it and choose Add to include a sample area in a zone. To deselect a sample area, double-click it in the grid and it is returned to the area on the right. All sample areas in the Field must reside in a zone even if that zone will not be planted.
- Summary Graph – The printed Nutrient Recommendation can optionally include a graph. Select the Print Graph option and then indicate the Graph Style and Graph Type to print. These settings default from the previously selected options.
- Use Test Results from What Season – Data from an archived season may be used to generate Nutrient Recommendations. The resulting Recommendation is always saved in the current year’s Field file.
- Crops and Yield – Indicate the Last Year Crop and Yield and up to three scenarios for next year's planned Crop and Yield Goal. These default from the Field file's Sample tab if data was entered. A Crop and projected Yield for year two may optionally be included. This gives a two-year Recommendation for a single fertilizer application.
- Save this Scenario – Selecting this saves the nutrient recommendation scenario displayed in the grid to the Field file for future use.
- Scenario 1 - 3 – These display the results of the scenario in the grid.
- Grid – This displays the last Nutrient Recommendations calculated for this Field. The grid allows for up to three scenarios to be calculated for comparison.
- Calculate – Choosing this creates the Nutrient Recommendation in pounds/acre of plant food regardless of the way the test results are stored in the Field file. This takes longer when calculating sample by sample as each sample is calculated separately.
- View – This displays the Nutrient Analysis report. If the Method selected is Each Sample, this can be quite lengthy.
- Print – This prints the recommended nutrients with buildup and maintenance levels noted. If multiple scenarios are used, they all print side by side. If the Nutrient Recommendation was done by zone or by sample, a separate sheet prints for each.
 Zones are defined by grouping sample areas together. There may be up to 12 management zones per field. There is a separate tab for each zone defined. The following information must be set up for each zone:
Options

- Years – This area specifies the number of years to build up for any nutrient.
- Headings – Define the headings for the Test Results column, the Nutrient Recommendation column, and the Graph area on the Nutrient Rec Summary report.
- Printout Formats – Specify the Printout Format. The styles are Presentation Version, which is one page per sample, or Summarized by Sample, which is a spreadsheet format of the Nutrient Recommendations. The Summarized by Sample style also has an option to print One scenario/page.
- Maintenance Options – Select which Crop Years to include in the maintenance calculations.
- Set the heading for the Nutrient Rec Printouts – This option determine the units used on the Nutrient Recommendation printout.
- Midwest Laboratories Options – This identifies soil sample core details.
Create Crop Zone Layer
This button is available on Fields with soil sample points entered in Mapping.

The Crop Year, Crop Zone and Crop may be indicated. Selecting New Crop Year displays a window to enter a new Crop Year. Update Existing Crop Zone adds a new Nutrient Recommendation layer to the Crop Zone listed.
Multiple Recommendation layers may be added. It is named per the Layer Name entered. Selecting Create New Crop Zone creates a new Crop Zone for the selected crop.
