These end of period functions are extremely important. Care should be taken that all checklists provided are followed.
Daily
The Agvance data represents the financial records of the business as well as many hours of data entry time. Here are some things that may be done to assure that the data is safe and accurate.
Accounting Checkups
Agvance has accounting checkups available in the Accounting Reports module. It is recommended to run them several times during the month to assure data integrity. Periodically, a hardware, operating system, or Agvance error may occur while operating the program. When this happens during a posting process, there is a chance that a transaction was partially posted. Found in the Accounting Reports module by selecting the red + icon, these checkups may help find data inconsistencies caused by partial posting.
- Daily – It is recommended to run the G/L Accounts Checkup before making the daily backup.
- Weekly – It is recommended that the Customers, Vendors, and Inventory Checkups are additionally run. If the Energy module is being used, then the Budget Billing checkup should also be included in the weekly run.
Any errors shown on any of these reports should be faxed to SSI Support (1-877-402-2204 or 217-774-2204) or emailed to support@agvance.net.
Backup
Daily backups are strongly recommended. This is the process of making a copy of the files within the LastImage folder, which is located within the Data folder (usually \avdata). The LastImage is updated by using scheduled daily images at Hub / Utilities / Make Database Image on the Schedule tab, and scheduling software such as Vale. It can also be updated by making an On-Demand image in this same menu selection, but using the On Demand tab. The files within the LastImage folder should be transferred onto some type of media such as an external hard drive or zip drive.
Data is automatically backed up for hosted customers.
Specific instructions about how to operate backup software are unable to be given because that will vary by machine. Consult a hardware dealer if this type of assistance is needed.
End of Month Posting Notes
There are three sections of posting notes. A typical end of month, an end of calendar year (December), and an end of fiscal year (the 12th month which may or may not coincide with December).
End of Fiscal Month
- Customers – Current Regular and Prepay balances are recorded as the Customer's end of month.
- Credit Information – Credit information is updated as needed such as Months Over Limit This Year and High EOM Balance This Year.
- General Ledger G/L Account Balances – The end of month balance is captured.
- Fiscal Month counter – The new current Fiscal Month counter is set.
- Last journal entry # – The last Journal Entry number of the month is saved.
- Future entries – Any Future Entries are posted to the journal in the new month. If it is fiscal month 12, Future Entries will post to fiscal month 1 of the new fiscal year.
- Vendor – Current Regular and Prepay balances are recorded as the Vendor's end of month.
- Inventory – Each Product's Amount on Hand is recorded as the month's ending balance.
- Cost Audit Log – Records older than six months are deleted.
End of Calendar Year (end of December)
- Vendors – The 1099 Paid amounts are zeroed out.
- Customers – The customer 1099 Amt Paid To Date is zeroed out.
- Patronage – Customer patronage amounts for patronage, interest, and dividends are zeroed out.
End of Fiscal Year (end of 12th month)
- Document numbering – The numbering scheme may optionally be reset for many of the documents.
- Archives Data – A directory is created called FYxxyyyy where xx is the first two characters of the data folder, as in AV for \avdata, and yyyy is the year selected in the Archive Database Name area.
- Vendors - The Total Paid YTD amounts are zeroed out.
Purchase
- Purchase Invoices – All are deleted.
- Purchase Receipts – All processed or voided Purchase Receipts are deleted.
- Purchase Orders – All filled or voided Purchase Orders are deleted.
- Purchase Order Request – Declined, voided, and manually closed Purchase Order Requests are deleted.
Inventory
- Products – On the Product Profile, all End of Month balances are set to zero and new beginning year amounts are captured from current Amounts on Hand.
- Inventory Detail – All records are deleted and the Inventory Detail counter is set back to 1.
- Inventory Adjustments – All Inventory Adjustments are deleted.
- Manufactured Inventory – All Manufactured Journal Entries are deleted.
- Lot Numbers – If the preference to delete Lot Numbers is selected, any lot that calculates to zero is deleted. Any lots with a quantity greater than or less than zero are retained.
- Delivery Tickets – All unprocessed Delivery Tickets are set to Fiscal Month 0.
- Blend Tickets – Voided blends are deleted.
Accounts Payable
- Vendors – Regular and Prepay beginning year figures are set from current and all end of month numbers are zeroed.
- Bills – All paid bills more than twelve months old and all voided bills are deleted. Any remaining bills have their fiscal months set to zero.
- Disbursement – Disbursement records more than 12 months old are deleted.
Accounts Receivable
- Customers – Regular and Prepay beginning year figures are set from current and all end of month numbers are zeroed.
- Credit Limit – Months Over Limit and High EOM Balance for this year are copied to last year's position. The This Year figures are zeroed.
- Invoices – The fiscal month is set to zero on all remaining Invoices.
- Payments – All Payments are deleted.
- Quick Tickets – Posted Quick Tickets get deleted.
- Credit Override – The Credit Status Override reasons are deleted.
- Bookings – The Fiscal Month is set to 0 on all Bookings. Voided Bookings or Bookings flagged as Deleted are retained.
General Ledger
- Accounts – The sum of all Expense Accounts is subtracted from the sum of all Income Accounts. That difference is added to the current Retained Earnings account balance. Then all Income and Expense account balances are set to zero. The process then copies the current balance of all accounts to the Beginning Year figure.
If there is more than one Profit Center, each Profit Center may have its own Retained Earnings account. In this case, the profit from each Profit Center is posted to the corresponding Retained Earnings account.
- General Journal – All Journal Entries are set and the Last Journal Entry number is set to zero.
- Future Journal Entries – Always the last thing to occur, any Future Entries are posted as the first entries in the new year. The future journal records are deleted.
Payroll Month
The Payroll Month End additionally performs end of quarter and end of year automatically when appropriate.

Payroll Month End Posting Notes
There are three sections of posting notes. A non-quarter end of month, an end of quarter (March, June, September, and December) and an end of payroll year (December).
- End of Month – All monthly Pay and Deduction totals are zeroed out for each employee.
- End of Quarter – All monthly and quarterly Pay and Deduction totals are zeroed out for each employee.
End of Calendar Year (occurs automatically when ending December)
- Employee file – All monthly, quarterly, and yearly Pay and Deduction totals are zeroed for each employee.
- Paychecks – All paycheck detail for the year is deleted.
- Archive Payroll Data – An archive data directory named PYxxyyyy is created where xx are the first two characters of the archived database directory (av for \avdata) and yyyy is the year selected in the Archive Database Name area.
Prepay Season
At the Prepay End of Season when the invoicing is complete, there are two tasks that should be addressed in the following order.
- Decide what to do with any leftover Prepay money.
- End the Prepay Season. There are several considerations before performing this function.

Prepay Season Posting Notes
- Bookings – All invoiced and voided Bookings are marked as Deleted.
- Unpaid Bookings – Unpaid Bookings, based on selection (Partially Invoiced and/or Not Invoiced), are marked as Deleted that are dated prior to the specified Booking or Expiration Date or within the specified Book # range.
- Unsigned Bookings – This option will only delete Bookings not marked as signed by the customer.
End of Prepay Season
As the end of the prepay season gets closer, it is important to review the customer checkup for out of balances in the Prepay Balance or Booking Detail (Prepay Balance) sections of the report. If there are any errors in these sections, please print the report and fax it to SSI support for further instructions. Before entering Bookings and taking Prepay for a new season, this end of season function should be performed. This function marks paid Bookings that are completely invoiced (by all participants), and voided Bookings as deleted. It also marks any unpaid Bookings prior to the specified Booking or expiration date or within the selected Book # range as deleted. There are a few things that should be done before running this function.
Clearing Prepay / Booking Balances
There are three options to consider when settling prepay balances at the end of the prepay season.
- Option 1: Leave the prepaid Bookings on the Customers’ accounts for use during the next Prepay season. The Bookings will remain open as long as there is Prepay money associated with them.
Note: These Bookings may have out-of-date pricing for the new season. - Option 2: Refund the Customer Prepay by issuing a check. To do this, go to Accounting / A/R / Transfer Customer Prepay and select the appropriate Customer.
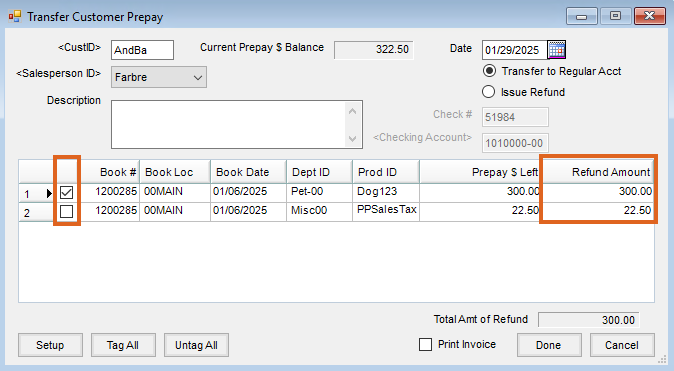 Choose Setup and select the Miscellaneous vendor and a Generic Prepay Product for each Location (this step only needs to be done once). Tag the Bookings to refund to the Customer. Optionally change the Refund Amount column if refunding only a portion of the Customer’s Prepay or a portion of a Booking line item. Selecting Done will create an Invoice to close the Booking (or reduce the Prepay dollars on the Booking) and transfer the Prepay dollars to the Regular Account. The program then issues a Quick Check through the Miscellaneous vendor, inserting the Customer’s information on the check. The Invoice can optionally be printed by checking the Print Invoice box.
 - Option 3: Transfer the Prepay dollars to the Customers’ Regular Accounts as a credit. This credit will then be available to apply to Invoices on the Regular Account. To transfer Prepay to the Regular Account, go to Accounting / A/R / Transfer Customer Prepay and choose the appropriate Customer. Select the Transfer to Regular Acct option (above the Issue Check option). Tag the Bookings to transfer and change the Refund Amount if necessary. Selecting Done will create an Invoice that closes the Booking (or reduces the Booking’s Prepay dollars) and puts a credit on the Customer’s account. The Invoice can optionally be printed by checking the Print Invoice box.
After the Customer settlements are complete, run the Booking Status report with detail (Accounting Reports / Accounts Receivable / Bookings / Booking Status). This report provides a list of open Bookings, their Prepay status, and the quantity and dollar balances remaining.
Running the End of Prepay Season Utility
To complete the end of Prepay Season, go to Accounting / End of Periods / Prepay Season.
Select Customers and/or Locations on which to run the utility. There are three ranges to choose from when selecting the Bookings to mark as deleted:
- The Date range will delete Bookings based on the Booking date.
- The Book Number range will delete Bookings based on the Booking number assigned by Agvance.
- The Expiration Date range will delete Bookings based on the expiration date saved on the Booking. If no expiration date was saved, then this selection will not delete any Bookings.
The Unpaid Booking Selection frame is especially important if the unpaid Bookings in the database were not completely invoiced. To delete all unpaid Bookings, choose both checkboxes (Partially Invoiced and Not Invoiced). To keep all unpaid Bookings that have not been fully invoiced, do not check either checkbox.
To view a report of the Bookings that will be deleted with the current selections, choose Print or Preview at the bottom of the screen and select OK. Selecting Post will mark Bookings as deleted based on the selections made.
How to End Prepay Season
- Run the Accounting Customer Checkup and correct any Prepay Bookings that are out of balance with the Prepay dollars left on the Customer account. Call the Customer Support Team for assistance if necessary.
- Run and archive a Booking Status report at Reports / Accounts Receivable / Bookings by Book # or Date range, for Both options (Prepaid and Non-prepaid Bookings), and to include All (Filled and Open). This is a complete report of all Bookings that existed before ending the season.
- Review the paid Bookings. Ending the Prepay Season will not mark any paid Bookings with remaining balances as deleted. If Product-specific paid Bookings exist, specific prices would be associated with those Products. If the specific prices should not carry forward to the next Prepay Season, the prepaid Bookings could be edited to show the remaining balance as generic Prepay, or the amount could be transferred from Prepay to a credit on the Customer’s Regular Account.
- Go to End of Periods / Prepay Season. Select the range of fully invoiced and voided Bookings to be deleted.
- Select if Partially Invoiced and/or Not Invoiced unpaid Bookings should be deleted.
- Select OK to preview or print the report. Verify that the Bookings listed on the report are the Bookings expected. If so, choose Post.
- Rerun the Booking Status report for all Bookings. Only prepaid Bookings and unpaid Bookings outside the selected range entered at the End of Prepay Season function should remain.
Print EOY Tax Forms
Beginning with the 2019 tax filing, SSI is partnering with Mag-Filer for the filing of tax forms. This comes at no additional cost to our customers. As a result of this partnership, we will no longer support printing 1099s and W-2s through Agvance. Instead, Recipient copy 1099s, W-2s, and W-3s can be printed directly out of MagFiler and SSI will provide full support for the Mag-Filer software.
Note: It is important to update to Agvance version 6.0.14071 prior to performing End of Year tax reporting to take advantage of the Mag-Filer software.
Mag-Filer is used to create 1099s and W-2s and print substitute 1099 forms, which print on white paper instead of pre-printed forms. Recipient copies of the 1099-MISC forms may optionally be emailed. Mag-Filer can create electronic files and guides through filing with the federal government and most states. Support for the Mag-Filer software is provided by SSI.
Setup
This area is used for installing Mag-Filer for tax reporting. To complete the installation, contact SSI Support for the required activation key.
The Mag-Filer program is installed directly from within Agvance. Go to Accounting / End of Periods / Print EOY Tax Forms / Setup.
Enter the Path to MagFiler Databases or select the Browse icon to select where the Mag-Filer database will be created. It is recommended to select the folder current data is in (such as AVDATA).
Select the version of Mag-Filer to be installed from the drop-down.

Select Install.
Enter the Activation Key provided by SSI Support.

Select OK to continue through the installation process.
The first time Mag-Filer is launched after completing these steps, it must be opened from the 1099 or W2 menu, NOT from the Mag-Filer icon on the desktop. This ensures the desktop icon points to the correct Mag-Filer database.
1099s
- Choose the 1099 Type to be created.
- Select the File Type under the File Output section. Enter the appropriate Tax Year and all necessary information for electronic filing. The Media Output Path determines where this file will be saved.
- Select Write to create the 1099 file.
Note: When selecting Rent/Misc/Gross as the 1099 Type, two files will be created. One file (IRSTAXNEC.csv) is created for nonemployee compensation, which is no longer reported on the 1099 Misc form. The second file (IRSTAX.csv) is created for rent and gross, which is reported on the 1099 Misc form. Both files should be imported into Mag-Filer.

- 1099 Type – Select the type of 1099 to be issued. Each type prints on a different government form.
- Get 1099 info from where – Select whether the 1099s are based on A/P Vendor information or the optional Patronage module.
- Federal Payer ID# – Enter the Federal Employer ID Number as it should appear on the forms.
- Minimum Qualifying Amount – Vendors with a 1099 Type selected on their file (found at File / Open / Vendor on the 1099 / Payment Info tab) and an amount in the 1099 Paid YTD equal to or greater than the amount entered here will have a 1099 printed. The Minimum Qualifying Amount varies depending on the style of 1099. Check with your accountant if there are any questions about the qualifying dollar figure.
- State Payer ID – For printed 1099s, this is the state-assigned ID.
- Print Account ID as Account number (optional) – Select this option to print the Vendor ID on the 1099 as the Account Number.
- Select Vendors – This is run for all Vendors who qualify for the selected 1099 form type or manually select Vendors.
- Location – The Location defaults to All which includes all Vendors or Patrons. However, if the 1099s must be reported by Location, select the specific Location to report.
- Print Address – These options allow the ability to determine which line or lines of the address from the Vendor file should print.
- Media Output Path – Indicate where the 1099 file should be created. This could be a location on a hard drive or a removable storage device. For example, it might be c:\send\.
- File Type – Select Original, Test, Replacement, or Correction to indicate the status of the file being sent.
- Contact Name – Enter the name of who the government should contact if there are questions.
- Contact Phone – Enter the phone number of the contact.
- Contact Email – Enter the e-mail address of the contact.
- Tax Year – Enter the tax year the file represents.
- Prior Year Data Indicator – Select this option if the data is from the year prior to the one just closed.
- Transmitter Control Code – Enter the five-character alpha/numeric Transmitter Control Code (TCC) assigned by IRS/MCC. A TCC must be obtained to file data electronically.
- Payer Name Control – This 4-character control ID is obtained from the mailing label on the Package 1099 that is mailed to some payers each December. If no packet was received from the IRS, the first five letters of the company name may be entered.
Note: There is no posting associated with the running of 1099s.
Importing 1099 Files
Once the file has been created, it may be imported into Mag-Filer including both Payer and Payee information. This may be done directly from Agvance or manually from within the Mag-Filer program.
To import the file directly from Agvance, select Import to Mag-Filer.
Agvance locates the file titled IRSTAX.csv and imports it into the Mag-Filer program which launches after the file is imported. If a username and password were created for the Mag-Filer database, there will be a prompt to enter User Login credentials. The IRSTaxNEC file should be imported into Mag-Filer using the manual import option.
Manually Importing Files
In Mag-Filer go to Utilities / Import / Payers and Payees from File.

Select the file created from Agvance. Once the file is imported into Mag-Filer, the imported data should be reviewed, changes (if necessary) made, and forms printed and/or electronically filed.
W-2s
Preview and save W-2s.
Go to the Electronic File tab of the Preview / Print W-2/W-3 Forms window, select the correct Tax Year and enter all necessary information for electronic filing. The Output File Path determines where the file will be saved. Select Create File.

Importing W-2 Files
Once the file has been created, it may be imported into Mag-Filer including both Payer and Payee information. This may be done directly from Agvance or manually from within the Mag-Filer program.
To import the file directly from Agvance, select Import to Mag-Filer.

Agvance locates the file titled W2REPORT.csv and imports it into the Mag-Filer program which launches after the file is imported. If a username and password were created for the Mag-Filer database, there will be a prompt to enter User Login credentials.
State Reporting
Illinois requires an electronic file to be filed monthly for state unemployment. This file can be created by completing the information at Accounting / End of Periods / Print EOY Tax Forms / State Reporting / Illinois and choosing Create File.

The file created is a .csv file which may be uploaded on the Illinois TaxNet site.
Canadian Tax Forms
T4A and T5 forms may be processed at Accounting / End of Periods / Print EOY Tax Forms / Canadian Tax Forms.
T4A
The Statement of Pension, Retirement, Annuity, and Other Income may be printed from this area.

- Select Patrons – All includes all Patrons who meet the minimum qualifying amount for the year. Specific Patrons may optionally be selected.
- Send Print Job To – Select Individual or Government, whichever is applicable.
- Print Address – Choose which of the customer address lines should print on the T4A form.
- Sort By – Choose to sort the forms by Customer ID, Zip Code, or Customer Name.
- Tax Year – Enter the tax year being reported.
- Minimum Qualifying Amount – Enter the minimum amount to be reported on a T4A form.
- Payee Account # for Box 61 – Enter the account number to be printed in Box 61 on the form.
- Include Other Information Code of ‘030’ – If Other Information Code 030 should be included on the form, select this option.
- Create File – This option allows an electronic file to be created for submitting to the government.
- Output File Path – This is the path where the file is to be saved.
- Contact Name – Enter the name of who to contact with questions about this electronic file.
- Contact Area Code/Phone/Ext – Enter the phone number for the contact name listed above.
- Contact Email – Enter the email address for the contact person listed above.
- Proprietor #1 S.I.N – For recipients who are a private corporation or unincorporated, enter the Social Insurance Number of the principal owner.
- Proprietor #2 S.I.N – For recipients who are a private corporation or unincorporated, enter the Social Insurance Number of the second principal owner.
- Submission Ref ID – Enter a unique number to identify each submission filed.
- Transmitter # – Enter the transmitter number assigned by the government. This number typically begins with MM followed by 6 digits.
T5
The Statement of Investment Income is processed in this area.

- Select Patrons – All includes all Patrons who meet the minimum qualifying amount for the year. Specific Patrons may optionally be selected.
- Send Print Job To – Select Individual or Government, whichever is applicable.
- Print Address – Choose which of the customer address lines should print on the T5 form.
- Sort By – Choose to sort the forms by Customer ID, Zip Code, or Customer Name.
- Tax Year – Enter the tax year being reported.
- Minimum Qualifying Amount – Enter the minimum amount to be reported on a T5 form.
- Box 11 Percentage – Enter the percentage to be used to calculate the amount for Box 11.
- Box 12 Percentage – Enter the percentage to be used to calculate the amount for Box 12.
- Recipient Type Attribute – Double-click and select the Customer Attribute which represents the recipient type to be reported in Box 23.
- Create File – This option allows an electronic file to be created for submitting to the government.
- Output File Path – This is the path where the file is to be saved.
- Contact Name – Enter the name of who to contact with questions about this electronic file.
- Contact Area Code/Phone/Ext – Enter the phone number for the contact name listed above.
- Contact Email – Enter the email address for the contact person listed above.
- Submission Ref ID – Enter a unique number to identify each submission filed.
- Transmitter # – Enter the transmitter number assigned by the government. This number typically begins with MM followed by 6 digits.
