This optional, add-on module allows accounting data to be exported in a format that can be read by the ARI Meppel program. Meppel software is required to be able to use this export. Contact SSI for more information.
Check the Cust ID Source and Prod ID Source on the Meppel Export tab (Accounting / Transfers / Export / Edi Sales / Meppel - DE). If the Cust ID Source is set to Agvance ID, the qualifier will be CV on the export regardless of the ID Qualifier setting. For the ID Qualifier setting to override, the Meppel ID must be set as the Cust ID Source on the Export tab. If the Prod ID Source is Agvance ID, the Product Code on the export file will show as VN instead of MG. For the Product Code to show as MG, the Prod ID Source on the Meppel Export tab must be Meppel ID.
The Agvance Meppel export was designed to export data from the Agvance Accounting database into a file format which can be read by the Adaptris Meppel program.
Before beginning the setup and use of the export, the following information should be gathered:
- Decide which information will be reported. The Meppel export can extract a variety of information from the Agvance database, including sales, purchases, inventory balances, and more.
- Determine if the Growers in the database are end users only or if some are resellers.
- Determine what Report Codes will be used for each manufacturer.
Adaptris should be able to help clarify the information needed if unsure of the answers to these questions. The SSI Support Team will be glad to help as well.
Setup
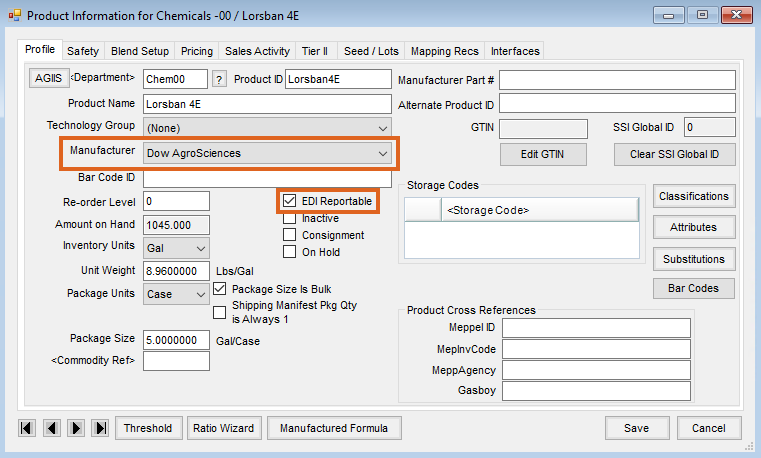
Set the appropriate manufacturer on Products at Accounting / File / Open / Products on the Profile tab. On the same tab, mark the product as EDI Reportable. Save the changes.
- Set up the Retailer IC Code at Hub / Setup / Company. This area requires a password and must be obtained from SSI by someone with password access.
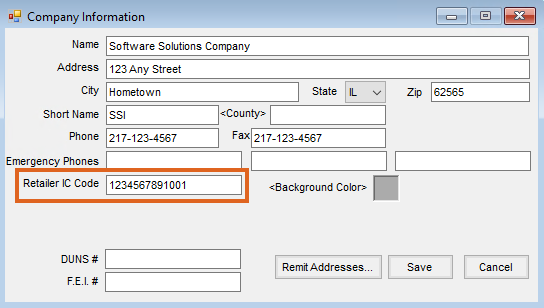 Note: A company with multiple reporting Locations must set up each individual Location’s IC code at Hub / Setup / Locations. This is in addition to setting up the main Location’s IC code as explained above.
 - Set up the manufacturers for Meppel reporting at Hub / Setup / Company Preferences on the Product tab.
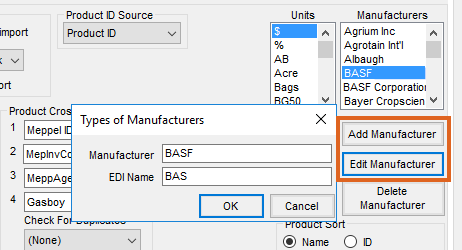
- For manufacturers not already in the list, select Add Manufacturer and add a Manufacturer ID (name or ID up to 50 characters) and the EDI Name assigned by Adaptris (see chart below). The EDI Name field is limited to 20 characters.
- For an existing manufacturer, highlight the appropriate entry in the Manufacturers area and select Edit Manufacturer. Complete the appropriate EDI Name for that manufacturer (see chart below).
ARV – Arvesta
DUP – Dupont
PIL RHO – Bayer Crop Science
AMV – Amvac
DWE – Dow AgroScience
SPN MIL – Bayer Environmental Science
BAS – BASF
FMC – FMC
VAL – Valent
BSP – BASF Specialty
GRF – Griffin
VAL RES – Valent Resources
CGY – Syngenta
GUS – Gustafson
CRM – Crompton
MON – Monsanto
- Set the appropriate manufacturer on Products at Accounting / File / Open / Products on the Profile tab. On the same tab, mark the product as EDI Reportable. Save the changes.
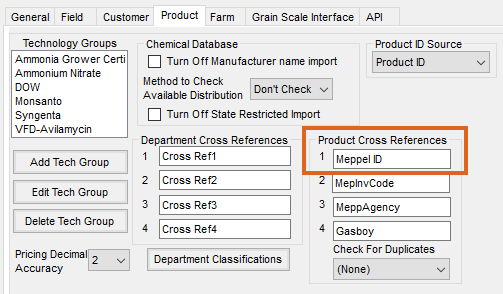
- The following should only be completed if Agvance Product IDs are not being reported and are instead only reporting Meppel IDs. If this is the case, set up a Product cross-reference named Meppel ID at Hub / Setup / Company Preferences on the Product tab.
- Once this Product Cross Reference has been saved, edit each of the EDI reportable Products and enter the appropriate Meppel ID in the Product Cross Reference field at Accounting / File / Open / Products on the Profile tab.
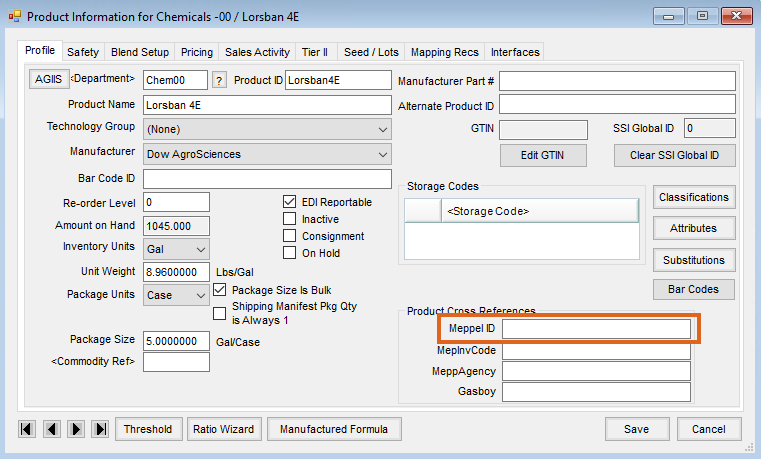 Note: Regardless of whether the Agvance ID or a Meppel ID is used, the following characters should not be included in the ID: ~^*<>.
 Note: A company with multiple reporting Locations must set up each individual Location’s IC code at Hub / Setup / Locations. This is in addition to setting up the main Location’s IC code as explained above.


 Note: Regardless of whether the Agvance ID or a Meppel ID is used, the following characters should not be included in the ID: ~^*<>.
Optional or Secondary Setup
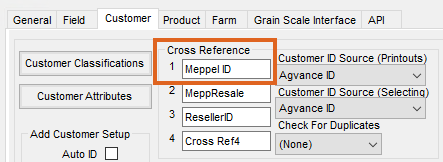
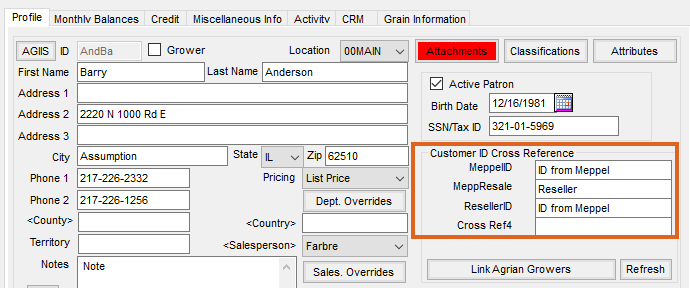
- The amount of the Customer’s personal information displayed in the Meppel export file can be controlled. To identify Customers by an ID number only, set up a Customer Cross Reference named Meppel ID at Hub / Setup / Company Preferences on the Customer tab. Then, enter a Customer ID for each customer at Accounting / File / Open / Customers on the Profile tab.
Note: This ID must match the Proprietary Code in Meppel for that customer. - Resellers must be identified in the export file. To do this, set up a customer cross-reference named MeppResale at Hub / Setup / Company Preferences on the Customers tab. For each customer who is a reseller, enter the word Reseller in the MeppResale cross-reference at Accounting / File / Open / Customers on the Profile tab.
- In some cases, companies who sell to resellers must also report a specific ID for that reseller. SSI suggests doing this by creating a customer cross-reference field named ResellerID at Hub / Setup / Company Preferences on the Customer tab.
- Set the cross-reference on each reseller to the corresponding Proprietary Code in Meppel on the Customer Profile tab.
- If inventory balances are reported to Meppel, set up a Product Cross Reference named MepInvCode at Hub / Setup / Company Preferences on the Product tab. On each applicable Product, enter the appropriate report code. Please contact Adaptris if uncertain of the report codes.
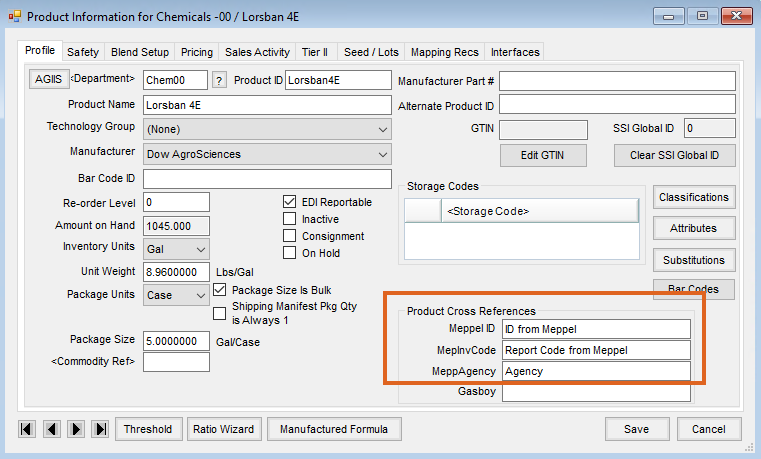
- Some companies report Agency products, which are Products not paid for until they are sold. These Products are reported to Meppel differently compared to the company-owned Products. Set up a Product Cross Reference named MeppAgency at Hub / Setup / Company Preferences on the Products tab. On each applicable Product, enter the word Agency into the MeppAgency Cross Reference field at Accounting / File / Open / Products on the Profile tab (see images above).
- To export identifying information for some Customers but not all, a Customer Classification will need to be set up to distinguish the two groups. Add this new Classification at Hub / Setup / Company Preferences on the Customer tab by choosing Customer Classifications. The Customers included in this Classification will be those whose identifying information will be reported. The identifying information for these Customers will appear in the export file. Enter a name for the Customer Classification which indicates these Customers’ identifying information will be shared with the manufacturers. Double-click on the Cust. Name heading and choose the Customers who will fall into this Classification.
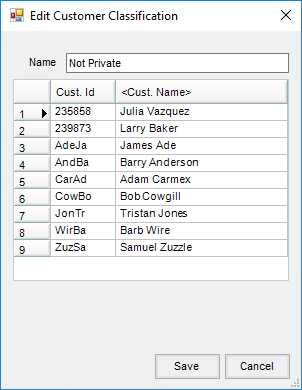


Note: This may require permission from these Growers before sharing their information with the manufacturer.
Processing an Export
Go to the Setup tab at Accounting / Transfers / Export / EDI Sales / Meppel – DE to set up the export criteria.

- Indicate the manufacturers being reported in the Manufacturer column. To remove a manufacturer from the list, select the line number to highlight that row and press the Delete key on the keyboard.
- For each vendor, select the appropriate checkboxes for each type of data being reported: Sales, Purchases, and Current Inventory.
- Mark the Export Cust Info Growers checkbox for each manufacturer to whom identifying end user grower information will be reported (non-qualified sales).
- Mark the Export Cust Info Agents checkbox for each manufacturer to whom identifying dealer information on qualified sales will be reported (sales to dealers = CV qualifier).
- The Inv 867 checkbox applies to certain manufacturers in different ways. If unsure of what to check, contact Adaptris or SSI Support.
- In the Customer is reseller source drop-down, choose MeppResale if there are Customers who must be reported as resellers.
- The Inv Bal Report Type Source should have MepInvCode selected if inventory balances will be reported.
- If reporting any Products classified as Agency Products, choose MeppAgency in the Product is Agency Source.
- Leave Use Harvest Partner Number unchecked. This is used for a different report code when reporting Harvest Partners through Meppel.
- Set the Ship/Bill to Location ID Qualifier to 92. This tells Meppel the ID / Zip Code being sent in the file does not need to be converted or cross-referenced in Meppel when doing the import. This option is ignored if the Cust ID Source on the Export tab is set to AgvanceID, in which case the qualifier would be set to CV. This is not common.
- When selected, Use ID Qualifier for regular customers and Reseller ID instead of Cust ID Source for Resellers allows the reseller ID to come from a source other than the ID for Growers. If no ResellerID was set up, this option should not be checked. This is only used in the case where a company who reports resellers must also report a specific ID for the resellers.
- The ResellerID is selected if this Customer Classification was set up in step 3 of the Optional or Secondary Setup section. If a Customer Classification named ResellerID was not set up, the option in Step 10 does not need to be checked and no selection needs to be made.
- There are several factors to be taken into consideration with the Export Address 1 and Export Address 2 checkboxes:
- When selected, both Address 1 and Address 2 (Grower.CareOf and Grower.Address) from the Profile screen of the Grower will be exported, but only if the Export Cust Info Growers is also marked in the grid on the appropriate manufacturer line(s).
- If the Bill to/Ship to format is used on Delivery Tickets and Invoices and there is a Ship To address chosen on the transaction being exported, both Address 1 and Address 2 of the Ship To address (CustAddr.Address2 and CustAddr.Address3; BorS=S) will be sent in the export file.
- If a Bill To address exists in the Customer file, Address lines 1 and 2 of the Bill To address will be exported as the billing address (CustAddr.Address2 and CustAddr.Address3; BorS=B).
- If the Bill To address is missing, the billing address will revert to lines 1 and 2 of the Profile address (Grower.CareOf and Grower.Address).
- Certain pieces of information are required in the addresses for the export to proceed without error, including Name (Grower.GROWNAME1 and Grower.GROWNAME2; CustAddr.Address1), Address 1 (Grower.CareOf, CustAddr.Address2), Address 2 (Grower.Address; CustAddr.Address3), City (Grower.City; CustAddr.City), State (Grower.State; CustAddr.State), Zip (Grower.Zip; CustAddr.Zip), and Geo Code (CustAddr.VertexGeoCode). Some of these data fields may just contain an x if they are not used for actual street address information. However, the information entered on these address forms in Agvance will appear on the Invoice or Delivery Ticket using the Bill to/Ship to format, as well as in the export file.
- The option to Export customer identification information for customers in a certain classification should be selected when reporting identifying information on some Customers and keeping other Growers’ information private. The Customer Classification set up in Step 6 of the Optional or Secondary Setup section of this document should also be selected. Identifying information about the Customers in that Classification will appear on the report. This option will only work if Zip Code is chosen as the Cust ID Source on the Export tab.
Note: This option, when checked, will cause any checkmarks made in the Manufacturer grid to be ignored.
Export

- Select Locations – If reporting one Location at a time, select each Location here, one at a time, and run the export for each Location separately. If reporting for all Locations in one file, leave this set to All.
- Starting and Ending Invoice Number – This will default to the range of Invoices that have not been marked as exported. This range can be changed manually.
- Path for export file – Before using the export for the first time, set up a folder on a local or network drive where the files created by the export will be saved. The export screen will retain this path after the export has been run with the path set. In the screenshot above, a folder called Meppel on the root of the C:\ drive was used.
- Name for export file – Once set, this name will be remembered by Agvance each time the export is used. It can be changed so the files are not overwritten or left the same, so the drive does not hold all the files and requires periodic maintenance.
- # of Untransferred Purchases – This field holds the number of Purchase Invoices that have not been exported using this function. It defaults in and cannot be changed. If not reporting purchases, this number will continue to grow.
- Report Location Name – Enter the company name here.
- UOM Conversion – Set up at a UOM Conversion at Hub / Setup / Unit of Measure Conversion to convert Agvance Units to the Supplier’s units.
- Unmark Invoices – Selecting this option allows invoices to be unmarked individually or in a range. It is typically used when a file has failed and needs to be recreated.
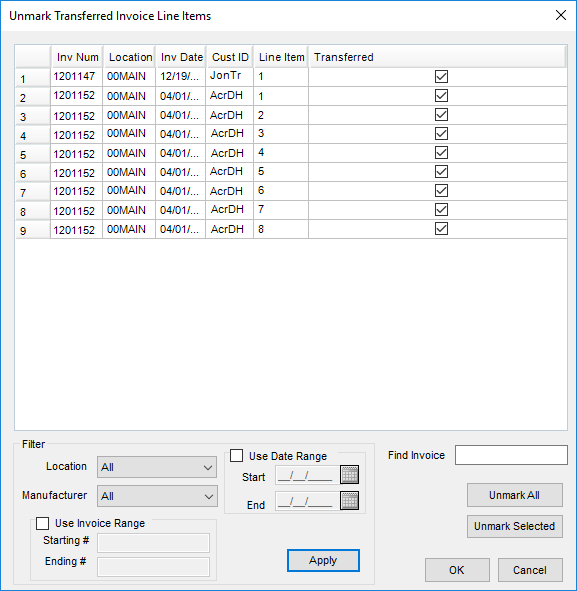
- Invoice – To find a specific Invoice on this screen, enter the Invoice number here.
- Use Invoice Range – To unmark a range of Invoices as transferred, enter the Starting and Ending # and select Unmark.
- Location – If unmarking a range of Invoices or one particular Invoice and the Invoice number range exists in more than one Location, the function will only unmark the Invoices entered for the Location selected.
- Use Date Range – Select this option and enter a specific date range to narrow the range of Invoices that appear in the grid.
- Manufacturer – Choose a manufacturer set up in the data to only see Invoices with Products from that manufacturer.
- Location – Filter the Invoices that appear in the grid to those entered in the Location selected.
- Unmark Purchases – Choosing this option will bring up a screen to select purchases to manually unmark as transferred.
- Prod ID Source – Choose the source from which Meppel will obtain the Product ID. This could be the Agvance ID or an Attribute set up specifically for Meppel.
- Cust ID Source – Choose the source from which Meppel will obtain the Grower ID.
- Choosing Zip Code will not send any identifying information about Growers (including Customer ID) unless the Export Cust Info Growers box is selected on the Setup tab, which is chosen for each manufacturer individually. Use this in conjunction with the option to Use ID Qualifier for regular customers and Reseller ID instead of Cust ID Source for Resellers to provide a Reseller ID instead of the zip code for those Growers identified as resellers.
- Choosing Meppel ID (or any other Customer Cross Reference no matter what it is called) will send the ID inserted into the Cross Reference of Meppel ID for each applicable Customer. This will send the Ship/Bill to Location ID Qualifier from the Setup tab of the Export screen, which is set to 92.
- Choosing Agvance ID will send the Agvance Customer ID for each applicable Customer. This selection will send a CV as the ID qualifier in the file.
- Start and End Date – This only affects the report by putting the dates on the inventory balances line which is currently required by BASF. It does not affect the transactions that are pulled into the report or include/exclude them by that date. The Meppel export always pulls all transactions into the report which have not previously been exported and are therefore not marked as transferred, regardless of the transaction dates.
- Test File – Before making the first actual Meppel transfer, it is recommended to select this checkbox. A test file will be created that can be sent to Adaptris and to an SSI support staff member to review before making a real Meppel export file. This helps to ensure the setup is correct.
- Note: SSI may need to run queries to mark beginning balance invoices, or invoice line items that have already been reported through other means, as transferred.
- Version – This defaults in as version 3.0 and cannot be changed.
- Warehouse IC code override – Use this if wanting to use a different IC code than what is set up in Company and Location Setup windows.
- Rep Locat IcCode – See above.
- Summary Report Frame – Use this to print, preview, or save the export summary and/or the Product totals. It is recommended to save the export.
- Export Intercompany Transfers – This checkbox includes transfers in and out of each Location’s inventory to and from other Locations in the same company.
- Include zero quantity inv balances – This reports all inventory balances even if that balance is currently zero.
- Save as Flat File – This is an alternative file format that will be created if this checkbox is marked. Optionally select to Include Tech License to add the license number to the end of each detail line.
- Export 100% to Grower – In split Invoice situations, this checkbox will cause the entire Invoice to be reported under the first person listed in the split.
- Suppress Inventory Message – This prevents Agvance from printing an error report that displays a message for any manufacturer’s Products that have zero inventory on hand.
- Suppress Error Report – This prevents Agvance from printing an error report that lists missing Bill to and Ship to addresses.
- Combine Like Items – This checkbox combines two of the same item on the same Invoice as one line item, the quantity being the sum of both original line items.
- Ignore Zero Quantity Invoice Line Items – Checking this box will exclude Invoice line items with zero quantity.
- Export Now – Once setup is complete and verified as correct, choose this to create the export file. After the export file has been created, the Export Summary will print or appear on the screen depending on the option selected. The export file will be saved to the path set in the Path for export file.

Once the file has been created, it can be imported into the Meppel program.
Creating a Report Set for Meppel Export
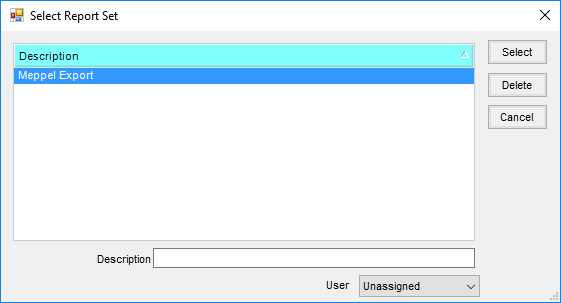
After the Export and Setup tabs have been filled out completely and the file has been verified, it is recommended a report set for the Meppel screen be created. This report set will retain the information set up on both tabs for future exports regardless of who is creating the export file (as long as a user is not specified on the report set).
To use a saved report set later, open the Meppel Export screen at Accounting / Transfers / Export / EDI Sales / Meppel - DE, and choose Load Set. Select the set saved and named in the following instructions, and choose Select. This will load the report criteria saved in that report set into both tabs of the Meppel Export screen.
Setup
- Set up both tabs of the export carefully and verify the report is correct by creating a test file (Step 12 in the Export instructions).
- Select Save Set located in the upper right corner of the Export tab on the Export Meppel Data window.
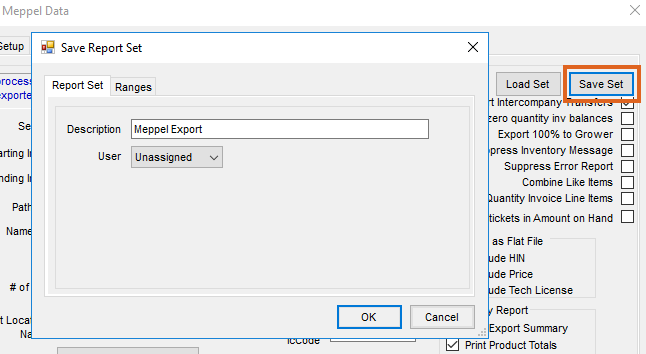
- Enter a description that is easily remembered. This can be especially helpful if running the export for one Location at a time. If multiple users require access to the report, leave the User set to Unassigned.
- Choose the Ranges tab.
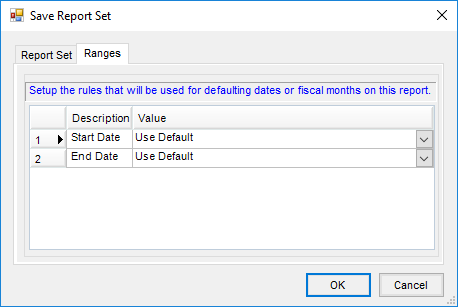 Note: This screen only needs to be completed if reporting inventory balances and want the date range to appear on the inventory balances line. The Ranges tab allows different dates to default here each time the report is run. Please contact SSI Support to discuss different ways to set up this tab.

 Note: This screen only needs to be completed if reporting inventory balances and want the date range to appear on the inventory balances line. The Ranges tab allows different dates to default here each time the report is run. Please contact SSI Support to discuss different ways to set up this tab.
Using the Saved Set
- Go to Accounting / Transfers / Export / EDI Sales / Meppel – DE and select Load Set located in the upper right corner of the Export tab.
- Highlight the report set to use and choose Select. The settings previously saved for both the Export and Setup tabs will load into the screens. Select Export Now.

Operational Considerations
- The marking of exported items as Transferred is done by making a meppexp type entry into the TransferLog table with the following values for each invoice line item included on the export(s) so the invoice line items can be unmarked and re-exported if so desired.
- InvNum – TransferLog.Key1
- Location – TransferLog.Key2
- Invdate – TransferLog.Key3
- CustID – TransferLog.Key4
- Line – TransferLog.attribute1
- Transferred – Checked
The Unmark function will delete the selected records from the TransferLog table.
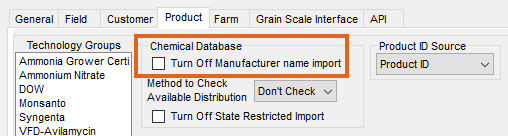
- If also using the Agrian import, it is advisable to check the preference at Hub / Setup / Company Preferences to Turn Off Manufacturer name import. This will prevent Agrian from importing manufacturer names that conflict with the manufacturer setups used by Meppel.

Meppel Contact Information
- Email: support-us@adaptris.com
- Phone: 1-866-281-2211
Meppel Unit of Measure Rules
If the length of the Unit in Agvance is > 2, it will use the first two characters for the unit of measure.
- Tons will equal TO
- Box will Equal BO
- Lbs will equal LB
If the length of the unit is < 2, the unit of measure is EA
- A will equal EA
- 1 will equal EA
- " " will equal EA
After the above rules have been applied the following changes will be implemented. All of the tests to switch are implemented after the unit is reduced to 2 characters
- If the unit is TO then it is set to TG
- If the unit is BO then it is set to BX
- If the unit is BA then it is set to BG
