This spreadsheet calculator requires Microsoft Excel™ version 2007 or newer.
The syntax of an Excel Spreadsheet for the Spreadsheet calculator is fairly simple but there are specific naming or labeling rules that are important to understand.

Multiple Worksheets
There must be a worksheet for every permutation and combination of the conditionals. For example, if there are five crops, there will need to be five worksheets. As in the example above, one workbook can be created for each nutrient and that workbook can contain several worksheets - one for each different crop that might be needed.
Conditionals
The block in blue is the Conditionals named range. It contains a row for every conditional that is defined for the workbook. The first column (Column B) is the name of the conditional and the second column (Column C) is the value of the conditional for this worksheet. These become the RequiredConditional properties of a SpreadsheetCalculatorOption. The Spreadsheet.SelectOption method will search each worksheet to find the one that has RequiredConditional values that match the ActualConditional values that have been set on the SpreadsheetCalculator class. The individual conditionals do not need to be named ranges, but the blue box must be explicitly named Conditionals and must be a sheet-specific name, not a workbook-specific name.
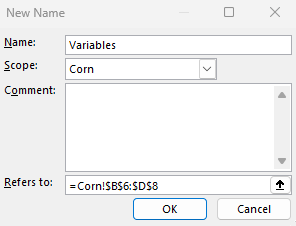
Variables
The Variables named range is shown in pink. It must have three columns: a variable name, its value in the calculation (updated automatically by the calculator for each row of the dataset) and a unit-of-measure. For now, the input cells (where the 110, 12, and 150 are) should be single cell named ranges, with the name being the variable name (K, CEC, and Yield). This will change as an absolute requirement but will always be a recommended practice.
The Units fields have specific requirements. Acre, for example, must be spelled out as acre and not the common abbreviation, ac. pH is another in that its range must be named pHw to work properly.
Acceptable units for these variables are: ppm, lbs per acre (st), meq/100g, tons/acre, bu/acre, and none. No other unit types or names will work. Select the one to use for the given variable. Below is a table of variables and their syntax:
| Variable | Range Name |
| B | B |
| Ca | Ca |
| Cu | Cu |
| CEC | CEC |
| ENR | ENR |
| Fe | Fe |
| K | K |
| Mg | Mg |
| Mn | Mn |
| NO3-1 | NO3_1 |
| NO3-2 | NO3_2 |
| OM | OM |
| *P1 | P_1 |
| P2 | P_2 |
| pHw | pHw |
| pHb | pHb |
| Previous Crop | Previous_crop |
| S | S |
| **Yield | Yield |
| Zn | Zn |
| Years to build | Years_to_build |
| Soil Class (A-E) | Soil_class |
* It’s critical that no Range names mimic a MS Excel cell address. In the table above, the common nutrient expression, P1, is such a case, so the Range name, P_1, is used.
** No other word or part of a word in the variable section can contain the word, Yield. This is a reserved word used in the calculation. For example, use SoybeanYld, rather than SoybeanYield if you have need for a variable like that.
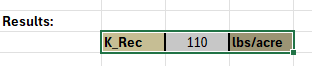
Results
The Results named range is shown in green. At this time, it has three required columns: result name, result value, and result unit. The value cell (the 110) should:
- Contain the formula used to calculate the value from the variables.
- Be explicitly typed as text, numeric, etc.
- If numeric, have a format defined that shows the number of decimal places, etc.
In the current implementation, the formula should use name range references for the variables, rather than cell references. For example, IF (K < 151… rather than IF (C6 < 151… This will change in a future build, but will always be a recommended practice.
The Results area has specific cell Range names required for the nutrients used in the calculator. The units for the nutrient recommendations can be either lbs/acre or tons/acre. UD_Rec in the last row stands for the one User-Defined nutrient allowed in Agvance. The table below displays those Range names:
| Nutrient | Range Name |
| N_Rec | N_Rec |
| P_Rec | P_Rec |
| K_Rec | K_Rec |
| Ca_Rec | Ca_Rec |
| Mg_Rec | Mg_Rec |
| S_Rec | S_Rec |
| B_Rec | B_Rec |
| Cu_Rec | Cu_Rec |
| Fe_Rec | Fe_Rec |
| Mo_Rec | Mo_Rec |
| Zn_Rec | Zn_Rec |
| Lime_Rec | Lime_Rec |
| CCE_Rec | CCE_Rec |
| UD_Rec | UD_Rec |
Building a Spreadsheet
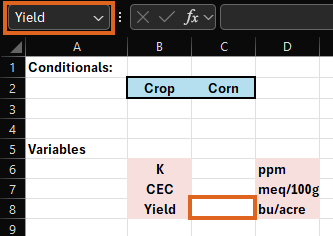
Label the worksheet tab by double-clicking the current name (ex. Sheet 1) and typing the equation name.

- Type Conditionals: in the first cell.
- Type the conditionals into the rows below using one conditional per row (ex. Crop).
- In the adjacent column, enter the conditional values (ex. Corn).
- Select the cells that make up the conditional labels and values (B2:C2 in the beginning of the article).
- Choose the Formulas menu option and select Define Name. If using Excel version previous to Office 2007, go to Insert / Name / Define.
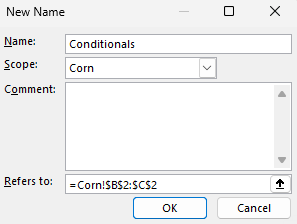
- Name – Conditionals
- Scope – Worksheet name (not Workbook)
- Comments – None
- Refers to – Default
- Choose OK.
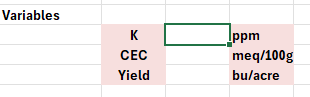
- Type Variables: in the first cell in a row below the Conditionals section.
- Enter the variables into the rows below using one row per variable (ex. K, CEC, Yield).
- Leave the adjacent column empty for now as this will be where the variable value is entered.
- In the next column, enter the unit of measure for each variable (ex. ppm, meq/100g, bu/acre).
- Select the value cell adjacent to the variable label.
- Choose the Formulas menu option and select Define Names.
- Name – variable name (ex. K)
- Scope – Worksheet name (not Workbook)
- Comments – None
- Refers to – Default
- Select OK.
- Upon selecting the variable value cell, the name will be visible in the Name field of Excel instead of the cell name like C8.
- Repeat Steps 12-14 for the remaining variables.
- Select each/all variable value cell(s), right-click, and choose Format Cells.
- Enter the Category and other information (ex. For numeric data, select Number, two decimals).
- Select the cells that make up the variable labels and values.
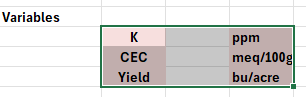
- Choose the Formulas menu option and select Define Names.
- Name – Variables
- Scope – Worksheet name (not Workbook)
- Comments – None
- Refers to – Default
- Select OK.
- Type Results: in the first cell in a row below the Variables section.
- Enter the results label(s) into the rows below using one row per result (ex. K_Rec).
- Leave the adjacent column empty for now as this will be where the results value equation is entered.
- In the next column, enter the result unit (ex: lbs/acre).
- Select the value cell adjacent to the results label.

- Select the Formulas menu option and choose Define Names.
- Name – Result name (ex. K_rec)
- Scope – Worksheet name (not Workbook)
- Comments – None
- Refers to – Default
- Select OK.
- Repeat Steps 23-27 for each additional Result.
- Select the result value cell(s), right-click, and choose Format Cells.
- Enter the Category and other information (ex. For numeric data, select Number, zero decimals).
- Select the cells making up the results labels and values.
- Select the Formulas menu option and choose Define Names.
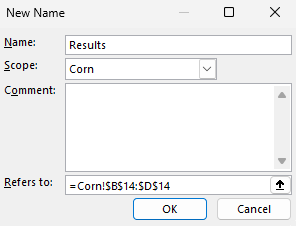
- Name – Results
- Scope – Worksheet name (not Workbook)
- Comments – None
- Refers to – Default
- Select OK.
- Choose the result value cell and enter the equation in the Formula Bar.

- Use the variable names (ex. CEC), not cell names (ex. C6) in the equation.
- Repeat Step 35 for additional results.
- Test the equation by entering values for the variables.
- Repeat all steps for each additional worksheet.
- Save the workbook.


