The Quick Ticket function, found at A/R / Manage Quick Tickets, is geared towards quick handling of Customer sales, complete with cash and credit card control. Bar code scanning is available here as it is at any Inventory Selection screen. An option is available to post each transaction as it is saved, or set the preference to batch post transactions. There is a prove-out report to help with end of day cash drawer/transaction prove-out.
Each user must configure some settings before using Quick Tickets. See the Quick Tickets Options tab for more information.
Important Note: To streamline this function, Invoices requiring association to Fields, Customer splits, Bookings, Prepay, or hazmat documentation must be generated at the standard Invoice screen. This function was designed for quick counter sales.
More information on Quick Ticket transactions can be found here.
Manage Quick Tickets

- Tag All – This selects all tickets displayed in the grid.
- UnTag All – This deselects all tickets displayed in the grid.
- Filter – This area allows filtering the tickets that display in the grid by Location, User, Status, Type, Cashier ID, Date Range, Customer, or Customer Classification. Set the filter options and choose Apply to filter the tickets.
- Reprint – Select the Quick Ticket in the grid and then choose Reprint to reprint the ticket.
- View – Choose this to display the selected ticket on the screen.
- Void – Only tickets that have not been posted may be voided. Select the ticket and then choose Void to void the ticket. If a Quick Ticket has been posted, then the Invoice created by the posting should be voided.
- Reprint LC – Select the ticket and choose this to reprint the Load Copy for the ticket.
- Options – This area sets the options for the user currently signed in. The options include selection defaults and printing preferences for the Quick Tickets.
- Void/Start With – Used for correcting tickets, this option voids the selected ticket and then begins a new ticket to replace it.
Note: When the Require a cashier on the quick ticket preference is enabled at Setup / Location Preferences on the Invoice tab, selecting this button will ask for a Cashier ID. This carries through to saving the newly created Quick Ticket without needing to re-enter the PIN/ID.
- Include Products – This is used in conjunction with Void/Start With. If the same products should default to the new ticket as they were entered on the voided ticket, select this option.
- Prove Out – This displays the End of Day Prove Out report of the selected tickets including totals for those tickets.
- Post – This posts the selected tickets as Invoices.
- Preview – Preview under Suspended Tickets Report is a way of seeing tickets that were previously suspended and have not been removed from the Suspend area.
- Print only Totals page when printing prove out report – When this option is selected, the detail from each ticket is omitted from the Prove Out report. The report includes only totals for the selected tickets.
- Print Product Recap when printing Prove Out report – This option allows an additional product recap at the end of the Prove Out report that totals by product.
- Sales per hour – This option displays a sales per hour recap for the selected tickets. It displays the number of transactions, a total quantity, and a total amount sold per hour.
- Print Customer Name – With this option selected, the customer name prints on the Prove Out report.
- Print Department Totals – This option prints the totals by Inventory Department on the Prove Out report.
Quick Ticket Options
Go to Accounting / A/R / Manage Quick Tickets and choose Options to set some key preferences.
If the Online Posting option is not marked, the transactions are held until they are batch posted to Invoices/Payments at which time inventory is updated. If this option is marked, the Quick Tickets, payments, and inventory amounts post immediately when saved which keeps the balances of the inventory and accounts current.
Complete the information for each user utilizing the Quick Ticket function. These preferences are set for that particular user.

- Cash Customer – This is set per user so multi-site companies working in the same database may default to their own location’s cash customer.
- Default Invoice Type – This indicates which Invoice Type defaults each time the Quick Ticket function is opened. This may be overridden as the tickets are processed.
- Online Posting – Selecting this option causes each transaction to create a separate Invoice at the time of the save regardless of the transaction type (cash, check, charge, etc.). Creating separate Invoices takes a bit longer but maintains accurate inventory throughout the day. Leaving this option unchecked causes the transactions to be held until they are posted. To post, go to A/R / Manage Quick Ticket, select the tickets to be posted, and choose Post.
Note: Inventory is not updated until the transactions are posted to Invoices. If Online Posting is not enabled, inventory amounts on hand will not be kept current throughout the day. - Set Due Date to Next FM – This works in conjunction with the Calculate discounts/due dates by fiscal month A/R preference and is only available when Online Posting is not utilized. If this option is selected, the A/R preference is used and a months ahead term is selected. The fiscal month is used as the basis for determining the discount dates. If the Location Preference for the Invoice Due Date is set to Terms and a months ahead term is used, then the due date is also set based on the fiscal month of the Quick Ticket.
Example: A company has a retail store. The office closes at 5:00 on the last day of the month but the retail store remains open later. The fiscal month has not yet been closed but the business done after 5 p.m. should be included in the next fiscal month. With this option selected, the Quick Ticket transactions created at the store during those later hours are saved on the last day of the month but will really be posted in the following fiscal month (when the office is open the following business day). Therefore, the discount or due date on the Quick Tickets should not be one month ahead but should be two months out from the transaction date. This option could be selected when the office staff leaves at 5:00. It automatically gets deselected when the fiscal month is closed. - Use Customer Tax Information – With this option selected, the tax rate on the Quick Ticket is based on the tax information on the Customer file instead of the Location.
- Require Sales Person – Before saving the Quick Ticket, a salesperson selection is required if this option is selected.
- Require Signature for Company Credit – When using the 40 Character Plain Text’ Form type and a signature pad is being used, this option requires the Customer to sign the signature pad when using the Company Credit Pay Method.
- Use Discounts from Inventory Departments – If discounts are set on the Inventory Department, this option allows those discounts to be used on the Quick Ticket screen. When selected, the columns in the Product grid are changed. Original Price and Discount % columns show in the Product grid which allows entering discounts for individual line items.
- Product Selection – This choice is the default when processing a Quick Ticket transaction. Choosing Product Selection Window causes the standard Product Selection window to display without double-clicking on the <Product Name> heading. Choosing Bar Code causes the cursor at the Quick Ticket screen to be ready to accept a bar code scan. Prod ID / Alt ID / Name causes the cursor to be in the input area ready for the selection of Product ID, Alternate ID, or Name, and the information to be entered.
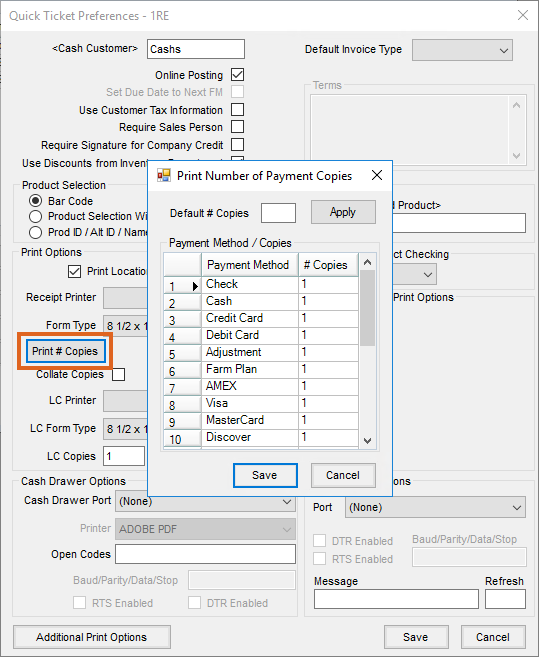
- Print Options – This allows the selection of the printer and number of copies of the transaction, receipts, and load copies that will print. On the receipts, it also controls whether the location heading prints. Select the Form Type which includes 8 ½ x 11 Laser, 8 ½ x 11 Laser 2, 8 ½ x 5 ½ Laser, 8 ½ x 5 ½ Dot Matrix, 40 Character Dot Matrix, 4.4” Star Thermal, 40 Character Plain Text, or 8 ½ x 5 ½ Generic. For the Load Copy, select the Printer, Form Type, and enter the number of Copies to print.
Note: What prints on the Load Copy when Delivery Ticket is selected as the LC Form Type follows the Delivery Ticket print options indicated at Accounting / Setup / Location Preferences on the Delivery Ticket tab. - Cash Drawer Options – The Quick Ticket function can open a cash drawer connected to the computer via serial or parallel port. Indicate the Cash Drawer Port and the Open Codes for the cash drawer model being used. If Com1 – Com4 is selected, the Baud/Parity/Data/Stop information must also be entered along with selecting if the RTS or DTR is enabled.
Note: The cash drawer instruction manual normally contains information about the type of port and open codes needed. If not, a hardware technician may need to be consulted. - Terms – Terms are available for the 8 ½ x 5 ½ Laser Form Type. Verbiage may be entered to print on the Quick Ticket.
- Age Restricted Product Attribute – Some products are not to be sold to under-age customers. Setting an attribute on the product for the Age Restriction and then setting the required age in that attribute will require the Customer’s date of birth to be entered at the save of any Quick Ticket where those products are used. If the customer is obviously old enough to buy the product, 99999999 can be entered to bypass entering the date of birth.
- Restricted Product Checking – Although the Quick Ticket function does not do the thorough permit checking like the standard Invoicing screen, a warning or stop the sale of restricted product may be used at this screen. If permit checking is preferred, set this to Warn Only or to Disallow (the sale). If no permit checking is necessary, choose Don’t Check.
- Moneris Receipt Print Options – These options enable when the location is using the Moneris Secure Pass Thru (POSPAD) option for Moneris Bank Card Processing.
- Printer – Select the printer for the Moneris payment receipts.
- # of Duplicates – Enter the number of copies of receipts that should print for Moneris transactions.
- Printer Type – Select the option for the Moneris payment receipt. Options are Standard, 40 Character Dot Matrix, or 40 Character Plain Text.
- Pole Display Options – For cash registers with a pole display, the port and connection information may be completed along with the Message to display on the pole while the Quick Ticket is idle. The Refresh time should be entered in milliseconds.
Note: Agvance supports the POS-X XP8200U (USB) and the POS-X XP8200S (serial). Once connected to the computer, the device shows in Windows Device Manager under Ports (COM & LPT). Once visible here, have each User who will enter Quick Tickets set up the Pole Display Options.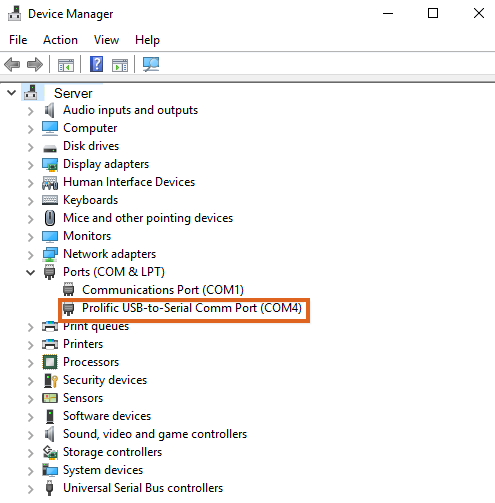
- Additional Print Options – This area allows additional options for the Quick Ticket document.
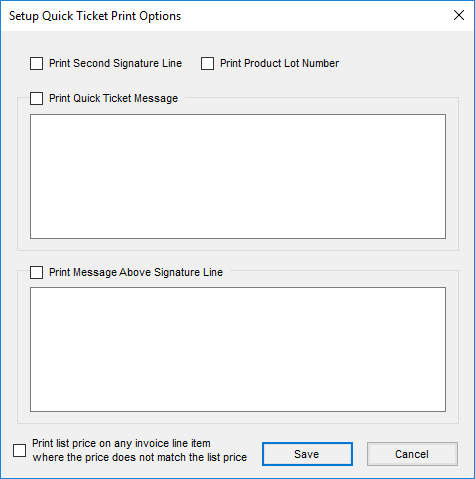
- Print Second Signature Line – If two signature lines are needed on the Quick Ticket document, select this option.
- Print Product Lot Number – When this option is selected and the 8 1/2 x 11 Laser Form Type is used, the Product Lot Numbers print on the Quick Ticket document.
- Print Quick Ticket Message – This option allows an additional message to print on the Quick Ticket document.
- Print Message Above Signature Line – Optionally print another message located above the signature line.
- Print list price on any invoice line item where the price does not match the list price – With this option selected, when the Unit Price entered on the Quick Ticket is lower than the List Price of the product, both the Unit Price and List Price are shown on the Quick Ticket document.


Printing Receipts
If using the 4.4" Star Thermal receipt printer, type the disclosure into a Notepad file and save that file into the data directory as QTFooter.txt. This disclosure will print after the JDF Multi-Use disclosure on the receipt. This will not work with any of the other types of receipt printers.
Note: John Deere Financial Multi-Use Account Integration (JDF Multi-use) was formerly known as Farm Plan.
If the Use Worldpay option is selected at Accounting / Utilities / Worldpay and Quick Tickets are printing double the number of receipts set up in Quick Ticket Preferences (found by selecting Options then Print # Copies at Accounting / A/R / Manage Quick Tickets), follow the steps below to ensure the correct number of receipts is printed.
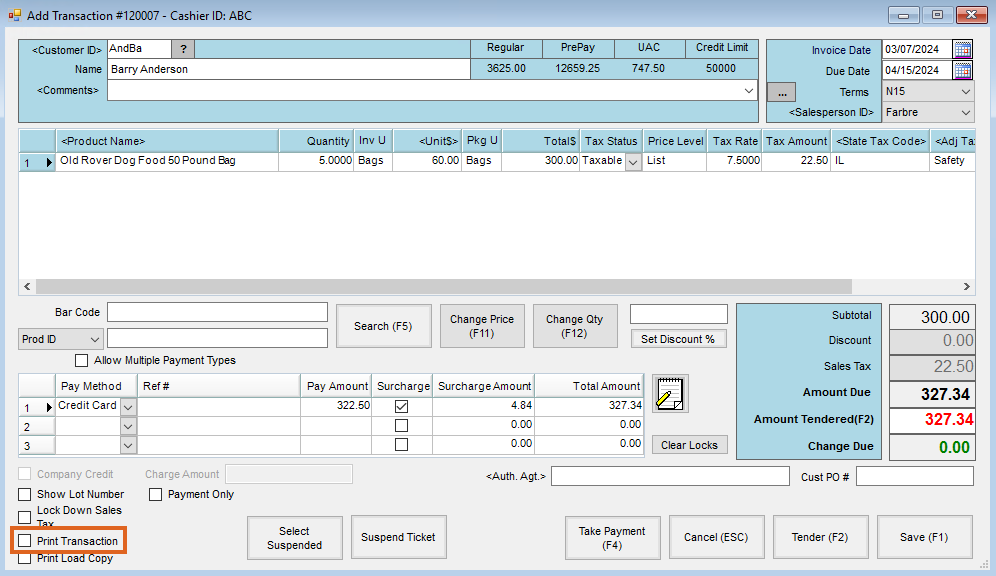
Note: The Print Number of Payment Copies area also prints receipts when the Print Transaction option is not selected on the Quick Ticket.
- Enter the correct number of receipts in the Quick Ticket Preferences area.
- Do NOT select the Print Transaction option on the Quick Ticket. This will result in the expected number of receipts to be printed.