This function is used to bring soil test results into the Field Test Result tab. The raw data must be transferred from the lab to the \AVDATA\LABDATA directory to be available for this function.
The lab knows what software is needed to access their bulletin board or could email the files.
Importing Soil Test Results into the Field Data
The following instructions assume that the data has been successfully downloaded from the soil lab and resides in the \AVDATA\LABDATA directory.
Before the first import, select Options to set up information for the specific lab.

- In the Hub, go to Transfer / Import / Soil Tests.
- The window displays all the soil test files available for import. Select the file or files to import.
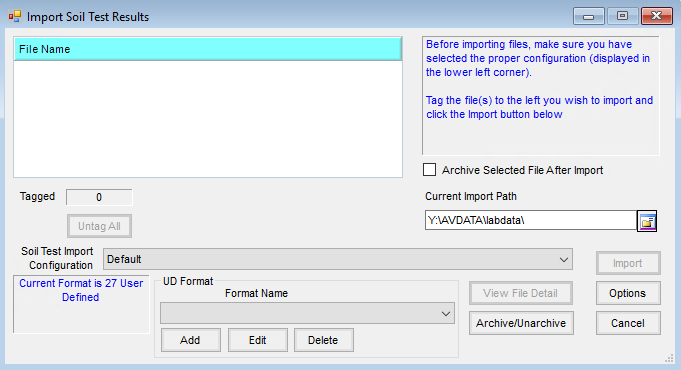 Note: To view the detail of a file prior to importing, highlight the file and select View File Detail. This displays the entire contents of the file in a text format with an option to print.
 - To archive the selected files after importing into the field file, check the Archive Selected File After Import box. To read more about archiving lab data, see Maintaining Lab Data Files.
- Choose Import to start the import process.
- The View Test Results screen displays the selected import files with the data identified by column headings at the top of the grid. There are several options for manipulating and viewing the data prior to importing. These options are listed below:
- Grower ID or Field ID – Double-clicking in either of these columns allows replacing data located in the Grower and Field columns by selecting a field that has previously been set up in Agvance. This allows corrections or adjustments to the IDs entered by the soil lab to ensure the file imports into the correct field in Agvance. The procedure changes all IDs in these two columns to the selected Agvance IDs starting at the row (sample #) in which the cell was double-clicked and ending at the row where a new or different Grower ID and Field ID exist.
- Sample Number – Double-clicking in this column enables the samples to automatically be renumbered starting at the cell (or sample #) in which the action was performed. A window displays to enter a starting sample number and a step interval to increment the numbers. This re-numbers the samples until a new field is detected.
- Change – This allows changing a data string in a column to another user input data string. To utilize this feature, position the cursor in the column to change the data and select Change. Enter the value to change (exactly as it appears in the file), enter the replacement value in the second input box, and choose OK. This finds all data values that match the user specifications and replaces them with the replacement values input by the user.
- Move – This function allows moving all the data from one column into another specified column. Select Move and indicate which column of data to move in the first selection box. In the second selection box, indicate the column where the data will be transferred. Choosing OK moves all the data from the specified column (leaving it empty) and places the data in the desired column, replacing any previously existing data.
- Delete – This is used to delete rows from the test results grid. These may be deleted one at a time or several rows at once. Select the row numbers to the left of the grid to highlight the rows to delete.
- Print – prints the entire file (spreadsheet style) in landscape format.
- Summary – Display a summary of the number of fields contained within the file and the number of samples per field.
- Save – Once the data has been viewed and modified (if necessary), this starts the import process.
- When ready to import the data into the selected fields in Agvance, choose Save and the Import Status window displays the first field along with the number of samples to be imported.
Note: If the Customer or Field IDs displayed do not currently exist in the Agvance database, they are added automatically as a result of the import process. If the Customer and Field exist in the database but under a different ID, correct the IDs in the file using Change at the View Test Results screen. - Optionally import the soil tests into the current year’s data or into a previously archived season. If recommendations are included in the file, a summary of that information displays at the bottom of this screen. Select the Agvance crop that corresponds with the crop for the recommendation. Choosing Save imports the data for the field indicated. Selecting Skip bypasses the field and displays the next available field in the file.
