As many daily transactions are saved, Agvance automatically creates entries into the General Journal. This journal is the foundation of the financial records - the basis of the profit/loss statement complete with an audit trail on all financial activity.
Although most of the posting is automatic, direct entries may be made to the journal as well for adjustments, the posting of depreciation, bank service charges, etc.
The General Journal is the foundation of the accounting system. It provides the audit trail of all transactions that affect the financial statements. Most entries into the General Journal are automatic as the daily transactions like invoicing, processing payments, and paying bills are processed. A few accounting entries occasionally need to be made manually into the journal.
Agvance naturally posts quantity/units for any transaction involving inventory. The units are posted in the G/L Posting Unit specified on the Inventory Department Profile tab. In general, the effect of the quantity on the Journal Entry is controlled by the debit or credit value of the dollars entered on the same line.
General Journal Entries can be added at Accounting / G/L / General Journal Entries.
General Journal Entries
When a Journal Entry is made, the G/L account balances are updated.
In the case where the Future Posting option is checked, an entry into the Future Journal is made instead of the General Journal. As the fiscal month is ended, any future entries are entered as the first JEs of the new month.
Vendor Balance – The balance is affected by the JE if the entry is marked as a Vendor A/P type and one of the debit or credit accounts is A/P. If the Prepay option was selected, the Prepay balance is affected. Otherwise, it is the Vendor's Regular balance.
Note: A word of caution on making direct Vendor A/P type Journal Entries - to record a check to a vendor that didn't go through A/P, do so at the G/L / Quick Check screen. Although a Vendor-Type Journal Entry can affect the G/L accounts and vendor balance, a direct Journal Entry does not make an entry into the Vendor Disbursement file.
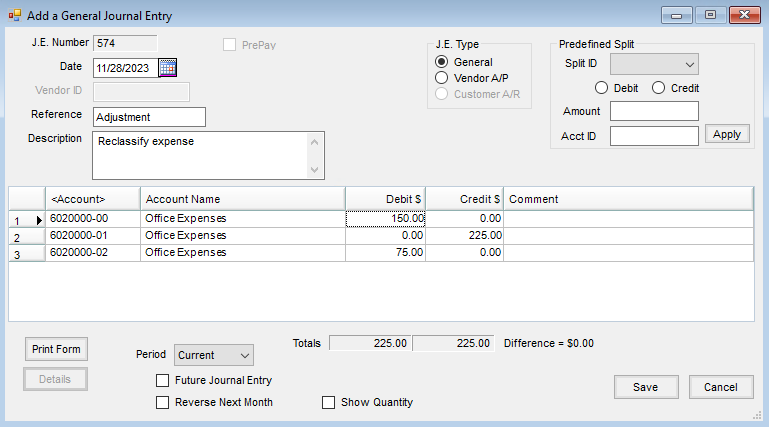
- JE Number – This number is automatically incremented and displayed by the computer.
- Date – Enter the date of the transaction or adjustment.
- Vendor ID – This is used only when making a Vendor A/P (P-Type) entry.
- Reference – Enter a brief reference to the entry.
- Description – Optionally enter notes about this JE.
- JE Type – A General Type entry only affects the selected G/L accounts. A Vendor A/P type entry affects the selected vendor's Regular account if the A/P account designated at Setup / Locations on the Preferences tab is one of the selected account numbers in the grid.
- Predefined Splits – This automatically splits expenses between multiple accounts based on predefined percentages. Splits must be defined at Setup / G/L / G/L Splits and the existence of at least one G/L Split makes this available.
- Split ID – Choose from a predefined split.
- Debit/Credit – Indicate whether the split accounts will be debited or credited.
- Amount – Enter the dollar amount to be split.
- Acct ID – Use this only if using the Wild Card option of the Split Out feature. Enter a complete valid account, and the corresponding group of related accounts is split according to the predefined split. For example, enter 61* in the Acct ID and all the 6100 accounts will be split out according to the selected Split ID arrangement.
- Account Grid – Select the general ledger account by double-clicking in the <Account> column. Enter the Debit and Credit dollar amounts. Bring the total of the columns current by selecting anywhere in the grid area. The Debit and Credit columns must be equal before the entry may be saved.
- Posting of units – In general, the sign associated with the units follow the dollars.
Hint: To select multiple accounts, double-click the <Account> heading, and then hold the Ctrl key down while selecting desired accounts. This allows multiple accounts to be selected at once. - Print Form – This prints the screen.
- Details – When editing Journal Entries, this gives information about who made this entry, the source of the entry, and, depending on the type of entry, the transaction date and time.
- Period – Most Journal Entries are made into the current period (fiscal month). But entries may be made into any previous month of the current fiscal year by selecting that month. In this case, all month-end balances for the affected accounts are altered accordingly.
- Future Journal Entry – This causes the Journal Entry to be saved into a special future file, not affecting the general journal or associated accounts (or vendor balances if Vendor A/P type) until the fiscal month is ended. At that time, any future entries are the first JEs of the new month.
- Reverse Next Month – Use this option if the Journal Entry is to be automatically reversed in the next fiscal month. This setting puts the reversal in the Future Journal Entry file to be posted along with any other future entries at month end. If the entry is made in month 12 of a prior year dataset with this option marked and the Journal Entry is to affect the current year, a reversing Journal Entry will be made in month 1 of the current year data if there are available Journal Entries reserved in fiscal month 1. If there are no available Journal Entries in month 1, then a message appears.
- Show Quantity – The Quantity column displays in the grid to allow quantities to be entered on the Journal Entry.
General Journal Entry Process
More information on General Journal Entries in Agvance SKY can be found here.
- Navigate to Accounting / G/L / General Journal Entries and select Add.
- On the Add a General Journal Entry window, enter the Date, Reference, and Description.

- Select the J.E. Type. A General entry only affects the selected G/L accounts. A Vendor A/P entry affects the selected vendor’s regular account if the Accounts Payable account is one of the selected accounts in the grid.
Note: Use caution when creating a J.E. Type of General for Accounts Receivable or Accounts Payable, as it can create an imbalance at the checkup. Similarly, use caution when creating a J.E. Type of Vendor A/P, as a Journal Entry does not create a transaction in the Vendor disbursement file. - Double-click in the Account field, and select the G/L accounts to be affected.
- Enter the amounts for each account in the Debit $ and the Credit $ columns. The totals of these columns must be equal before saving the entry is allowed.
- Select the Period to post the Journal Entry. The Current period, as well as any of the previous fiscal months, may be selected from the drop-down menu. To post the Journal Entry immediately and automatically reverse next fiscal month, select the Reverse Next Month option. The Future Journal Entry option automatically posts the Journal Entry in the next fiscal month.
- Select Save.
