Add all items currently on hand for resale as well as any services that are invoiced. Any Product carried in different units should be added as separate items. For example, a chemical packaged in 2.5 gallon jugs and also 30 gallon drums would be two distinct Products in the inventory.
For multiple Location plants, the task of setting up Products may be minimized by replicating the Products set up for one Location to the other Locations. The Department setup must be established for all Locations, but the inventory Products are entered for just one Location. SSI Support will assist with using a utility to copy the Products from the master Location to the other Locations.
There are several different units that help determine how the Product is handled at various stages of the selling process. Additional units beyond the ones provided, such as jugs or cartons, may be added to the list at Hub / Setup / Company Preferences on the Product tab.
The Inventory Units established on the Profile tab and the Billing Units on the Pricing tab affect the look of the Invoice. The Inventory Unit is the quantity shown on the Invoice (5500 Lbs or 2.75 Tons). The Billing Unit is the pricing unit ($125/Ton). The Billing Divisor is the relationship between the two. More information on Product units can be found here.
Profile
The Profile tab holds basic data such as manufacturer and inventory (storage) units (Lbs, Ton, Gal, Pts, etc.). Type in, or cross-reference to a chemical database the information shown at the Profile tab.

- Department – The department selected on the previous screen defaults. Double-click in the Department field to list the available departments from which to choose. For more about the selected department, select More Info (?).
- Product ID – Use up to 10 alpha-numeric characters to identify this Product. This ID must be unique within this department and is often a portion of the Product Name. The Product ID should not include any spaces or special characters.
- Product Name – This is the description that appears on the customer’s documents such as Maps, Plans, Blends, or Invoices. Use up to 50 characters to describe this Product. Note: The Product Name and/or Product ID may be edited at any time. The changes filter through the database so the history follows the changes and maintains the integrity of the data. There are a couple of things to note if changes are made:
- When running reports across years (i.e. including additional datasets), if the Product Names and Product IDs do not match in both datasets, it may result in the Product showing more than once on the report - once for the old name and ID and once for the new name and ID.
- When running reports sorted by name, the Product may show up more than once on a report, as it will show transactions under the old name and transactions under the new name. This also happens on reports if a Product Name is manually changed on a transaction.
- Technology Group – When applicable, select a Technology Group from the drop-down list for the Product. Technology Groups are setup at Setup / Company Preferences on the Product tab. For more on the setup of Technology Groups, see Technology License Setup.
- Manufacturer – Select the manufacturer from those provided if applicable. Add to this list at Setup / Company Preferences on the Product tab. If using a DOT regulatory interface chemical database, the manufacturer is added automatically when linking the Product to the database ID (from the Safety tab). This is particularly helpful for chemicals and seed.
- Bar Code ID – This area optionally holds the Universal Product Code (UPC).
- Re-order Level – This optional input allows a re-order level to be established for this Product. If utilized, Products falling below this level are indicated on the Re-Order Report found in Inventory Status reports. This is an optional, manually set quantity. The program does no calculation to determine the number entered here.
- Amount on Hand – This holds the current Amount On Hand in Inventory Units. This input is used by the Agvance Accounting module and is updated automatically when Product movement (Delivery Ticket, Invoice or Purchase Receipt/Purchase Invoice) occurs. It is not needed for Agvance Mapping, Planning or Blending.
- Inventory Units – Not to be confused with Billing Units, the Inventory Unit is the storage unit used for quantity sold and purchased as well as Inventory Amount On Hand. The Product may be stored in one unit and billed in another. The Billing, Rating and Blending Units are set up on other tabs.
- Unit Weight – Enter the weight of one Inventory Unit of this Product in Lbs. For example, if the Inventory Unit is Lbs, the Weight is 1. If the Inventory Unit is Tons, the Weight is 2000. For liquid, determine the weight/unit.
- Package Units – Enter the unit for the Product package utilized on Delivery Tickets. This is commonly something such as case, bags, jugs, etc. but could also be pounds or gallons for bulk Products.
- Package Size – Used primarily for chemicals and bagged fertilizer, the size, along with the Package Units, prints on Delivery Tickets and Blend Tickets to help the person loading the Product. Package Size is how many Inventory Units are in one Package Unit. This is important for the Tonnage Tax report in Agvance Accounting and hazardous material shipping papers, which may be printed from several of the Agvance modules.
- Commodity Ref – Double-click to select a Commodity if this Product should be included in Grain posting.
- EDI Reportable – Select this option if sales of this item are being tracked via an EDI system in order to export to any chemical company (or Harvest Partner, Meppel, etc.).
- Inactive – Select this option when the Product is no longer active. This prevents further transactions from being created using this Product. A Product must have a zero Amount on Hand and company-owned inventory quantity to be marked Inactive.
- Consignment – Choose this option if this Product is a consignment Product. Items marked consignment may optionally be included on Inventory Statement reports.
- On Hold – Choose this option to keep unauthorized purchases of this Product from being saved.
- Package Size Is Bulk – Select this option if the Product is shipped in a bulk mode. This preference is used for placard calculations on the hazmat printouts. If Agvance is set up to interface with Agrian, this preference will be checked automatically depending on the Agrian Product and Package Size to which the Agvance Product is linked.
- Shipping Manifest Pkg Qty is Always 1 – If selected, the Product will always print a 1 for the package value on shipping papers.
- Manufacturer Part # – Optionally enter a part number here which is then available to display at the Select Products window and prints on a Purchase Order.
- Alternate Product ID – If Product ID source at Hub / Setup / Company Preferences on the Product tab is set to Alternate Product ID, then information entered here prints on select reports and is displayed at the Select Products window.
- GTIN – This is the Global Trade Identification Number used by Supplier E-Link.
- SSI Global ID – This number automatically populates when the Agvance Data Link database is accessed.
- Edit GTIN – If the number displaying in the GTIN area is incorrect, this option allows the number to be edited.
- Clear SSI Global ID – Select this option to clear the number from the SSI Global ID above.
- Storage Codes – Double-click to add a row and enter a Storage Code up to 30 characters. The codes entered print on select documents. Storage Codes may be added, edited, or deleted at any time.
- Classifications – Choose to select a Classification or multiple Classifications for the Product. Classifications are set up at Setup / Company Preferences on the Product tab. Classifications allow for selecting multiple Products at once instead of one by one.
- Attributes – Choose to select the Attributes for this Product. Attributes are set up at Setup / Company Preferences on the Product tab.
- Bar Codes – For Products with multiple bar codes, the bar codes may be entered here. To utilize these multiple bar codes, go to Setup / Company Preferences, and select Product Barcode Scannable Items on the Products tab. In the Barcode Lookup Order grid, select {Product}{Additional Barcodes}.
- Product Cross References – There are four optional inputs to help identify this Product to other computer systems or numbering schemes. The headings for these miscellaneous inputs are set at Setup / Company Preferences on the Product tab.
Safety

- EPA# – Enter the unique EPA# if applicable. If using a DOT regulatory interface program, this input is completed when linked to the Product. Blend Tickets, Delivery Tickets, and Invoices (optionally) print EPA numbers if they exist on this screen for the Products involved.
- PCP# – Record the PCP Registration # for Canadian chemical Products. This can be imported from Agrian or entered manually. If a number is populated here, the PCP Registration # will print on hazmat documents for Delivery Tickets and Blend Tickets and Custom App Sheets for Blend Tickets. If imported from Agrian and the file contains a PMRA Registration Type, that number will populate in this field.
- Federally Restricted and Potentially Hazardous – Using these options, indicate the rating if applicable. If using a DOT regulatory interface program, this input is completed when linked to the Product.
- Warning – Indicate if Posted or Oral warnings are required.
- Prop 65 Details – For transactions delivered in California, Prop 65 warnings print on the documents. This option controls the Prop 65 warnings entered at Setup / Company Preferences on the General tab. Using Agrian for chemical compliance automatically updates these options as needed.
- Known to cause cancer – If the Product is known to cause cancer, select this option and then list the Cancer-causing chemicals in the field below.
- Known to cause birth defects or other reproductive harm – For Products known to cause birth defects or other reproductive harm, select this option, and enter the Birth defect or other reproductive harm causing chemicals in the area below.
- GHS Required – Select this option if GHS SDS documentation is required for this Product.
- State Restricted – This opens the Restricted Use State Setup window listing states. Choose this option for each state where this Product is restricted, which requires a valid permit to be used.
- Re-Entry Interval (Hours) – Indicate the number of hours after application re-entry is permitted.
- Shipping Name – When using the Agrian interface, this information is received from Agrian.
- Nat. Motor Carrier Class. – This is an industry standard for comparison of commodity transportability. It may be manually entered and if so, prints on the HazMat document for Products not set as Potentially Hazardous.
- Safety Comments and DOT Warning Note – Information may be manually added at this screen for informational purposes only. In order to get accurate hazardous material shipping sheets to print automatically, subscribe to a DOT regulatory interface database. For more information on this interface, please contact SSI.
- Chemical Database – This section is populated by the Agrian Interface, which may optionally be used.
Blend Setup
This window must be filled out to use the Product in the Agvance Planning or Blending modules. It defines several units of measure, critical ratios, and the Product’s nutrient contribution. If those modules are not purchased or the Product will never be used in them, it does not need to be filled out.
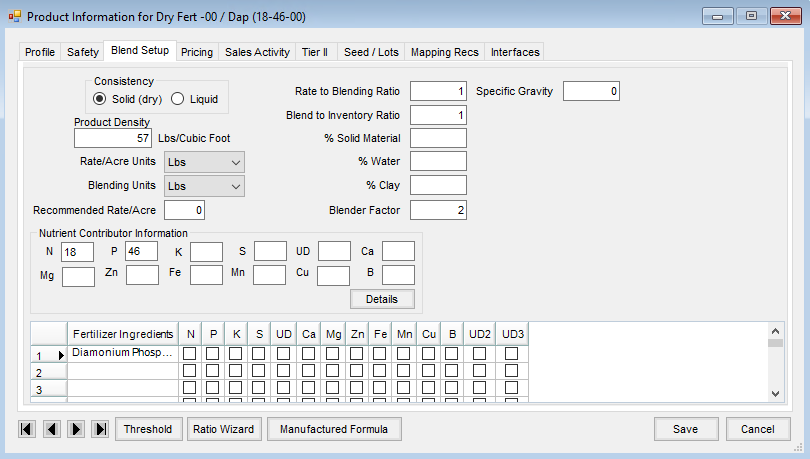
- Solid (Dry)/Liquid – Indicate if this Product is a dry or liquid item. If not applicable (services, parts, etc.), then set to Solid.
- Product Density – Enter the density in pounds/cubic foot.
- Rate/Acre Units – Select the rating units. Add to the list of available units at Setup / Company Preferences on the Product tab.
- Blending Units – Indicate the Blending Units.
- Recommended Rate/Acre – Enter the recommended rate/acre in rating units if applicable. The Product defaults at this rate when added to a Field Plan or Blend Ticket.
- Rate to Blending Ratio – Enter the number of rating units in one Blending Unit. This ratio may be automatically calculated by selecting the Ratio Wizard button at the bottom of the form.
- Blend to Inventory Ratio – Enter the number of Blending Units in one Inventory Unit. This ratio may be calculated by selecting the Ratio Wizard button.
- % Solid Material – Indicate the percent of solid material in this Product.
- % Water – Indicate the percent of water in this Product. Only use this when using the percent water when formulating blends. If not using the percent water when formulating, the only product that should have this number filled out is the actual water Product.
- % Clay – Indicate the percent of clay in this Product.
- Blender Factor – This is used only for automated blenders. Refer to the Automated Blender File Overview for details.
- Specific Gravity – This is used to correctly calculate the final weight and volume of a blend when using a dry product in a liquid blend.
- Nutrient Contributor Information – This is enabled only if the Inventory Department is set up as a Nutrient Contributor. If the rate/acre is pounds, then this number is the percentage of 100 lbs of material. If the rate/acre is gallons, then the contribution is a percentage of 100 gallons of material.
- Details – This option accesses an area to add additional information pertaining to each nutrient. This information prints on the state fertilizer tag.
- Fertilizer Ingredients – This grid allows ingredients to be input for fertilizer products in states where specialized tags are required (GA, FL, TX).
Pricing
The Pricing tab holds costs, List price, and Pricing Level information. The Pricing screen should be filled out if using the Agvance Planning, Blending, or Accounting modules.
Note: Costs are the company's costs to purchase a Product from a Vendor. Prices are what the company charges a customer.
It is important to have valid Last Cost and Average Cost entered for any inventoried product on-hand. If Estimated Average Cost will be used, it should be entered also. Costs are entered at Hub / Utilities / Admin Utilities and then Accounting / Edit Product Balances.

- Billing Units – Indicate this Product’s pricing units. Add to the list of available unit types at Setup / Company Preferences on the Product tab if necessary.
Note: The cost amount reflects the Billing Unit. - Billing Divisor – Select one of the existing Billing Divisors or type in a number. The Billing Divisor indicates the number of Inventory Units in a Billing Unit. For example, if a Product is inventoried (stored) in Lbs and billed (priced) by the Ton, the divisor would be 2000.
- Average Cost – When using the Agvance Accounting program, this number is automatically updated when a Purchase Invoice is created for that inventory item. It is a weighted average based on the amount of product on hand before the purchase, the previous Average Cost, the amount just purchased, and the new cost figure.
Note: All cost figures display at 3-decimal accuracy. - Last Cost – If using the Agvance Accounting program, this number is automatically updated when a Purchase Invoice is created for that inventory item. The new cost of the item simply replaces the old.
- Replacement Cost – This figure is not automatically updated by any accounting transaction. Optionally manually enter a cost figure here feathering in overhead costs or other hidden cost factors and use the Replacement Cost as a basis for the markup for product pricing.
- Profit Margin – For departments with Profit Margin Department checked at the G/L Posting tab found at Accounting / Setup / Inventory Departments, enter the desired margin here. The cost saved on an Invoice for this Product is calculated based on the selling price and this Profit Margin. This function is designed for non-inventoried departments where generic items are used to invoice product where predictable margins are expected.
- Estimated Average Cost – This optional field is updated upon saving a Purchase Receipt for departments set to Compute Invoice Cost by Estimated Average. The averaging calculation rules mimic the average cost calculations except they use the total Amount On Hand rather than company owned quantity. The purpose of this cost is to save a more accurate cost for Products that are either fast moving or have prices that are fairly volatile.
- Replacement 2 Cost – This figure is not automatically updated by any accounting transaction. A manual cost figure may optionally be entered here, feathering in overhead costs or other hidden cost factors and use the replacement cost as a basis for the markup for product pricing.
- Replacement 3 Cost – This figure is not automatically updated by any accounting transaction. A manual cost figure may optionally be entered here, feathering in overhead costs or other hidden cost factors and use the replacement cost as a basis for the markup for product pricing.
- Replacement 4 Cost – This figure is not automatically updated by any accounting transaction. A manual cost figure may optionally be entered here, feathering in overhead costs or other hidden cost factors and use the replacement cost as a basis for the markup for product pricing.
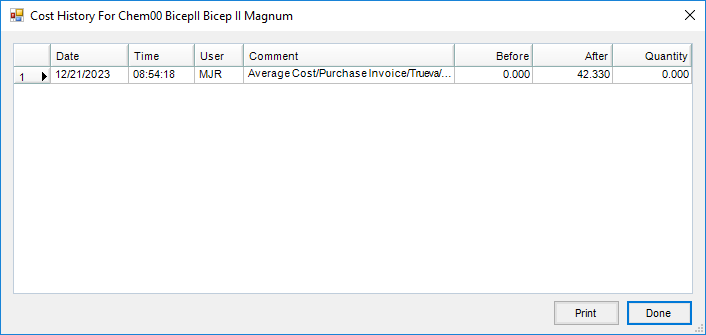
- Audit Costs – This opens the Cost History window showing most activities which caused a change to the cost of the Product. This can be very helpful when trying to find how a particular cost was set on an item.
- Audit Prices – Similar to Audit Costs, this option shows a list of transactions entered where the List or any Price Level's prices were overridden.
- Pricing Levels – There are up to twenty-four Price Levels in addition to the List Price for each Product. A Customer may be set to default to any of these price levels on the Customer Profile window. Customize the labels on these twenty-four optional price levels at Setup / Inventory Departments on the Price Levels tab. Price Levels can be used throughout the Agvance program when pricing items as an alternative to the List Price.
Note: The price amounts reflect the Billing Unit. - Show Formulas – Select this option to add, view, or edit any formulas saved to aid in setting and/or updating level prices. When setting up formulas for several related Products, it may be more convenient to use the utility found at Hub / Utilities / Edit Product Pricing.

Sales Activity
The Month-to-Date and Year-to-Date sales and purchase amounts display on this tab, along with the end of month Inventory Amount on Hand.

- Sales Taxable – This option denotes that the Product is Sales Taxable.
- Sales Account – If the Product is in an Inventory Department marked as Sales Posting Item Override, this option is enabled. Select the General Ledger account where the sales of this Product should post.
- Cost of Goods/Purchases # – if the Inventory Department for this Product has the Cost Posting Item Override set, this option, along with the two following options, is available. Select the General Ledger account where the purchase amount should post.
- Freight/Add On # – Enter the General Ledger account where the Freight and Additional Charges should post.
- Purchase Disc # – Select the General Ledger account where any Purchase Discount entered on the Purchase Invoice should post for this Product.
- Extra Charges – Select any Extra Charges that should be included when entering a Purchase Invoice for this Product.
Tier II
The Tier II tab holds information needed to fill out the Maximum / Average Daily Inventory report that must be filed annually. It also stores information about spill quantities before they need to be reported. All information on this tab, except Storage Codes, may be imported from a DOT regulatory interface if the linked Product contains this information.

- Chemical Description – These options are used to select the type of Product. Examples are a Pure or Mixture and in what state the Product is stored: Solid, Liquid, or Gas. The EHS Name does not need to be filled out as the chemical name is used when it is checked as an EHS Product in the CAS Numbers grid.
- Health Hazards – Select the appropriate Health Hazards this Product poses.
- Storage Codes – Indicate the Container Type, Pressure and Temperature in which the Product is stored. Double-clicking in each column displays a selection box from which these codes may be selected. Location information as to where the Product is stored may also be entered in this section.
- CAS Numbers – This section contains the chemical breakdown of the Product. This information can usually be found on product labels or on the Product’s SDS. Enter the chemical name in the column provided. Enter the chemical’s CAS Number in the CAS # column without dashes. The reportable quantity for a spill is entered in the next column then the active percentage of the chemical in the next column. If an exact quantity is not known, a zero may be entered in this field. An example of this is an inert ingredient that is being broken out separately. Select the EHS option if the Product is considered an Extremely Hazardous Substance. The Threshold Plan Quantity is used on EHS Products if that Product’s quantity is required to be reported below those of all the other EHS Products; usually 500 pounds of material. For that reason, if the Threshold Plan Quantity is greater than 500, it is not necessary to enter that information. The last column is used to record the Threshold Report Quantity.
Seed/Lots
Detailed seed information may be entered on this tab along with lot information. Quantities for Lot Numbers are calculated on this tab by selecting Calculate.

- Is Bio Tech – Check this option if the seed being entered has some type of biological insect or disease resistance.
- Is Insect Resistant Material – Check this option if the Product is insect resistant from a seed treatment or from a biological standpoint.
Mapping Recs
The information on this tab is used only if generating Product recommendations in the Mapping program. By filling out this tab, the Product is available in Mapping for fulfilling nutrient recommendations.

- Product Category – Choose the Product Category for each Product.
- Code – This Code will only be used in Mapping.
- Description – This Description is only used in Mapping.
- Product Form – Choose the form for this Product from the list. The options are Unknown, Liquid, Dry, Unit, and Service.
- <Agvance Sky Mapping Product Name> – SKY Mapping Products can be linked with Agvance Products. Double-clicking in this text field will attempt an automatic link by Agrian ID. If a Product is not found or is already linked, it will allow the option to select from all SKY Mapping Products. Additionally, select in this field and press Delete on the keyboard to remove the link. For more information on linking Products, see here.
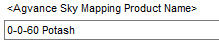 Note: This option is only available to databases linked to SKY Mapping at Hub / Setup / Company Preferences.
 Note: This option is only available to databases linked to SKY Mapping at Hub / Setup / Company Preferences.