Agvance Version 7.0.25080 or above must be installed to have access to this PMR export.
The PMR export is available at Accounting / Transfers / Export. This export was developed to send Customer Sales Invoice information directly to Land O'Lakes/Winfield via Web Transfer.
Note: It may be necessary to send the reporting company's IP address to Land O'Lakes for whitelisting if there are issues with the Web Transfer.
When first activating the PMR Export, Customer Classifications must first be set up before using the export. This Classification can be generic and does not need to be in use but must exist for the PMR Export.
Setup
The XML file will be created locally in temporary storage, then the contents of the file will be sent to the web service to be transferred. The web service has limitations of 100 Invoices per call. If there are more than 100 Invoices, it will require an additional web service call.
Note: SSI Support will need to assist with encrypting credentials to enter into this Setup area.
![]()
- Vendor Name – Enter Winfield United as the Vendor Name.
- Vendor GLN – Enter 0034500002851 as the Vendor GLN.
- Wholesale Customer Classification – Optionally select a Classification from the drop-down. This indicates the transaction is to a wholesale Customer if the Customer is in the selected Classification. If so, Wholesale displays in the export file instead of EndUser.
- Product ID Assigned by Manufacturer – If a Product Attribute is selected, it will send the information from the Product Attribute and designate it in the file like this:
 If nothing is selected, it sends the Department ID and Product ID of the Product and designates it in the file like this:

 If nothing is selected, it sends the Department ID and Product ID of the Product and designates it in the file like this:

Export

- Document ID – This defaults as 0000000001 and does not need to be changed.
- Save File Locally – Set the path where the file should be written, and designate the name of the file with an extension of .xml.
Note: A file cannot be saved locally and sent via the web service at the same time. - Customer Address – Select which address to send to for the Customer being invoiced.
- Main – This is the address set up on the Profile tab of the Customer.
- Bill-To – This is the Bill-To address found by selecting the Addresses button of the Customer profile.
- Ship-To – This is the Ship-To address found by selecting the Addresses button of the Customer profile.
- 100% to Grower – When this option is checked, the entire sale quantity and dollars on split Invoices will be attributed to the Grower(s) on the billing split. If there are multiple Growers, the amounts are split according to those Growers' shares. If there is only one Grower, they will have the full amount of the Invoice reported to them. If no one is marked as a Grower, the sale is reported under the first Customer on the Invoice.
- Department Categories – To only export certain Products in Department Categories, select Add Row then choose the Category from the drop-down. Department Categories must first be set up on the Profile tab at Accounting / Setup / Inventory Departments before they are available here.
Note: Department Categories and Product Classifications cannot be used at the same time. - Product Classifications – Choose Product Classifications to only export Products within the Classification(s) selected.
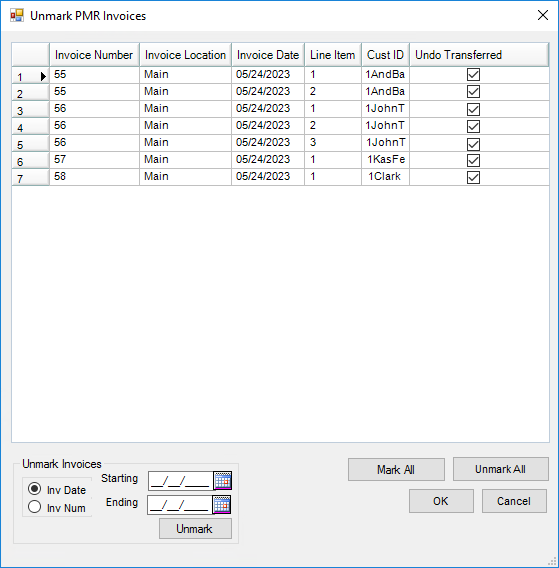
Note: Department Categories and Product Classifications cannot be used at the same time. - Unmark Transferred – When this is selected, a range of Invoice dates or Invoice numbers and individual line items on the Invoice may be unmarked as transferred and will be available to transfer again.

If one of the following program errors occur, it may be because the TranTime in the Invoice table is formatted incorrectly. Contact SSI Support for assistance with this error.


