Preferences allow options to be set, therefore customizing to a degree how the program works for the company. Often these default settings may be overridden as transactions are being entered.
Important scale settings, which determine the accuracy of Product weights and how the Blend Ticket handles the department settings, are defined here.
The cost basis for quotes, unhidden blend fee departments, and the Product discount level to apply may be selected. The Blend Ticket numbering may also be set to number from a Company or Location level, and the starting ticket number is designated here.
This information may be edited from either the Blending or Planning modules under the Setup menu.
Blend Setup

- Scale Options – These set the accuracy for a group of Products. Each Inventory Department is assigned a scale setting (1 - 9) assigned at Hub / Setup / Inventory Departments. Setting a scale also allows a group of items to be separated on the Blend Ticket. Each time a new scale is used on the ticket, a line separates the items.
- Accuracy – Enter the blending accuracy to the nearest unit. This is a practical way to manage inventory relief. The Blended column on the Products tab of the Blend Ticket reflects the accuracy defined here. The amount is rounded and represents the quantity converted to Inventory Units, which is the amount taken out of inventory when the Blend Ticket is marked as Loaded.
- Reset to Zero – As the Blend Ticket prints, indicate if the accumulating figures should reset to zero when the department changes.
- Accumulate – As the Blend Ticket prints, the Product quantities accumulate from Product to Product, giving a cumulative weight. This method is generally used for fertilizer Products loaded one after the other on a scale to give the proper scale stops.
- Analysis – A checkmark indicates any items in departments set to this scale are to be included in the blended and guaranteed analysis weight calculation.
- Quoting Basis – This is the cost - not selling price - saved with each line item of the Blend Ticket. Loaded tickets are valued on this basis when calculating available credit for a customer.
- Reformulation Weight Tolerance – When an analysis quoted blend is reformulated, this tolerance controls how much the new analysis may vary from the original and still be considered the same analysis.
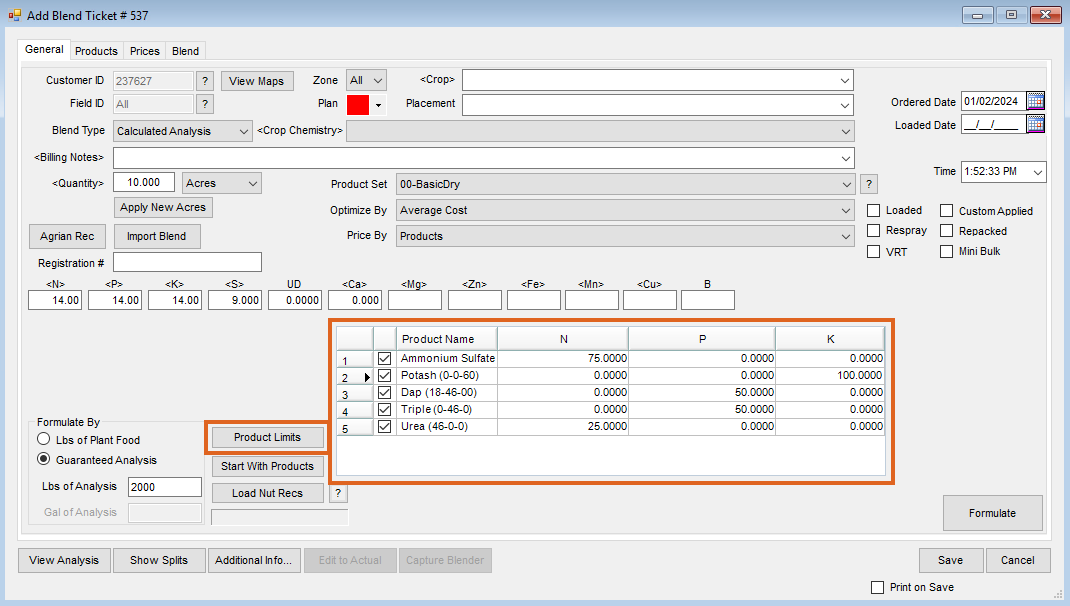
- Allow Formulation by Residual Product Limits – This feature is available only when formulating by Guaranteed Analysis. It allows a percentage of the N, P, and K supplied by certain products to meet the analysis requested to be specified on the Blend Ticket. When selected, the Blend Ticket displays a Product Limits option.
- Product Limits – Selecting Product Limits displays the grid of Products. Specify which Products in the Product Set supply what percent of the N, P, and K nutrients. Each column must total to 100. This feature allows analysis blends to be customized outside the usual parameters of the Optimize By feature.
- Product Limits – Selecting Product Limits displays the grid of Products. Specify which Products in the Product Set supply what percent of the N, P, and K nutrients. Each column must total to 100. This feature allows analysis blends to be customized outside the usual parameters of the Optimize By feature.
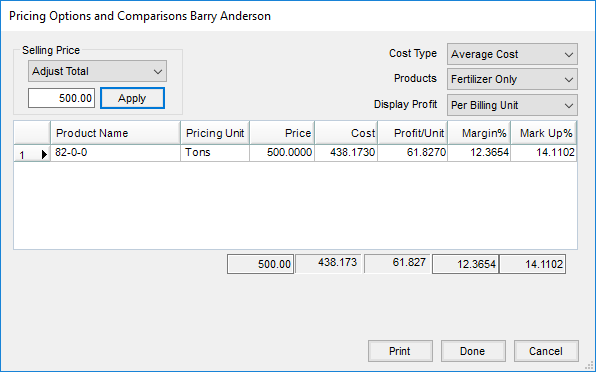
- Show Original Cost on Pricing Options when available – When a quoted and approved Field Plan is imported into a Blend Ticket, additional cost and margin comparisons are added to the Pricing Options window. Field Plans are usually made well ahead of season and product costs may have changed before the application is actually made. These display in the Quote Costs area and allows the original cost and margins quoted on the Field Plan to be compared to those of the Products at the time the Blend Ticket is made.
- Default Terms to None if Plan Payment Terms are Expired – Select this option to keep expired Payment Terms from a Field Plan from being used when the Plan is imported into a Blend Ticket.
- Void Comments Required – With this option selected, when a Blend Ticket is voided, a window appears requiring a Void Reason be entered. The reason entered is then prepended onto the Blend Ticket comments on the voided ticket.
- Set Blend Ticket Requested Date from Plan Execution Date:
- Import Blend – When selected, choosing Import Blend on the Blend Ticket then selecting a Plan to import on the Plans tab causes the Plan Execution Date to populate the Blend Ticket Requested Date.
- Plan Selection Drop-Down – When selected and the Plan selection drop-down is used on the Blend Ticket to import the Plan, the Plan Execution Date is transferred to the Blend Ticket Requested Date.
- Default Terms – Payment Terms set here default into new Field Plans and Blend Tickets.
- Document Counters – This allows the Blend Ticket and Sales Order numbering sequences to be either global or Location specific and to set the first number of that sequence.
- Location Drop-Down – These preferences are set by Location. By selecting the various Locations, the preference settings may be changed for the selected Location.


Print Prefs

Field Plan
- Print Company Heading – Check this option to print the company heading on the Planning forms or leave unchecked if using pre-printed forms.
- Analysis String to Print – Options here include None, Blended Analysis, Guaranteed Analysis, or Both.
- Format – Select Standard, Standard-Invoice, Bill To/Ship To-Invoice, or Bill To/Ship To format.
Blend Ticket
- Regular/Large Font Size – This controls the font size of the Product names and quantities to mix on the printed Blend Ticket.
- Calculated Lbs. – This allows the calculated pounds of a Product for each line item to display on the Blend Ticket regardless if the Product is rated in pounds.
- Adj Scale Start – A starting weight may be entered for the scale settings on the Blend Ticket to allow for the weight of the truck, if known.
- Print Salt Out on Blend – Selecting this option prints the salt out temperature on the Blend Ticket.
- Print Ticket # Barcode – When selected, this option prints a barcode on the Blend Ticket that represents the Blend Ticket number. This option is used by certain blender interfaces.
- Print Container ID – With this option selected, for Products tracked in the Refillable Container Management area, the Refillable Container ID prints on the Blend Ticket.
- Print VRT Ticket on Single Page – When selected, one Blend Ticket prints for all Products on the blend, regardless of the VRT checkbox setting on the Blend Ticket.
- Print One Ticket per Load – When selected, each batch from the Blend Ticket prints on a separate page (print one batch sheet per load). The Print on Collated Paper option also becomes active when this option is selected.
- Print on Collated Paper – Selecting this option allows printing on multi-colored collated paper.
Note: The Print Control # option in the Consolidated Blend Ticket area also controls the printing of the control number on a Blend Ticket. - Create Automated Blender File – Options are available to create the automated blender file from a Blend Ticket. There are options to print from adding and/or editing a Blend Ticket and an option to print from Dispatch.
- Consolidated Blend Ticket – Select the options to include on the Consolidated Blend Ticket. The available options are Print Department ID, Suppress Guaranteed Analysis, Suppress Density, Print Tech License #, Print Blend Comments, and Print Field Directions, Print Lot #, Print Lot # on Product Row, and Print Control #. Field Directions are set in the Hub at File / Open / Fields / Edit.
Other Preferences
- Print Product ID on Blend Documents – When this option is selected, the Product ID prints on the blend documents. Selecting this option enables the Spaces drop-down selection which allows setting the amount of space between the ID and Name.
- Print Farm Info – When marked, the Farm ID and Description print on all blend documents.
- Do Not Print Zero Rate/Acre Line Items – Select this option if Products with a zero rate per acre should not be printed on the Blend Ticket.
- Print Selected Items in KG – When checked, the blend documents display the batch weight in units of KG/Batch.
- Print “See Terms On Reverse Side” on all “Received by” lines – This provides direction to the location of the terms.
- Record Conditions on Save of Blend Ticket – When selected, the Record Conditions window displays when the Blend Ticket is saved. With this option unchecked, the Record Conditions window will not display so field conditions will not need to be recorded upon saving every Blend Ticket.
State Fertilizer Tag
- Review Tag Numbers – Review and edit the customer’s state fertilizer tag prior to printing.
- Tag Review - Perform CI Warning – When selected, if the chlorine concentration of the blend is greater than the percent specified in the Product Set, a warning displays.
- Suppress Zeros on Tags – Selecting this option suppresses zero percent guaranteed analysis and nutrient break downs from printing on Blending documents.
- Manufacturer License – This prints the license number of the product manufacturer.
- Fertilizer Tag Heading – Select the headings to display on the state fertilizer tags. Options available are Manufactured By, Distributed By, Guarantor, or Manufactured for and Guaranteed By.
- Alt. Location Name to Print – This entry overrides the Location name printed for all state fertilizer tags for the selected Location.
- Location’s Address to Print – Select the Location to print instead of defaulting to the Location on the Blend Ticket. The second Location drop-down allows a Location address to be different for the Distributed By Locations. When both of these are populated, the Locations will print side by side for the TX tag.
- Guaranteed Analysis Decimal Accuracy – When printing the guaranteed analysis, indicate how many decimal places are displayed for each nutrient with the Accuracy selection. Different maximum amounts are allowed for different types of nutrients. Tolerances function in the following manner: The number in the Tolerance is added to the nutrient’s blended and guaranteed analysis then truncated to the accuracy set on the nutrient. For example, true truncation would have a tolerance set to zero. Regular rounding with an accuracy of whole numbers and a tolerance of .5 would act as normal rounding rules of math. In situations where true rounding is not desired, consider adding 0.1 to the analysis to push for the desired accuracy.
Note: State agricultural departments regulate tolerances (decimal accuracy). It is important the accuracies be set to the tolerances tested by the inspector.
Miscellaneous

Unhidden Blend Fee Departments
- Department Name – Products included on the blend from the departments specified here print on the blend documents like other add-on items. The Products are reset at the Edit to Actual function but remain outside the analysis. For example, when charging buggy rental by the ton, the program keeps the Unhidden Fee item’s quantity matched to the total fertilizer quantity when using Edit to Actual to update the Blend Ticket. If the total weight of the load is adjusted from 6400 to 6550 pounds, for example, the Unhidden Fees are also adjusted to the total weight of 6550.
- Default Field Plan Start Date To Ordered Date – When Field Plans are imported into Bookings with this option selected, the Start Date from the Field Plan is set as the Ordered Date on the Booking.
- Field Plan - Require Start Date – The options are No Checking, Warning Only, or Disallow Save. When warning or disallowing the save, the existence of the Start Date is verified when saving a Field Plan.
- Field Plan - Require End Date – The options are No Checking, Warning Only, or Disallow Save. When warning or disallowing the save, the existence of the End Date is verified when saving a Field Plan.
- Field Plan - Require Salesperson – The options are No Checking, Warning Only, or Disallow Save. When warning or disallowing the save, the existence of the Salesperson is verified when saving a Field Plan.
- Blend Ticket - Require Salesperson ID – The options are No Checking, Warning Only, or Disallow Save. When warning or disallowing the save, the existence of the Salesperson is verified when saving a Blend Ticket.
- Blend Ticket Require Target Pests – Optionally set to Warning Only or Disallow Save when a target pest is not entered on the Blend Ticket. At least one Product on the Blend Ticket must be federally restricted for this message to appear.
- Blend Ticket - Require Crop – The options are No Checking, Warning Only, or Disallow Save. When warning or disallowing the save, the existence of a Crop is verified when saving a Blend Ticket.
- Blend Ticket - Disallow Save of Edit to Actual with In Process Scale Tickets – The options are No Checking, Warning Only, or Disallow Save. When warning or disallowing the save, the Edit to Actual process verifies the associated Scale Tickets are not in process in the Agvance Scale Interface module at the time of the edit.
- Blend Ticket - Recommended Rate/Acre – The options are No Checking, Warning Only, or Disallow Save. The warning option displays a message if the rate per acre on the blend exceeds the recommended rate per acre on the Product when saving a Blend Ticket. The Disallow Save option does not allow saving the Blend Ticket if the rate per acre on the blend exceeds the recommended rate per acre on the Product.
- Blend Ticket - Crop Chemistry – The options are No Checking, Warning Only, or Disallow Save. When using the warning or disallow save options, the program checks for the existence of Crop Chemistry on the save of a Blend Ticket. When using this option, the Products to be checked for Crop Chemistry should be in a Product Classification.
- Select Product Classification to Check – This is used in conjunction with the Blend Ticket – Crop Chemistry option above. When checking for Crop Chemistry on a Blend Ticket, select the Product Classification containing the Products to be checked when saving a Blend Ticket.
- Disallow Multifield Blends and Plans – With this option selected, only a single Field may be selected when entering Blend Tickets or Field Plans.
- Disallow Blend to Stock Resulting in Negative Amount on Hand – Selecting this option stops Blend to Stock transactions that would cause the raw ingredient on hand inventory balance to result in a negative number.
Sales Order Prefs
These settings on the Sales Order Prefs tab at Planning / Setup / Location Preferences control the preferences for Sales Orders for the selected Location.

- Default Offer Expires Date – Selecting this option sets the expiration date automatically when entering Sales Orders.
- Number of Days – Enter the number of days for the default expiration date.
- Exclude Weekends – Marking this option skips weekends when calculating the Offer Expires date.
- Lock Offer Expires Date – With this option unchecked, the Expiration Date may be edited on the Sales Order. Selecting this option locks the Expiration Date so it is not available to be edited.
- Require Offer Expires Date – This option verifies that an Offer Expires Date is entered on the Sales Order.
- Disallow Approval of an Expired Sales Order – When selected, expired Sales Orders may only have the Status changed to Declined.
- Disallow Edit of an Approved Sales Order – With this option selected, the only change allowed to an Approved Sales Order is changing the status to Declined.
- Disallow Edit of Declined Sales Order – Once a Sales Order is marked as Declined, with this option selected, edits to that Sales Order are not allowed.
- Disallow Edit of an Offered Sales Order except to set Status to Approved or Declined – This preference, when marked, restricts editing Sales Orders except changing the Status to Approved or Declined.
- Disallow Save of Sales Orders with Products from Different Locations – Selecting this option verifies the Products on the Sales Order are from one Location. If multiple Locations' Products have been selected, saving the Sales Order is not allowed.
- Disallow Save of Sales Order Exceeding Allocation Amount – This option, when enabled, checks the Sales Allocation amounts to confirm the Sales Order does not exceed the Sales Allocation amounts.
- Disallow Delete of Sales Order in Mobile Sales – With this option selected, Sales Orders are not allowed to be deleted in the Mobile Sales module.
- Disallow Save of Sales Order with a negative Quantity – Marking this option does not allow negative quantities to be entered for Products on Sales Orders.
- Allow users to create DT from Sales Order in Agvance Sales app – With this option selected, Delivery Tickets can be created from Sales Orders in the Agvance Sales app.
- Print Location Heading – This prints the Location information on the heading of the Sales Order document.
- Print Zero Quantity Line Items – When this option is selected, line items on the Sales Order with a zero quantity are included on the printed document.
- Print Unit Price – When this option is selected, the Unit $ is included for each Product line item on the printed document.
- Print List Prices – When this option is selected, the List Price for each Product line item is included on the printed document.
- Print Sales Order Contract – When this option is selected, the Sales Order Contract Verbiage will be printed on a separate sheet with the Sales Order.
- Center Location Heading – When this option is selected, the Location information is centered on the heading of the printed document.
- Print Department ID – When this option is selected, the Department ID for each Product line item is included on the printed document.
- Print Product ID – When this option is selected, the Product ID for each Product line item is included on the printed document.
- Print Net Pricing Summary – When this option is selected, the Net Pricing Summary will be printed on the Sales Order document.
- Purchase Terms Message – A Purchase Terms Message can be manually input and printed on the Sales Order document.
- Document Counters – Selecting this opens the Setup Document Counters window, where Blend Ticket and Sales Order numbers can be determined. Each can be set to Use Global Number or Auto-number Document. Additionally, the Last Document Number can be manually overwritten. Selecting Set Location Counter allows for counters to be set individually for each Location.
Note: If setting Location Counters, it is important to set wide enough ranges to avoid overlapping transaction numbers. Caution should be taken when updating document counters. To ensure transactions are not being made when the Document Counters are being updated, make sure all users are signed out of Agvance. Contact SSI support for help with this process.
GHS SDS Template

Enter the template text and images for the GHS SDS document which displays when the Blend Tickets contain Products designated as GHS SDS on the Safety tab of the Product file and the SDS print option is selected.
Custom App Sheet

- Print Field Condition Information – Select the field conditions to print on the Custom App sheet.
- Print Manufacturer – If the product manufacturer should print on the Custom App sheet, select this option.
- Print on Collated Paper – If multiple copies of the Custom App sheet are printed and the print job should be collated for multi-colored paper, select this option.
- Print Weather Only Once – When selected, the weather information prints only one time for all Fields on the Custom App sheet.
- Always Print Dicamba Label – When selected, the Dicamba label along with a blank line for the Dicamba license # and training date will print on the Custom App sheet when the license number and training date are not available on the applicator.
- Print Totals in these Units – Select to print the totals in Rating, Blending, or Inventory Units.
