The Inventory Adjustment function under the Inventory menu in Accounting corrects inventory quantities for any reason (shrinkage, damage, package size substitutions, etc.) when the amount of product on hand does not match the computer balance. Inventory Adjustments leave an audit trail in the Inventory Detail file.
This function may be used to set the amounts on hand for the non-inventoried items back to zero. For example, the application service items will have a negative Amount on Hand that represents the number of acres spread during the current fiscal year. After ending the fiscal year, it is helpful to set these back to zero to gauge the number of acres spread the next year.
Inventory Adjustments are voided by highlighting the adjustment at Inventory / Inventory Adjustments, then choosing Void. Voiding an Inventory Adjustment affects the inventory balances for the Products on the adjustment. If using the Transactional Posting option, the General Ledger is also affected.
Taking a Physical Inventory
To maintain control over inventory, a physical count is done periodically. The Physical Worksheet is a helpful report to use when recording the count. This report is found in Accounting Reports at Reports / Inventory / Inventory Status / Inventory Statements. Choose the Physical Worksheet style. The computer quantity can optionally be printed on this report.
Overages/shortages of inventory and package size substitutions are common in the fertilizer/chemical business. When adjustments to inventory quantities are necessary, using this function can be helpful and leaves a good audit trail as well.

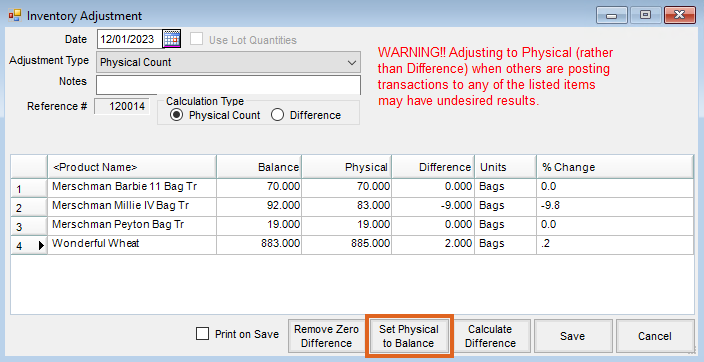
- Date – Enter the date the adjustment was made.
- Use Lot Quantities – Select this option to enable specific lots to be selected and displayed at this screen. This may only be enabled prior to product selection.
- Adjustment Type – This can help note reasons for the various adjustments and may be reviewed on some inventory reports. Physical Count is the most common Adjustment Type. Custom adjustment types such as Shrinkage, Damaged Product, or Repackaged Product may be added by selecting InvAdj Types found at Setup / Preferences on the Inventory tab.
- Notes – Enter any notation such as end of month physical. This becomes part of the audit trail.
- Reference # – The computer automatically assigns this number.
- Calculation Type – Choose whether the amounts being entered are a Physical Count or a Difference (change). This determines which column Calculate Difference updates.
- Remove Zero Differences – After selecting Calculate Difference, this removes all the products from the grid that have a zero difference. This makes the printout more concise.
- Set Physical to Balance – This sets the Physical column to the same quantities as the amounts in the Balance column.
- A few products in a department may need adjusted, but it is much easier to select the whole department than sort through and select just a few products. Selecting Set Physical to Balance will set the physical balance to the current balance on all products. Scroll down to find the products to adjust and change the physical balance. Choose Calculate Difference. This will show the difference of the adjustment on all the products. If Remove Zero Difference is selected, there will be an Inventory Adjustment for only the products adjusted.
- A few products in a department may need adjusted, but it is much easier to select the whole department than sort through and select just a few products. Selecting Set Physical to Balance will set the physical balance to the current balance on all products. Scroll down to find the products to adjust and change the physical balance. Choose Calculate Difference. This will show the difference of the adjustment on all the products. If Remove Zero Difference is selected, there will be an Inventory Adjustment for only the products adjusted.
- Calculate Difference – After editing the Physical column to actual, choose this to calculate the difference between the Physical and Balance columns.

Product Grid
- Product – Double-click on the column heading to bring up the Select Products screen. Select the products to be adjusted. If all lot numbers of a product should be chosen, once the product is selected, right-click on the product and use the Select All Lots option.
- Balance – This is the current amount on hand prior to the adjustment.
- Physical – If the calculation type is set to Physical Count, enter the actual quantity on hand. This is the number that becomes the Amount on Hand when the adjustment is saved.
- Difference – If the calculation type is set to Difference, enter the difference in this column. If the calculation type is set to Physical Count, this column is automatically calculated by selecting Calculate Difference. Difference = Physical – Balance.
- Units – This displays each product's Inventory Units.
- % Change – The Difference divided by the Balance is used to calculate the percent of change.
- Lot Number – If the Use Lot Quantities option above was selected prior to choosing products, optionally enter the lot number of the adjusted item.
Posting Notes
- Save of the Adjustment – The record is saved in the database and the Adjustment Counter for this location in the table is updated.
- Inventory Detail – A record for each Product's difference amount is recorded. If positive, then an inbound entry is made. If negative, an outbound entry is made.
- Inventory Amount on Hand – This amount is updated for the products involved. New Amount on Hand = Previous Amount on Hand + Difference.
- General Ledger – If Transactional Inventory posting is enabled at Accounting / Setup / Preferences on the General tab.
| General Journal Entry | Debits | Credits |
| Cost value of change | Asset Accounts for each product – Positive if adjusted to larger quantity. Negative if smaller. | |
| Cost value of change | Cost of Sales for each Product |
- Void – The original image of the adjustment is voided. New entries are made to the Inventory Detail file opposite of original. Product amount on hand is affected.
