Overview
Scale Tickets are used to enter and store data for each load received or loaded out.
In the ticket list at the bottom of the Add a Scale Ticket window, highlight a row and scroll to the right to view additional columns. A right-click in the header row provides several additional options such as Choose Columns, Make This Layout My Default, etc.
The ticket list can optionally be filtered. In the Filter List Direction area, choose to filter for Both, Inbound or Outbound which are tickets missing a Gross or Tare Weight, Ready-All, Ready-Inbound or Ready-Outbound which are tickets with both Gross and Tare Weights, or All which includes all the preceding. Select Filter to filter tickets by Date Range, Transferred Status (Transferred, Not Transferred, or Both), Location, or a specific Ticket #. There are also options to Include Imported or Voided Tickets.

- Location – The Location defaults from the scale configuration. It can be changed if necessary by double-clicking in the field and selecting a Location at the Select a Location screen. This field is required.
- Ticket # – A number may default in depending on the setup at Setup / Configure Scale Interface. If No Counter was selected at setup, a number must be manually entered. If Database / Location was selected, the next global number or the next location number defaults. If a location counter is set up, it takes priority over global numbering. With Scale Specific selected, the Next Scale Specific Ticket # displayed on the Configure Scale Interface window defaults. This field is required.
- Ticket Date – The default is the system date. Choose the Calendar to select a different date. This field is required.
- Gross Weight – This is the total weight of the vehicle and the product before the vehicle has been unloaded. This weight can be entered manually or captured if a machine is connected to a scale. Double-clicking in this field brings up previously saved weights for selection. Double-clicking on the lb label enables manual entry if the scale weight reading is 00. This field is required.
- Tare Weight – This is the weight of the vehicle when it is empty. Double-clicking in this field brings up previously saved weights for selection Double-clicking on the lb label enables manual entry if the scale weight reading is 00.
- Net Weight – The Net Weight is calculated by subtracting the Tare Weight from the Gross Weight. This field is cannot be edited.
- Inv Units – After a Product is selected, the Net Weight is divided by the inventory weight per unit and the number of Inventory Units displays. This is only available when the Show/Print Inv Units option is selected at Setup / Company Preferences.
- Note: A preference may be set at Setup / Company Preferences to display this information on a Delivery Ticket Scale Ticket.
- Pkg Units – After a Product is selected, the Net Weight is divided by the package weight per unit and the number of Package Units displays. This is only available when the Show/Print Pkg Units option is selected at Setup / Company Preferences.
- Customer – This field is available if Blend Ticket, Delivery Ticket, or Unknown is set as the Ticket Type. Double-click in this field and select a Customer from the Select Customers window. A Customer may be manually entered but they would not be considered a valid Customer by Agvance and will not carry through to a Delivery Ticket or Blend Ticket.
- Vendor – This is available when the Ticket Type is set as Purchase Receipt. Double-click to select the Vendor for the ticket.
- Product – Double-click in this field and select the Product being weighed from the Select a Product window. There is an option at Setup / Company Preferences that, when unchecked, allows a Product to be manually entered. However, the Product is not considered a valid Product by Agvance. This is available when Delivery Ticket, Blend Ticket (VRT), or Purchase Receipt is set as the Ticket Type.
- Add-Ons – When the Update Delivery Ticket information upon completion option is selected at Setup / Configure Scale Interface on the General tab, this option is available for Delivery Ticket type Scale Tickets. Multiple add-on Products may be selected on the Scale Ticket which then carry forward when the Scale Ticket is imported into the Delivery Ticket. The inventory amount is entered. There is also an option to select if the weight of this Product should reduce the weight of the base Product. Add-On Products print on the SASI-Full and SASI-FP 2 Up Ticket Types.
- Comment 1-5 – Five Comment fields are available. The labels for these comments may be changed at Setup / Company Preferences. Comments to be used repetitively may be saved at Setup / Saved Comments. Use the arrow to select a Saved Comment from the drop-down menu. Comments may also be typed into the Comments field manually.
- Ship To – Select from the Customer’s stored Ship To addresses by using the drop-down. To view the full Ship To addresses stored on the Customer file, double-click on the Ship To heading.
- Ticket Type – Select the type of Scale Ticket being entered from the drop-down menu. Available types to select are Unknown, Blend Ticket, Blend Ticket (VRT), Delivery Ticket, Purchase Receipt, and Pass Through Blend.
- Inbound/Outbound – Select whether this is an Inbound or Outbound Scale Ticket.
- Weighmaster – Double-click to select a user as the Weighmaster. If the Assume Weighmaster is logged in preference found at Setup / Configure Scale Interface on the General tab is selected, the current user logged into Agvance defaults.
- Blend Tk # – Double-click to select a Blend Ticket to associate with the Scale Ticket. This also helps filter when selecting a Scale Ticket on the Blend Ticket. This option is only available when the Ticket Type is Blend Ticket or Blend Ticket (VRT) and may be required based on the Company Preference setting.
- Delivery Tk # – This option is available for Delivery Ticket Ticket Types when the Update Delivery Ticket information upon completion preference found at Setup / Configure Scale Interface on the General tab is not used. Double-click to select the Delivery Ticket associated with this Scale Ticket. The Delivery Ticket number prints on the SASI-Full and SASI-FP 2 Up Ticket Types. Also, by selecting a ticket, this Scale Ticket is only able to be imported into the selected Delivery Ticket in Accounting.
- Change Scale to Use – Select to change to another scale (Scale 1 or Scale 2). The default is the last selected.
- Driver On – Select this option if the driver is on the scale when weighing.
- Capture Gross Weight – Select this to capture the gross weight. This value defaults into the Gross Weight area. This is available in the Weigh mode when Disable Scale is not checked.
- Capture Tare Weight – Select this to capture the tare weight. This value defaults into the Tare Weight area. This is available in the Weigh mode when Disable Scale is not checked.
- Save Weight to File – Select this to save the scale weight being displayed. An opportunity is given to indicate if driver was on or off the scale at the time, enter a description to help identify this weight later, and to enter a Vehicle ID. If a Vehicle ID is selected, the description defaults to the Vehicle Description but may be overridden.
- Print Current Scale Weight – Print the current scale weight being displayed.
- Capture Dual Weight – Capture the combined weight of two trailers at the same time and access a function which allows capturing the weight of the second trailer by itself. The program then calculates the weight for the first trailer. The two trailer weights can be used to create two new Scale Tickets or can be saved so they can be added as the second weight for existing In Process tickets.
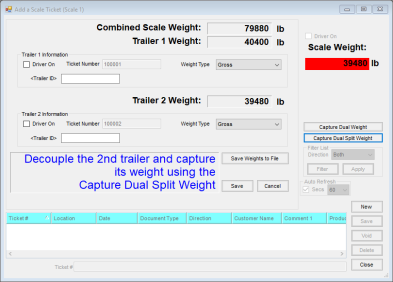
- Select Capture Dual Split Weight after the second trailer has been positioned on the scale by itself (and Driver On, Trailer ID, and Weight Type have been entered). Choose Save. This results in two new tickets being created with an In-Process status.
If trailers are coming back in from the Customer for capture of the second (normally tare) weight, select Save Weight to File after the second trailer has been positioned on the scale by itself (and Driver On, Trailer ID, and Weight Type have been entered). This results in the saving of the two weights which will be available to be added as the second weight on the corresponding in-process ticket.- Driver On – Select this option if the driver is on the scale when weighing.
- Ticket Number – If a counter is set up, the next number automatically populates. If no counter is set up, the ticket number must manually be entered.
- Weight Type – Select Gross or Tare for each trailer. Gross is the default.
- Trailer ID – Double-click in this field to select a trailer from the list of Vehicles entered at Agvance at Hub / Setup / Vehicles.
- Capture Dual Weight – Select this to overwrite the previously captured combined weight of both trailers.
- Capture Dual Split Weight – To create two new tickets, select this to capture the weight of the second trailer. The program automatically subtracts this weight from the combined weight of both trailers to arrive at the weight of the first trailer. Choose Save.
- Save Weight to File – To capture/calculate the tare or gross and save the weights so they can be added to existing, in-process tickets, select this after the second trailer has been positioned on the scale by itself (and Driver On, Trailer ID, and Weight Type have been entered). These weights are then saved and can be recalled when editing the corresponding in-process tickets and double-clicking in the Gross or Tare area.
- Select Capture Dual Split Weight after the second trailer has been positioned on the scale by itself (and Driver On, Trailer ID, and Weight Type have been entered). Choose Save. This results in two new tickets being created with an In-Process status.
- Cust PO # – The Customer’s Purchase Order number may be manually entered and prints on the SASI-California Scale Ticket Type in the Doc No area. It also imports into Delivery and Blend Tickets unless a Cust PO # previously exists on the ticket. If the Customer preference is set to require a Purchase Order number, this entry is then required.
- Lot Number – After a Product has been selected, any Lot Numbers associated with that Product are available for selection from a drop-down menu or may be manually entered. The Lot Number transfers to the Delivery Ticket upon import and updates the quantity for the Lot Number at the Product Information window.
- Driver – Double-click in the field to select a Driver from the list of Applicators entered in the Hub at Setup / Applicators.
- Vehicle – Double-click in this field to select a Vehicle from the list of Vehicles entered in the Hub at Setup / Vehicles.
- Trailer 1/Trailer 2 – Double-click in the field to select a trailer from the list of Vehicles entered in the Hub at Setup / Vehicles.
- Freight Vendor – Double-click in this field to select a Vendor from the list entered in Accounting at File / Open / Vendors.
- Ready for Transfer – Mark this option if the ticket is considered to be complete even though gross or tare equals zero (in the case of hopper bottom bin with weighing element). This allows the ticket to be transferred or imported.
- Auto Refresh – This option allows selecting how often the grid is automatically refreshed to show the most current status of all tickets.
- Void – Voided tickets are marked as Void but remain visible. This option is recommended for companies who have DOT checking.
- Delete – Deleted tickets are removed from the data and are no longer visible.

Agronomy Scale Ticket Process
Create a Scale Ticket to be imported into a Blend, Delivery Ticket, or Purchase Receipt.
- Navigate to Hub / Utilities / Scale interface / Agvance Scale Interface / Operations / Scale Tickets.
- Choose Done on the Scale Interface List Filter window. The Add a Scale Ticket window displays.
- On the Add a Scale Ticket window, choose the Ticket Type. The Ticket Date defaults to the current date but may be edited. Optionally add Comments, Driver, Vehicle, Trailer, Freight Vendor, or Ship To.
Note: Depending on the Ticket Type selected, different options are available.- Unknown – When selected, the Scale Ticket will not be available for import into the additional Agvance transactions.
- Blend Ticket – Select the Blend Tk # to import the Scale Ticket into a specific Blend Ticket.
- Blend Ticket (VRT) – Select a Product. The Quantity will be updated when the Scale Ticket is imported into a Blend Ticket.
- Delivery Ticket – A Customer and Product must be selected to import into a Delivery Ticket.
- Purchase Receipt – The Scale Ticket may be imported into a Purchase Receipt.
- Pass Through Blend – This Scale Ticket can be imported into both a Purchase Receipt and Blend Ticket to record incoming and outgoing Product at the same time.
- Choose Capture Tare Weight to record the weight of the unloaded truck.
- Select Capture Gross Weight to record the weight of the loaded truck.
Note: In-process tickets that have not had both weights captured are listed in the lower grid and may be completed at a later time. - Select Save. The completed ticket, with both weights captured, will be available for import into the Ticket Type selected.
