The steps below demonstrate how Zone soil sampling can be done in Agvance SKY Mapping.
- Select the Grower/Field.
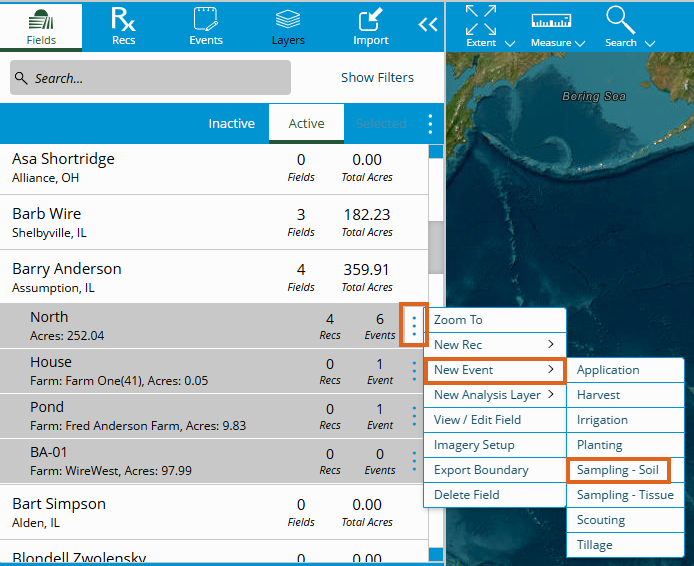
- Choose the Vertical Ellipsis at the Field level. Under New Event, select Sampling - Soil.
- The Zones menu on the toolbar at the top of the screen provides various tools that can be used to create Sampling Zones prior to adding the proposed sampling points.

- Create – Manually draw zone boundaries across the Field. Cross the Field boundary completely to ensure the Zone is properly defined. Acreage updates dynamically when moving the mouse.

- Circle – Manually create a circular Zone or Zones anywhere in the Field (including along any of its boundaries). Acreage updates dynamically when moving the mouse.

- Create – Manually draw zone boundaries across the Field. Cross the Field boundary completely to ensure the Zone is properly defined. Acreage updates dynamically when moving the mouse.
- After Zones have been defined using the Create or Circle tool, the Edit, Union, and Eliminate tools are enabled. To modify the vertices of a Zone, select Edit, then choose a Zone. Hovering over a vertex changes the vertex color to green. Select and drag the vertex to a new location.

- Union – Select the Union tool then two or more Zones to combine those Zones.
- Eliminate – Automate the removal of all Zones smaller than the entered Minimum Area.
- Reset – This resets changes made. Alternatively, select the Delete tool to delete selected Zones.
- There are several automated methods as well to create Sampling Zones.
- Grid – Segment the Field boundary into an array of grid cells by Area or Dimensions. To adjust the position of the grid, select and drag to the appropriate position. Right-click and drag to rotate the grid about its center point. When finished, select Create Zones.

- Area – Select the Area option, then enter a value in acres.
- Dimensions – Select the Dimensions option, then enter the Width and Height values.
- Buffer – Create a Field boundary-buffered Sampling Zone. On the window that displays, indicate if the buffer should be created using the Field Boundary, Measure Tool, Non-Field Feature, or Partial Boundary. Select Add Buffer.
- Field Boundary – Create a buffer based on a setback distance. Choose a Unit of measurement and enter a Distance.
Note: Multiple buffers can be created at varying distances.
- Measure Tool – Create a buffer based on manually drawn points, lines or areas. Select the Measure menu found to the left of the Zones menu. Options for Area, Line, and Lat/Lon will permit manual placement of a point, line, or area respectively.

- Non-Field Feature – Create a buffer based on a non-Field feature such as a Field Entrance. Choose Non-Field Feature from the drop-down, then select a Unit of measurement and enter a Distance.

- Partial Boundary – Create a buffer based on a specified running length of the Field boundary. While holding the Shift key, select the Start and Middle or Start, Middle, and End vertices of the Field boundary where the buffer should begin and end. Select a Unit of measurement and enter a Distance.

- Field Boundary – Create a buffer based on a setback distance. Choose a Unit of measurement and enter a Distance.
- Grid – Segment the Field boundary into an array of grid cells by Area or Dimensions. To adjust the position of the grid, select and drag to the appropriate position. Right-click and drag to rotate the grid about its center point. When finished, select Create Zones.
- Once Zones have been created, open the Sampling menu.

- Manually place points using the Add/Select or Composite tool. Use the Delete tool to remove selected points as necessary.

- Add/Select – Place individual Sampling points.
- Composite – Locate multiple soil samples that will be collected as a composite sample.
- Complete General Information to complete the Zone Soil Sampling by entering an Event Name, Timing Info, and any other pertinent details.
- Select Save to create and save the Event.