Agvance Energy Dispatch users can view route lists displayed in a grid populated by the first 500 Ready status Energy Work and Delivery Orders based on ticket number (highest to lowest).
The list can be narrowed down by selecting the Filter icon and entering a filter criteria on any grid cell or with the search bar located in the header. When typing, the grid will populate based on the text entered. Choose the Ellipsis at the top to Reset Grid from filtering or Autofit Columns.
For more information on how to use the Agvance SKY Energy Route Management grid see, Using Grids in Agvance SKY.

Columns and Filters
- Ticket Number – Formerly known as Call In ID. Selecting will show a full page view of the Product Delivery Order information in a new tab.
- Out of Gas – If the order was marked Out of Gas, the column will display Yes. If the order was not marked Out of Gas, the column will display No.
- Estimated Left (%) – If a Tank has a reading within the last five days, a percentage bar will show along with percentage amount.
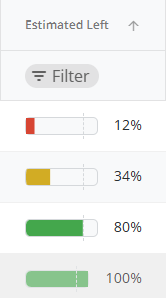
- Very low/Critical, under 25%, will be seen as red.
- Low levels but not yet critical, 26% - 50% will be seen as yellow.
- Normal levels, 51% - 100%, will be green.
- If a tank does not have a tank reading within the last 5 days, the cell will display a double dash ( - - ) or empty.
Note: The dotted line on the 80% level is to give a better reference based on propane fill % standards.
- Ticket Type – Will display as Product Delivery Order or Energy Work Order
- Status – This column defaults to show Incomplete first. To change the Dispatch Status from the grid, select the Status icon as long as it is not Completed. A window displays to select a new status.
Note: Choosing Completed as the Dispatch status and saving will also populate the current date in the Completed Date field. - Location ID
- Location
- Call In Date
- Schedule Date
- Due Date
- Complete Date
- Customer ID
- Customer – To view more Customer details, select the Customer name link to open that specific Customer’s Agvance SKY Customer Overview page.
- Credit Status
- Tank Serial Number – Navigates to the Tank Information page.
- Tank Description
- Product ID
- Product Name
- Deliver By
- Tank Size
- Tank Address
- Tank City
- Tank State
- Tank Zip
- Salesperson
- Driver Name – Select a Driver in the Driver Name column to change a Driver from the grid. The Driver Search table displays to select a new driver(s) then select Select & Close to save the Driver and update the grid.
- Route
- Region
- Geo Reference

Note: Any field without data will show a double dash (--).
The Filter button can be selected to narrow down scheduled Routes by Location, Status, Driver, Tank Type, Region, Route, Product, Out of Gas, and Date (Call In Date, Due Date, Scheduled Date, Completed Date). After selecting desired filter options, choose Apply Filters. To reset the filters, open the Filter panel, scroll to the bottom and select Reset Filters.

Create Schedule
Creating schedules in Agvance SKY Energy from the Route Management page requires the Agvance SKY Admin permission Manage Route.
- If the permission is on, a check box column becomes available and Select a row to begin scheduling process. displays at the top of the page.
- If the permission is not on, no check box column shows and no additional helper text is displayed. This will be view only.
- To create a schedule, select the checkbox for a row and the + Manage Job Schedule button displays in the bottom right.
- Validations are displayed first if applicable to any orders
- If one or more selected rows have Product Delivery Order Status as Complete or On Hold or if the Tank Status linked to the order is On Hold the following message displays. Go Back is the only option available and creating a schedule cannot move forward until the line is unselected.

- If the selection does not have a Geo Reference, a message displays stating selections do not have a Location entered for either the Tank or Customer associated and will not be shown on the map. The order will still be available to see on the Driver’s schedule.
 Continue will navigate to the Manage Job Schedule page while Go Back returns to the previous page with all selections still checked.
- If one or more selected rows have Product Delivery Order Status as Complete or On Hold or if the Tank Status linked to the order is On Hold the following message displays. Go Back is the only option available and creating a schedule cannot move forward until the line is unselected.
- Validations are displayed first if applicable to any orders
- Manage Job Schedule Page:
- Driver – Select a single Driver to populate on all jobs when saved. Not a required field.
- Status – Select a Status to be assigned to all jobs when saved. Not a required field.
- Grid detail:
- Job Order Number – Enter a Job Order Number if one was not already previously assigned. If one was assigned and needs removed, select the X next to the Job Order Number. Choosing Cancel on the confirmation window will close the message and choosing Remove will remove the Job Order Number from the grid.
- Tank Serial Number – Redirects to Tank Information page in a new tab.
- Customer ID
- Customer – Redirects to the Customer Overview page (when Agvance SKY Customer access is available).
- Ticket Type – Product Delivery Order or Energy Work Order.
- Driver ID – Driver currently assigned if available.
- Driver Name – Driver Name assigned if available.
- Job Status – Current status of job.
- Estimated Left – Estimated % left on tank for this job.
- Product ID – Product detail assigned to this job.
- Out Of Gas – Yes or No (if flagged on the Order).
- Must Be First – Yes or No (if flagged on the Tank) when the Tank must be the first stop of the day.
- Remove – Removes the line from job schedule.
- Select Save Schedule to create the schedule and return to the Route Management page (similar to the process in Agvance Windows Energy Dispatch).
- Select Cancel to cancel scheduling the job. A message displays to choose to Continue and no changes will be saved.
Note: Pressing Tab on last entry might be necessary to allow the Save Schedule button to activate.
- Select Cancel to cancel scheduling the job. A message displays to choose to Continue and no changes will be saved.

 Continue will navigate to the Manage Job Schedule page while Go Back returns to the previous page with all selections still checked.
Note: If any filtering is applied on the Route Management page when the Select All checkbox is chosen, only the filtered selections will come over to the Manage Job Schedule page.
Map view coming soon!
