The Select a Container window is located at Hub / Setup / Refillable Container Management. At this window, Add, Edit, or Delete Containers, add activity information for a specific Container, generate one of the four Container Reports that are available, establish functionality Rules, and set up Materials of Construction or Seal Materials. Several filtering options are available to help isolate specific Containers.
Selecting Delete on the Select a Container window allows the currently highlighted Container and all related activities to be deleted.
Since the Container record-keeping regulations require records to be kept for three years, Agvance has been coded to only allow the Container to be deleted if the Container does not have any activities within the past three years. However, any Container can be marked Inactive to remove it from selection lists.

Adding a Container
Select Add from the Select a Container window will displays the Add a Container window where the initial setup information for a container is entered.

The only information required before a container can be saved is the Container ID.
- Container ID – Enter a unique ID used for the container.
Note: If using the Contain app, using a bar code with no alpha characters as the Container ID gives the ability to search within the Contain app by scanning the bar code of the container. - Alt. Cont. ID – This is an optional field for an alternate Container ID.
- Owner’s ID – This is an optional field.
- Tank Type – As tank types are manually entered and saved, those types are added to a list and are available for selection when adding or editing any Container.
- Manufacturer – Select the appropriate manufacturer from the drop-down.
- Owning Location – If a multi-Location company, select which Location owns the Container.
- Current Location – If a multi-Location company, select the Location where the Container is currently located.
- Capacity – Enter the holding capacity of the Container and select the capacity unit of measure.
- Fill Status – Indicate the Fill Status of the Container from the drop-down.
- Material of Construction – Double-click to select from a user-defined list. Materials may be added to this list by selecting Materials of Construction found at Setup / Refillable Container Management.
- Seal Material – Double-click to select from a user-defined list. Materials may be added to this list by selecting the Seal Materials option found at Setup / Refillable Container Management.
- Note – Use this section to enter any additional information regarding the Container.
- Owned By – Indicate whether this Container is owned by the company, a Customer, or a Vendor. If owned by a Customer or Vendor, double-click to select the appropriate Customer/Vendor.
- Approved Products – Select any Products that may be placed in the Container. Choose to be warned or stopped when filling ineligible Products into a Container. To enable this functionality, the Container Fill Validation Rules, found when selecting Rules on the Select a Container window, must be set to either Warn or Stop for the Approved Product for Container line item and the approved Product(s) must be added to the Approved Products grid. Refer to the Rules tab for clarification. The Product line items on Delivery Tickets, AR Invoices, Purchase Receipts, and Purchase Invoices are required to have a Container selected if the Required checkbox is selected on a matching item in the Approved Products grid.
- Scheduled Test Requirements – Indicate the frequency at which scheduled tests are required for a Container. Agvance will use these settings to determine if a Container is due for a scheduled test when filling a Container. A warning level can then be selected for use. Refer to the Rules tab for additional information.
- Tamper Evident Device # – A number may be added in this area for the tamper evident device on this Container.
- Date of Manufacture – Optionally enter the date the Container was manufactured.
- Attachments – Selecting Attachments displays the Attachments window where files can be stored on the Container, or files that have been previously attached to the Container record can be viewed. An example of a file that might be attached is a picture of the container.
- Add Activity – This allows activities to be added for the Container. Activities available are Inspect, Fill, Delivery to Customer, Receive from Customer, Receive from Vendor, Send to Vendor, Cleanout, Information, Maintenance, Unload, Scheduled Test, and Remove from Service.
If the data has the same Product in multiple Inventory Departments (possibly across Locations), then setting up a single Product in the Approved Products grid will make any matching Products eligible for refill if:
- The Product ID from any existing department matches the Product ID of any of the Products in the grid, and
- The Product being filled has an Inventory Department Category that matches the Inventory Department Category of the matching Product ID line item in the grid.

Editing a Container
Selecting Edit on the Select a Container window opens the container information which can be edited and/or add activity records for a specific container.
Selecting Add Activity allows an activity to be added for the Container. The container activities that are available are: Inspect, Fill, Delivery to Customer, Receive from Customer, Receive from Vendor, Send to Vendor, Cleanout, Information, Maintenance, Unload, Scheduled Test, and Remove from Service.

When adding a Fill activity, a Transfer inventory from Product checkbox is available. When this option is selected, a Product can then be selected to transfer. With the checkbox selected, saving the activity will create a Manufactured Inventory entry in the background and update the inventory of the Fill Product (finished good on the Manufactured Inventory entry) and relieve inventory of the Transfer Inventory from Product (raw good on the manufactured inventory entry). The Unload activity has similar but opposite functionality.
When the Transfer inventory from Product checkbox is not selected, no manufacture or inventory movement will occur.
![]()
Rules
Choosing Rules from the Select a Container window displays the Setup Container Fill Validation Rules window. In this area, establish Warning Levels as validation rules for six different scenarios when filling Containers.

Note: Container Fill Validation rules only apply to the Refillable Container Management window and activities. They do not apply to transactions or other activities outside of this window.
Rule scenarios
- Approved Product for Container – Attempting to put a Product in a Container that is not on that Container’s approved Product list.
- Exceeding Container Capacity – Attempting to put a quantity of Product in a Container that exceeds its rated capacity.
- Inspection Completed – Attempting to put Product in a Container before an Inspection activity has been recorded.
- Matching Prior Product – Attempting to put an approved Product in a Container that is different than the previous Product that was put into the Container when no Cleanout activity has been recorded.
- In Compliance with Scheduled Tests – Attempting to put Product into a Container where a pressure test has not been recorded within the required 30 month time frame. (This specific time frame must be set up on each Container that must undergo the test.)
- Already Filled – Attempting to fill a Container when the Status is already set to Filled.
- Use EPA# for matching prior product – This checkbox changes the Matching Prior Product functionality to use the EPA# to determine if the Product matches the prior Product in the Container instead of using the Product ID and Inventory Department Category to determine the match. The Matching Prior Product rule will still need to be set to the appropriate Warning Level.
Warning Levels
- None – The transaction goes through without receiving a message.
- Warn – A warning is given first and then an option to continue.
- Stop – Saving the transaction is automatically stopped.
Setting up Materials
Materials of Construction
Selecting the Materials Of Construction button from the Select a Container window allows materials of construction descriptions, based on industry standards, to be added. Materials of construction IDs and descriptions can also be edited or deleted. Materials of construction are available for selection from a list when adding or editing container information or setting report criteria for container reports.

Seal Materials
Depending on the chemical in the container, seals must be a certain material so as to not deteriorate on contact. Selecting Seal Materials button from the Select a Container window allow seal material descriptions, based on industry standards, to be added. They can also edit or delete seal material IDs and descriptions. Seal materials are available for selection from a list when adding or editing container information or setting report criteria for container reports.

Reporting
Selecting Reports on the Select a Container window, found at Hub / Setup / Refillable Container Management, provides access to four types of Container reports that are available to help manage refillable Containers.

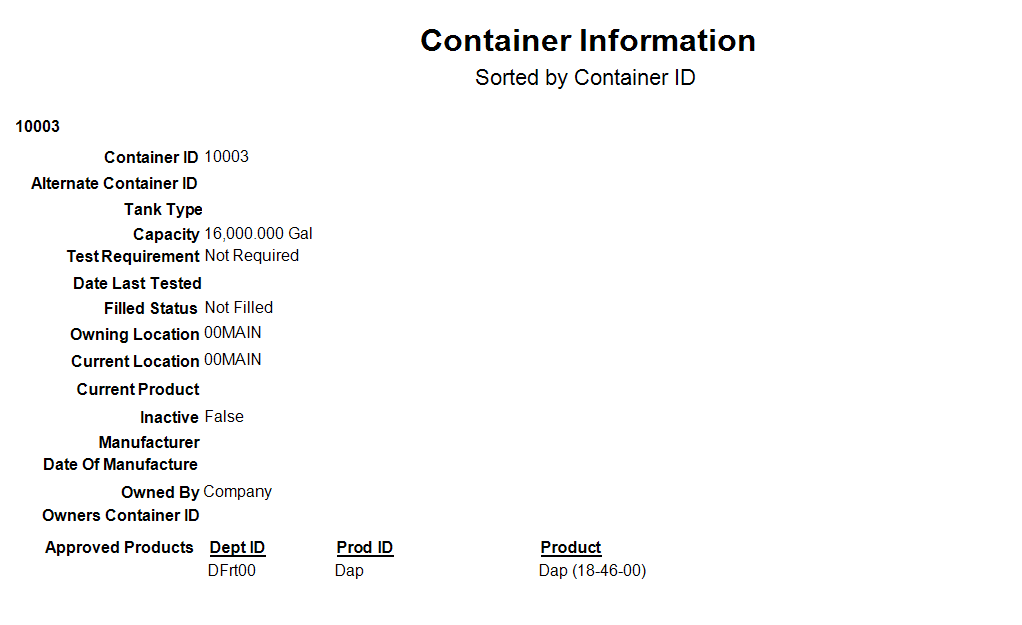
- Container Information – The current information for the selected refillable Containers is displayed.
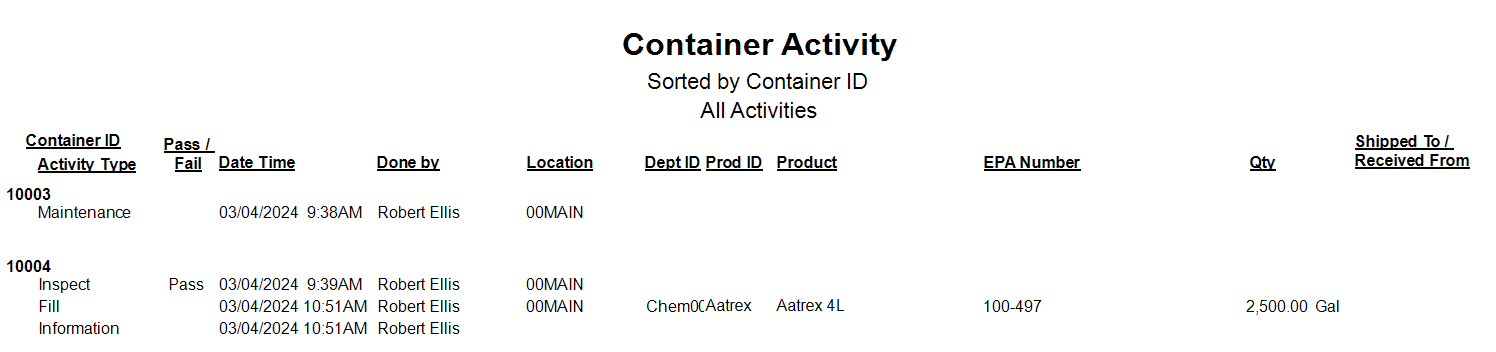
- Container Activity – Activity history for the selected Containers is displayed.
- Container Status – Details of the last activity on record for the selected Containers is displayed.

- Pressure Test Status – Test frequency and dates for the selected Containers are displayed.


