Product Sets are set up and maintained at Blending / Setup / Product Sets.
Overview
Product Sets are groups of inventory items often combined as blended products. This involves grouping fertilizer or other products (i.e. water, clay, or dry filler) typically used when filling a requested analysis or nutrient recommendation. For example, when creating a fertilizer blend, two or three dry Product Sets may exist where the nitrogen source is different because of customer preference or product prices. There might also be one Product Set with a pre-mixed micronutrient product and others with the micronutrient products listed individually.
Note: Chemicals and services should not be included in the product grid of the Product Set. This Product grid is for fertilizer items only.
The sets determine the inventory products used to satisfy a particular analysis. They also determine the order Products printed on the Blend Ticket and the order the Products are loaded.
Product Sets are Location-specific, therefore they can be set up to pull inventory from different Locations. The Location where the Product Set will be used must be specified in the setup. When creating a Blend Ticket, only Product Sets for the default Location are available for selection. Also, if a user is restricted from a Location’s Products, Product Sets assigned to the restricted Locations are not available.
Each Product Set stores the information necessary for Agvance to interface with various automated blenders. This information is Product Set-specific, therefore may be different for each Product Set.
Within each Product Set, the Products used are selected when creating a Blend by marking the Product as Active. Each nutrient in the formulation may be flagged to indicate if it is allowed to run over the requested amount in order to achieve a specific analysis. The Products in the Product Set may also have constraints placed on them as to the amount of a given nutrient they can contribute to the blend. This can also be used to set a minimum and/or maximum amount of a nutrient a product will supply.
Companies that blend dry and liquid products may have several Product Sets where the source of nitrogen is different in each set. One set could include certain micronutrients and another one not. Another option is to have a liquid and dry set containing all the Products a Location would use. The Products may be marked Active. The inactive Products are not used in the blend. If Products are inactive in the Product Set, blending order is still important because inactive Products are skipped when the Product Set is used on a Blend Ticket.
Product Set names must be unique across all Locations. If the Product Set name is not unique, a message will display stating the Product Set already exists. One suggestion to keep Product Set names unique would be using a Product Set name strategy such as 1Dry, 2Dry, 3Dry, etc., using a Location number to identify.
General

- Set Description – This displays in the list of possible Blend sets to help identify the set when adding a Blend Ticket. Be as descriptive as possible in the space provided. There are 15 characters available for the description.
Note: Apostrophes ( ' ) and Slashes ( / \ ) are invalid characters and should not be used in the Set Description. - Type – Select from the drop-down to identify the type of blend set. Choices include Dry, Liquid, Suspension, Feed, and Other.
- Dry – This calculates density in Lbs/Cubic Foot. It causes the blending process to be aware of any dry filler.
- Liquid – This calculates density in Lbs/Gallon. It causes the program to be aware of the use of water and clay. Blending capacity may be stated in gallons when working with liquid blends.
- Suspension – This calculates density in Lbs/Gallon. The suspension setting causes the minimum amount of water to be calculated so the sum of all nutrients does not exceed the suspension target percentage or given salt out temperature specified in the Product Set.
- Feed – This setting changes Acres to Tons on printouts and reformats the printed batch tickets for feed.
- Blender Capacity – This is the default for the blender used to mix the product (may also be used as the capacity for the spreader). The capacity affects the number of batches required for the blend. The capacity may be overridden on the Blend tab when generating a Blend Ticket. Also, indicate how batches are measured – Lbs, Gal/CuFt, or KG.
- Water & Clay Rate/Acre – If the water and clay percentages are not used, these optional Rate/Acre settings may be used to indicate the default amount of either item to include. They must be included in the list of Products as well as in the Key Inventory Items to be used.
- Minimum Gal/Acre – Applicable only to liquid and suspension blend sets, the program adds enough water to meet this minimum if the calculated Gallons/Acre falls below this figure during the formulation process. If filled out, when a Blend Ticket is created, an amount of the water product is added to the Products tab to ensure the blend meets this minimum setting.
Note: To use this setting, water must be one of the Products listed in the set and that same item must be listed as the Water Key Inventory Item. - Water % & Clay % – These optional settings cause water and/or clay to be added in as a percentage of the total product. If using these percentages, the Clay Rate/Acre and Water Rate/Acre must be zero or blank. To utilize either of these items, they must be included in the list of Products making up the Product Set and in the Key Inventory Items.
- Inactive – A checkmark indicates the Product Set is inactive. Marking a Product Set inactive prevents it from being available in the list of Product Sets on the General tab of the Blend Ticket window.
- Key Inventory Items – Double-click in the field next to each item to display the Select a Product screen. Indicate the inventory Product for each of the items listed. Note the Product used for clay must have a clay percentage filled in on the Product’s Blend Setup tab (found at Hub / File / Open / Products). The Inventory Department and Product ID display to the right of the items for quick reference.
Note: Key Inventory Items must be filled out, even if they are not used. When this is the case, select an item that would not be used on a Blend or Plan, such as Finance Charge. - Batch Defaults – Choose from Equal Load Amounts or Partial Based on Capacity options.
- Location – Specify the Location for this Product Set. Only the Product Sets created for the Location assigned to a Blend Ticket are available for selection when the Blend Ticket is created. When an existing Blend Ticket is edited, Product Sets from all Locations are available to use as needed.
- Visible to Dispatcher Only – A Product Set with this option selected is not visible to blend operators when adding or editing a Blend Ticket unless the dispatcher has saved the Blend Ticket with one of these Product Sets assigned to it.
- Ship from Location – This option relates to the Dispatch module only. Specifying a Ship From Location on the Product Set allows the Dispatcher to be in more control of Products available when selecting Product Sets in Dispatch to create automated blender files. This is available regardless of the selections in Accounting for the Ship From Location or Sell From DeptID preferences. Setting a Location on a job through one of the viewing options (Ship From or Sell From) has the original Product Set associated with the blend as well as any other Product Sets from other Locations which match that Location, available in the Product Set drop-down list.
- Allow Nutrient to Run Over – Check any nutrient allowed to run over the requested analysis during formulation. When unchecked, the formulation blends low on one nutrient to avoid running over on another, if necessary.
- Product – Select up to 50 different items that may be used to satisfy an analysis. All items must be in the Product list. If clay and/or water or dry filler are to be added automatically on a Blend Ticket, they must be on the list of Products.
Tip: Double-click in the first available row under the Product column to display the Select a Product screen. Select the Product needed and choose Done. - BO (Blending Order) – This is the order the Products appear on the printed Blend Ticket and therefore the order the Products are actually mixed. This order also appears on the Invoice if pricing is done on a Product-by-Product basis. The order may be overridden by selecting Reorder Products on the Blend Ticket.
- Invoice – A checkmark indicates this item should display on the Invoice. Products included in a blend but at no charge could be unchecked. However, if pricing by analysis, the quantity may be inaccurate if an analysis item is not checked to be invoiced. Therefore, only uncheck Products that do not need to be on the Invoice. If creating Blend Tickets for chemical blends, a Product Set is needed specifically for that purpose. The chemical Product Set will only contain water in the Product grid.
- Active List – This column determines the Products available to use when fulfilling the requested analysis. This is helpful when Products are frequently substituted. Some companies make one large Product Set and set the Active flag when formulating a blend. However, dry and liquid Products should be on separate Product Sets for the proper density to display.
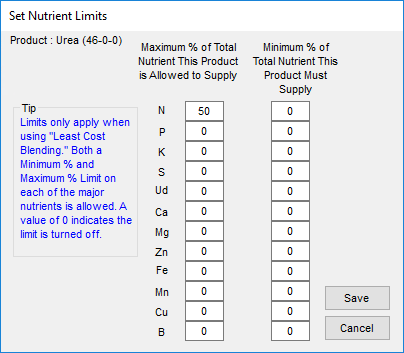
- Set Limits – This is used to set the maximum and minimum limits on the nutrients. The following screen is an example of setting constraints on a Product.
 Warning: If too many constraints are set, the formulation may not be able to return a blend that meets the analysis request and ALL the constraints set. If this happens, a warning appears stating the nutrient goal was not met.
 - Insert Row – Highlight a row in the Product grid then use this option to insert a Product above the selected row. This allows a Product to be added after the initial setup of the Product Set.
Blender Interface / Print Preference

- Automated Blender Type – If interfacing with an automated blender, indicate the type of blender. Call SSI if the desired unit is not listed.
- Blend Factor to Use – This allows the same Product to have multiple blend factors by using the Product Attributes set up on the Profile tab at Hub / File / Open / Products.
- Data Storage Path – It is recommended that the Data Storage Path be set to the UNC path (ex. \\computername\drive\).
- Round Done Amounts to Scale – This option rounds amounts of completed product from the automated blender based on the scale settings on the Product’s Inventory Department.
- From Remote – Available for the Murray Remote type blender, enter the path where the blender file is located.
- Shipped from Location Code – Available for SSI Standard XML Murray Remote, Murray Liquid Extended 2, and Murray Dry Extended 2 Blender Types, this option includes the remote blend ID location in the file.
- Alternate Complete Extension – For the Murray Liquid Extended 2 and Murray Dry Extended 2 Blender Types, this option allows an extension to be set for done files from Murray. A service running for Agvantage often deletes the file that Agvance would normally read, so this alternate complete extension allows the files to not be deleted by Agvantage.
- Use Blend Factor as Product ID – This allows the Blend Factor to be sent as the Product ID for Murray Remote, Murray Liquid Extended 2, and Murray Dry Extended 2 Blender Types.
- Expiration Date – For the Murray Remote Blender Type, an expiration date for the files may be set. Files dated past this expiration date are not recognized as valid files.
- Ranco Blender Settings – This allows setting this Product Set to figure and print the RPM settings needed to operate a non-digital Ranco Blender by setting the Maximum Capacity (Lbs/Min) and the Dial Setting Maximum.
- Suppress Blend Ticket Load Checkboxes – Selecting this option overrides the printing of the boxes representing multiple batches for this Product Set on the Blend Ticket.
Advanced - General
Used for liquid and suspension blends, this screen allows customization of several options.

- Salt Out Parameters – Selecting the Use Equations option activates the use of Formushare equations to calculate salt out temperatures. If Use Equations is unchecked while one of the five Systems is selected, Agvance uses the original/alternative method. The System drop-down has several choices. Select the option that best fits the need.
- System:
- (None) – No salt out temperature will be calculated.
- No Poly UAN – This is for solutions containing Urea Ammonium Nitrate (UAN) solution and no ammonium polyphosphate.
- 55% Poly UAN – This is for solutions using standard quality polyphosphate and UAN solution as their primary ingredients.
- 70% Poly UAN –This is for solutions using higher quality polyphosphate with UAN solution as their primary ingredients.
- No Poly Urea – Use this for solutions using Urea solutions and no ammonium polyphosphate solution.
- 55% Poly Urea – Select this for solutions using standard quality polyphosphate and Urea solution as their primary ingredients.
- Base Grade – This is a Product that can be preloaded. This inventory item must be listed in the Product Set and have the percentage filled out to preload. For this to show up on the Field Plan, there must be a % of Base to Preload figure other than zero. This Product is listed at the top of the Blend Ticket (just under water if water is also preloaded) regardless of its Blend Order status in the list of Products.
- Formulate to a given Salt Out Temp – Select this option to allow the program to verify the salt out temperature during formulation and adjust if needed. This option is only available for Suspension type Product Sets and when Use Equations is not chosen. One of the Salt Out Parameter Systems must be set to formulate to a salt out temperature.
Note: If formulating to a given salt out temp, the Suspension Blend Target % must be set to 9999. - Maximum Salt Out Temperature – Enter the maximum salt out temperature used for a Suspension Product Set. Use Equations must not be checked for this option to be enabled.
- Suspension Blend Target % – This is the total analysis % (sum of the nutrients’ percent concentration) that the guaranteed analysis cannot exceed when formulating a Suspension blend. If the percentage is higher than this number, a prompt appears for the blend operator to decide if water is to be added to the blend until the total of the nutrients’ guaranteed analysis is at or below this setting.
- P% Guaranteed Limit (999=Off) – This upper limit setting for the P2O5 Guaranteed Analysis adds water to the blend until this blend’s P2O5 guarantee is at the upper limit entered here. This is used by companies when the amount of a product should be limited, such as Acid, to keep the fertilizer mixture from getting too hot. A setting of 999 deactivates this checking.
- % Chlorine Warning (0=Off) – This is the percentage at which a warning is displayed after formulating a blend. If set to zero, the warning is disabled.
- % Water to Preload – If completed, the percentage of water is listed first on the Blend Ticket regardless of its Blend Order.
- % of Base to Preload – If completed, the percentage of the Base Grade Product is listed first on the Blend Ticket regardless of its Blend Order.
Advanced - Add On Products
This may be set to add any Product automatically to a Blend Ticket or Field Plan when formulating to an analysis. Double-click the Product heading and select the Products to add. Each product marked as Active is added to the Blend or Plan when Formulate is selected. This is often used for items such as delivery charges, mixing fees, or surcharges.
The Fee Item option should not be checked if the Add On Product is to be charged per acre, such as custom application. If the Product is to be charged per pound or per unit of blended material, the Fee Item option should be checked.

Product Set Constraints
Below are some details on how the nutrient constraints are calculated. These constraints are added at the Product Set screen by selecting Set Limits located to the right of the Product to be limited.

The constraints are entered as a percentage of the nutrient to which they apply. For example, if the requested Guaranteed Analysis of N is 10% and half the Nitrogen is to come from a given Product, the limit for that product is set to 50.
If an exact rate per acre of a Product is needed, some math must be done ahead of time to calculate the percentage the desired Product contributes to the analysis. For example, a field needs 200 lbs per acre of a particular Product, UAN 32%. The entire final blend will have a Guaranteed Analysis of 23%N. The blend rate per acre of that final blend is 500 pounds.
The amount of Nitrogen the final blend is applying is 115 pounds. The Product desired, UAN 32%, at the given rate of 200 lbs contributes 64 pounds. To get the percentage supplied by the UAN 32%, divide 64 by 115 (0.5565). This is multiplied by 100 which equals 55.56% and that is entered as the minimum and maximum percentage in the Set Limit for the UAN 32% product.
