Information for each type of Commodity being purchased, sold, and/or stored is entered here. This information is used throughout the Agvance Grain program as Scale Tickets are entered, commodities are received, and grain is shipped. Commodity specific factors may be established that affect the quantity and dollar value of the transaction (shrinkage and premium/discount factors).
If a commodity is handled at more than one location, it is only necessary to enter it once. It is then available at all locations.
Add various commodities at Grain / Setup / Commodities.

- Commodity ID – This required field is the primary reference used to identify the Commodity. The maximum number of characters allowed in this field is 6.
- Name – Enter the name of the Commodity. This name displays when selecting the Commodity in list boxes. The maximum number of characters allowed in this field is 30.
Note: For some reports, it may help to keep the names as short as possible. For example, DPR and TPR. - Inactive – Select this option if the Commodity is inactive. There must be no open activity to allow the Commodity to be saved as inactive. This removes it from all transaction selection windows and report selection options.
- Unit of Measure – Enter the unit of measure to be used to inventory this Commodity. Abbreviations are acceptable and encouraged. The maximum number of characters allowed in this field is 6.
- Lbs/Unit – Enter the weight in pounds of one unit (of measure) of this Commodity. This is often pounds/bushel.
- Units/Metric Ton – Entering the units per metric ton in this area allows bushels to be converted to metric tons.
- Decimals – This is the number of decimals the program uses to calculate and display quantity for this Commodity. Although the quantity is stored as four decimals, this controls the display of the quantity with options 0-4 being the choices.
- Min Price/Max Price – Optionally set the minimum and/or maximum prices that may be saved when entering prices on priced Scale Tickets and priced Settlements (Priced, Installment Sale, and Deferred Payment).
- Commodity ID Cross Reference – These are four non-specified fields typically used as a cross-reference for this Commodity when interfacing with another application. One application that requires one of these fields is the e-ADM import.
Location Receiving Totals
This area of the Commodity setup is Location-specific and displays summarized receiving and shipping information for the Commodity. Multi-Location companies can view this information per Location by selecting different Locations from the drop-down located directly under the Location Receiving Totals heading. Locations are set up in the Hub or Accounting at Setup / Locations.
- Location – Once a Commodity is set up, it becomes available for use by all Locations. Location-specific information about the Commodity is available by selecting the Location in the drop-down.
- Print on DPR – Select this option to allow the Commodity to print on DPR reports and the Grain View function.
- Print on TPR – This option allows the Commodity to print on the Trading Position report.
- Agvance Product Linked to this Commodity/Location – Double-click in this field to link this Commodity with a Product set up in Agvance Accounting. This linked Product is used when creating an Invoice from the Shipment.
Note: The linked Product must have the Unit Weight filled out appropriately for the Inventory Unit. - Agvance Grain Bank Product Linked to this Commodity/ Location – Select the Product to be used in Accounting when Grain Bank grain is invoiced. This must not be the same Product used to link the Commodity/Location which is used for local sales.
- Patronage Category – Double-click Category to select any appropriate Patronage Categories for the Commodity. Also select if paying on Regular Settlements, Direct Shipments, or Both.
- Tax Code – If there is a Settlement Deduction to be associated with this Commodity/Location, double-click and select the appropriate code.
- Override Master Schedule – Enter the schedule to be used instead of the master for the Commodity/Location. This schedule overrides the master for any premium/discount, shrink, or dock tables set to this schedule.
- Setup Charges – Set Settlement defaults and default Product IDs for invoicing Storage/Service Charges per Commodity/Location.
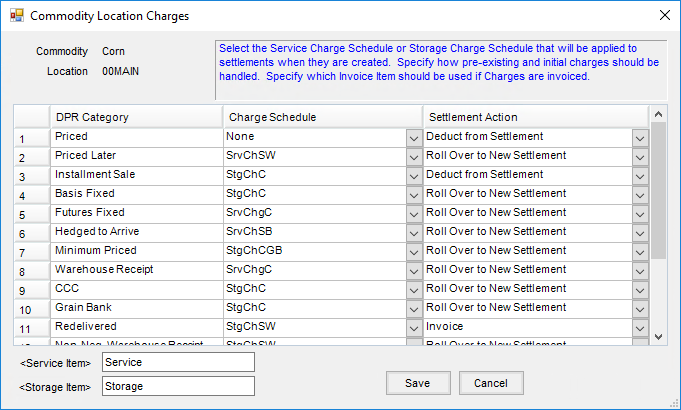
- DPR Category – This represents the ToDPR selected in the Source section of the Settlement screen.
- Charge Schedule – Select the Charge Schedule to default when settling to the corresponding DPR Category. The default may be changed.
- Settlement Action – This determines how the Accumulated Storage/Service Charges are handled on a Settlement.
- Service Item – Select the Product to use when service charges are invoiced.
- Storage Item – Select the Product to use when storage charges are invoiced.
Note: Even if not invoicing Storage/Service Charges, these two items must be set up for running the Storage and Service Charges report.

Grade Factor Grid
- Grade Factor – Double-click to add Grade Factors specifically associated with this Commodity.
- Min Value – Enter the minimum value for each Grading Factor. If there is no minimum value, enter 0.
- Max Value – Enter the maximum value for each Grading Factor. If there is no maximum value, enter 999.
Note: If used, these values act as the data entry validation ranges on the Scale Ticket and Settlement windows. - Allow Skip – Selecting this for a Grade Factor allows Scale Ticket information to be saved without entering a result for this Grade Factor.
- Use Average – Select to average the result of the open Scale Tickets for this Grade Factor/Commodity.
- Default Value – Enter the default value to populate on Scale Tickets being added in Agvance Grain and Agvance Grain Scale Interface.
Reshrink to Average Moisture
- Require Prepare for Settlement – If selected, Assemblies for the Commodity are not available for settlement until Prepare for Settlement is selected on each Assembly.
- Include Zero – Selecting this option includes moisture results of zero in the averaging.
- Grade Factor – Select the Grade Factor to be averaged.
- Assembly Average – This option allows all the Scale Tickets on the Assembly to be eligible for averaging.
- Daily Ave. of – This option applies a daily average for Scale Tickets on Assemblies to the Grade Factor based on the specified range.
- High/Low Divide – This is a set value at which a warning occurs if an Assembly has test results at or above this value which are too high to be averaged with other Scale Tickets on the Assembly. Scale Tickets with this value or higher should be put on a different Assembly.
- Decimals – This sets the number of decimal places to be included in the averaging results.
- Grades – This is where Warehouse Receipt Grades are defined by the test results of each Grade Factor that affects the Grade for the Commodity being edited.
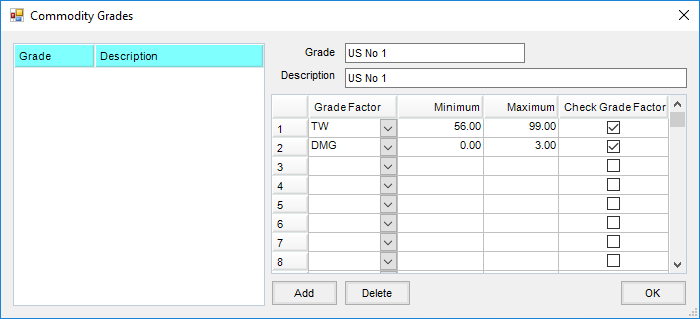
- Grade – Enter an ID for the Grade.
- Description – Enter a description for the Grade.
- Grade Factor – Select a Grade Factor from the list.
- Minimum – Enter the minimum value for the Grade Factor.
- Maximum – Enter the maximum value for the Grade Factor.
- Check Grade Factor – Select if this is a Grade Factor to be used to determine this Grade.
- Classifications – Select a Classification to be applied to the Commodity.

