As Product is received, the receipt may be entered in Accounting at Inventory / Purchase Receipts using the Bill of Lading ticket and optionally referencing a Purchase Order. This action increases the amount of Product on hand. If the Product’s Inventory Department is marked to use Estimated Average costing, then the Estimated Average Cost is updated when the Purchase Receipt is saved. If the Inventory Department is not marked to use Estimated Average cost, costing of the Product and posting to Accounts Payable occurs when the Purchase Invoice for the Product is entered.
Only limited edits are allowed on a Purchase Receipt. The notes are available to be edited but Products and quantities cannot. A Purchase Receipt entered with the wrong Vendor, Product, or quantity must be voided and re-entered.
Start With is helpful when adding several similar receipts of Product. Enter one Purchase Receipt then use it as a template for entering the remaining loads, changing the ticket number, quantity, etc. Start With is found on the Select a Purchase Receipt screen at Inventory / Purchase Receipts.
When adding Purchase Receipts in succession, the Select a Product window defaults to the last Inventory Department and Product selected on the previous Purchase Receipt.
Purchase Receipts are designed to affect the inventory Amount on Hand and may optionally affect the General Ledger and cost of Product. The Purchase Receipt is usually entered prior to receiving the Product Invoice.
Once saved, these receipts may be viewed, voided, or reprinted. If a change is needed, void and re-enter the Purchase Receipt.
See Purchasing 101 for more information regarding the full purchasing process.
Purchase Receipts
When adding Purchase Receipts in succession, the Select a Product window defaults to the last Inventory Department and Product selected on the previous Purchase Receipt.

- Ship Date – Enter the ship date noted on the bill of lading or the date received.
- Warehouse Transfer – Indicate if this receipt is product movement from one Location to another within the same company. When using the Transfer In or Transfer Out options, this defaults as selected. If adding a Purchase Receipt, the option may optionally be checked.
- In-Transit – Purchase Receipts created from Inter-Company Transfers are marked as In-Transit. If the User is set to be notified of in-transit receipts, when the receipt is acknowledged on the Notification screen, the In-Transit flag on the receipt is unmarked.
- Vendor – Double-click in this field and select from the list of Vendors.
- Ticket # – A number must be entered here - usually the bill of lading number that the Vendor includes on the shipping papers. This will be the number used to select the Purchase Receipt on the From Receipt tab of the Purchase Invoice.
- BOL # – Enter the Bill of Lading number. This is used on the North Dakota Motor Fuel reports.
- Control # – A number can be entered if Auto-number Document for Purchase Receipts is not checked in Accounting Preferences. If this option is checked, this number cannot be edited and will be incremented automatically.
- Load # – This is an optional extra number that could be used for Vendor shipment identification.
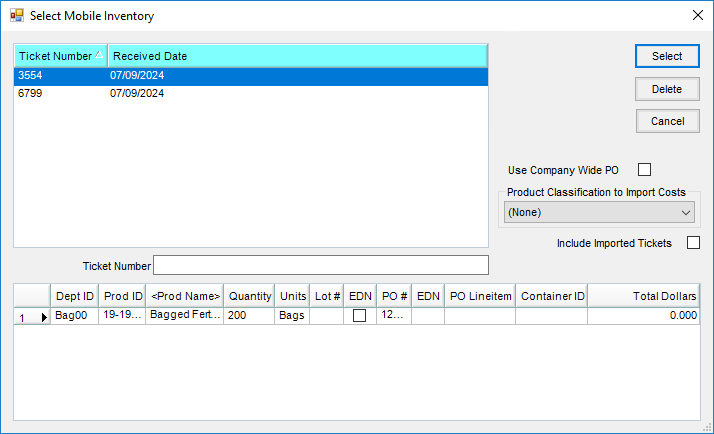
- Select Mobile Inv. – If using Warehouse and the Vendor has transactions in the Warehouse app, this button is available to bring Products from a ticket entered in the app. When importing Warehouse app transactions (Mobile Inventory) to a Purchase Receipt, if a PO was selected in Warehouse, that information will be populated and used when creating the Purchase Receipt.
- Product Grid – A list of Products received on this shipment is displayed.
Note: By right-clicking on any line item in the grid, a pop-up window displays the Department ID and Item ID. For companies with multiple Locations, this is helpful if there is uncertainty that the correct Product was selected. - P.O. # – If the delivery originated from a Purchase Order, double-click the <P.O. #> heading. All POs for this Vendor display. Choose the appropriate PO for this receipt. A Release # filter is available. Entering a Release Number and selecting Refresh will filter for a Purchase Order line item with the associated Release Number. If the PO line is selected when the Purchase Receipt is saved, the Release Number is automatically marked as used and the actual quantity and Purchase Receipt number are populated in the PO’s Release Numbers grid.
- Product Name – If not working from a PO, double-click here to select the items on this receipt.
- Received – This displays from the Product Selection screen if quantity was entered there. Otherwise, the quantity received must be entered in Inventory units.
- Dept ID – The Department ID for the selected Product displays in this area.
- Prod ID – The Product ID for the selected Product displays here.
- Invoiced – This column is automatically updated as Purchase Invoices are processed against this Purchase Receipt. The option next to the invoiced quantity will be selected when the entire line item has been invoiced.
- Est. Cost – If this Purchase Receipt references a Purchase Order, the estimated cost per unit is imported from the Purchase Order. If the receipt doesn’t reference a Purchase Order, the estimated cost may be entered in this area. If Add-On charges based on percentages are being used, the estimated cost will be required for the Add-On charge to calculate.
- Container ID – Double-clicking in this column displays the Select Container window. If the Product is being received in a container that should be tracked and already exists in the data, select that Container. If the Product is being received in a new container, the Container may be added to the data by selecting Add Container.
- Add On – If Add-On charges apply to the line item, they either automatically default here or may be manually added. These charges will be part of the cost of the Product.
- Freight – If there is freight information entered in the bottom left Freight area, the freight cost for each line item appears in this column. This amount may be edited if necessary.
- Freight Type – This column always appears blank when adding or editing a Purchase Receipt. It exists to hold freight information necessary for correct Purchase Receipt posting.
- PO Line Item – If a PO was selected earlier in the grid, the PO Line Item number displays in this area.
- Contract – If the line item is part of a Vendor contract, the contract number from the Purchase Order displays in this area.
- Freight – Optionally enter the amount expected for freight and select the freight type (actual freight will be included in the Vendor’s bill, estimated freight will be billed through a third party). The freight defaults into the Purchase Invoice and is included in the cost of the Product.
- Freight Vendor – For estimated freight, indicate the Freight Vendor.
- Make PO – Selecting this option automatically creates a Purchase Order for the Products entered on this Purchase Receipt.
- Notes – Optionally enter any comments.
- Show Lot # – This option causes the Product Grid to display an additional column for Lot #. Then a Lot Number for any line item on the receipt may be entered.
- Import Scale Ticket – Scale Tickets from the Agronomy Scale Interface can be imported into the Purchase Receipt.

Posting Notes
- Purchase Receipt – One entry is made into the journal file for each receipt. Entries are made into the journal detail file for each line item on the receipt. If Add-On Charges are used on the receipt, an entry is made for each Add-On Charge selected on the receipt.
- Inventory Amount on Hand – The Amount on Hand quantities for the Products listed on the Purchase Receipt are increased if positive and decreased if the receipt is negative.
- Estimated Average Cost – This is updated if the Product is in a department set to compute Invoice cost by Estimated Average. The calculation is based on the following formula: ((old quantity X old $) + (new quantity X new $)) / (old quantity + new quantity). Old $ is the Product’s current Estimated Average Cost and New $ is the cost on the Purchase Receipt.
- Inventory Detail – An entry is made into the Inventory Detail for each Product listed.
- General Ledger – If the Accrue Estimated Payable for Purchase Receipts option is selected at Setup / Preferences on the General tab, a Journal Entry is made to debit the Inventory Asset account for the cost of the Product that was entered on the Purchase Receipt and all add-on and freight charges. The credit for this Journal Entry is to the Estimated A/P account specified at Setup / Locations on the G/L Posting tab. This Journal Entry is automatically reversed when the Purchase Invoice is entered for this Purchase Receipt.
Corrections to PR
Void
Sometimes a Purchase Receipt is entered for the incorrect Product or quantity and should be voided. Voiding the Purchase Receipt is done at Accounting / Inventory / Purchase Receipt. Select the Purchase Receipt and choose Void.
If a Purchase Receipt has been used on a Purchase Invoice or partially used, voiding is not allowed. In that case, the Purchase Invoice could be voided to release the Purchase Receipt, and then voiding the Purchase Receipt would be allowed.
Voiding a Purchase Receipt affects the inventory detail for the Products. Depending on company preference settings for Estimated Average Costing and accruing Estimated Payables, the General Ledger might be affected by voiding a Purchase Receipt.
Return
Navigate to Accounting / Inventory / Purchase Receipt and select Return to return the portion of the Purchase Receipt that has not yet been invoiced.
